How to Disable Touchpad When a Mouse Is Connected in Windows 10
Jun. 24, 2022 / Updated by Bessie Shaw to Windows 10
Plenty of users prefer connecting a mouse to their laptop and hope to disable the touchpad in Windows 10. Because they think the touchpad can get in the way sometimes or they encounter two finger scroll not working problem. Here’s how to turn off the touchpad in Windows 10.
Method 1. Automatically Disable Touchpad When a Mouse Is Connected in Windows 10
Disabling the touchpad when a mouse is connected is pretty easy, and you could do the following steps to automatically disable the touchpad of your laptop when a mouse is connected.
Step 1. Click Start and then select Settings to open theSettings menu
Step 2. Navigate to Device and then click Mouse & touchpad
Step 3. On the right side of the window, click Touchpad
Note: If your computer has a precision touchpad, Windows 10 will send you a note: Your PC has a precision touchpad.
Step 4. Toggle the Leave touchpad on when a mouse is connected option Off
Note: This setting is only available on Windows 10 laptops equipped with a precision touchpad.
See Also:
Method 2. Update Your Touchpad Driver
In some cases, you have to update your touchpad driver first then you could successfully disable the touchpad when a mouse is connected in Windows 10. Or else, you even can’t find the “Leave touchpad on when a mouse is connected” option. You could visit your laptop manufacturer’s website to look for the relevant touchpad driver, but you shall be pretty cautious to install the right version. Once an incorrect touchpad driver is installed, your computer may suffer various unexpected issues. It’s highly recommended to use an automatic driver download and update utility tool, such as Driver Talent, which could find out your outdated, corrupt, damaged or missing touchpad driver in seconds and then automatically repair or download the latest update driver within 2 minutes.
Click the button below to free download Driver Talent directly.
Here is the step-by-step guide to use Driver Talent to download and install the most compatible touchpad driver to help disable touchpad in Windows 10.
1. Scan Your PC
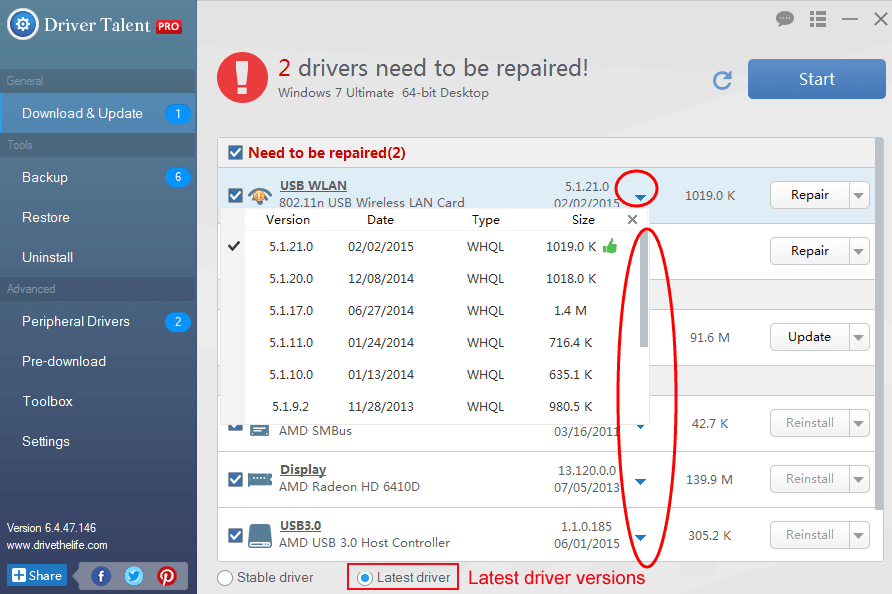
Start Driver Talent. All your outdated, corrupt, broken or missing device drivers could be identified in seconds by one-clicking the “Start” button.

2. Update the Touchpad Driver
Click “Repair” to fix the faulty driver by automatically downloading and installing the best-matched touchpad driver. You’re also allowed to click “Update” to keep all your drivers up to date. Don’t update what ain’t broken unless you have a specific requirement.
3. Reboot Your PC
Don’t forget to reboot your PC to allow the touchpad driver update to fully take effect.
Note: Bear in mind that back up you drivers with Driver Talent before download the latest touchpad driver in case of driver crashes or further issues.
Drive Talent is equipped with other advanced features in addition to driver download and update, such as drivers restore, drivers uninstall, system restore, drivers pre-download for another PC, PC Repair, hardware detection, VR support check and PC speed up, etc.
Any other Windows 10-related computer issues, such as middle mouse button not working issue, cursor disappears bug, no WiFi available problem, reboot loop and more, you can check for the solutions in the Windows 10 Issues and Fix section.
See Also:
Lenovo IdeaPad 320 Touchpad Not Working after Windows 10 Fall Creators Update
How to Fix Touchpad Not Working after Windows 10 Anniversary Update
Top 4 Fixes for Touchpad Not Working after Windows 10 Creators Update Issue
Top 4 Methods to Download Synaptics Touchpad Driver for Windows 10
If you have any questions or ideas about how to disable the touchpad when a mouse is connected in Windows 10, please make comments below or click the left menu for help.

|
ExplorerMax |

|
Driver Talent for Network Card | |
| Smart and advanced file explorer tool for Windows platforms | Download & Install Network Drivers without Internet Connection | |||
| 30-day Free Trial | Free Download |