How to Fix Lock Screen Asks for Password Twice in Windows 10
Jun. 24, 2022 / Updated by Helia to Windows 10
Many users reported that they have to type password twice on Windows 10 lock screen to sign in after the Windows 10 upgrade or Windows 10 update, like Fall Creators Update, Creators Update, Anniversary Update, etc. After they type into the lock screen password first time, there will be a rotating circle, and then it will back to the Windows 10 lock screen and ask for the password again.
This often happens when they wake up the computer from sleep or restart the PC. If you have no idea to fix the lock screen password problem, go on the reading and take a close look at workarounds below.
See Also:How to Fix Computer Won't Wake Up from Sleep
Solutions for Windows 10 Lock Screen Password Issue
Windows 10 Fall Creators Update, Creators Update or Annversary Update is never free from this or that problems. But you don't need to be so worried. We've had 4 tips for you to fix such Windows 10 lock screen issue.
Solution 1: Uninstall Programs You've Installed Recently
Some system process optimization software or programs result in conflict in Windows 10 and cause the Windows 10 lock screen password issue. If you have installed such programs recently, disable or remove them to see if the problem still persists.
You can also try Windows 10 clean boot to exclude the exact programs or services and fix this login failure issue.
See Also: How to Use Windows 10 Clean Boot to Fix PC Errors
Solution 2: Use Command Line to Fix Windows 10 Lock Screen Password Issue
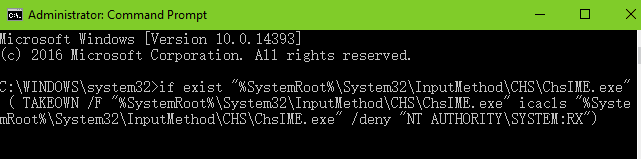
If Solution 1 does not work, try command line in Windows 10 and fix the lock screen password problem. This helps to avoid chsime.exe being created as a Background process in SYSTEM. If there are two ChsIME process, Windows 10 will stuck in the lock screen and ask for password twice. Follow the steps below:
Step 1. Use Windows shortcut keysWin + X.
Step 2. Select the Command Prompt (Admin).
Step 3. Copy the command line below to the pop-up box:
if exist "%SystemRoot%\System32\InputMethod\CHS\ChsIME.exe" ( TAKEOWN /F "%SystemRoot%\System32\InputMethod\CHS\ChsIME.exe" icacls "%SystemRoot%\System32\InputMethod\CHS\ChsIME.exe" /deny "NT AUTHORITY\SYSTEM:RX")
Step 4. Hit the key Enter.
Now wake up your computer again by typing your password on the Windows lock screen. Has the problem been solved?
Solution 3: Reinstall Graphics Drivers to Troubleshoot the Unlock Problem
It is better to check your graphics drivers, which can also cause the Windows 10 lock screen password problem. Graphics/display/video drivers are used to keep the communication between the OS and hardware or programs. Once there are incorrect, corrupted or broken graphics drivers, Windows display issues will occur, such as driver_power_state_failure BSoD ,graphics error 43, Windows 10 graphics not showing, etc.
Some users reported that they have fixed the sign-in password issue via reinstalling the Intel HD graphics driver or other display drivers. So you can use Driver Talent to reinstall the graphics drivers and fix the password issue on Windows 10 lock screen.
Click the button below to have Driver Talent directly and follow the steps below to reinstall the display driver.
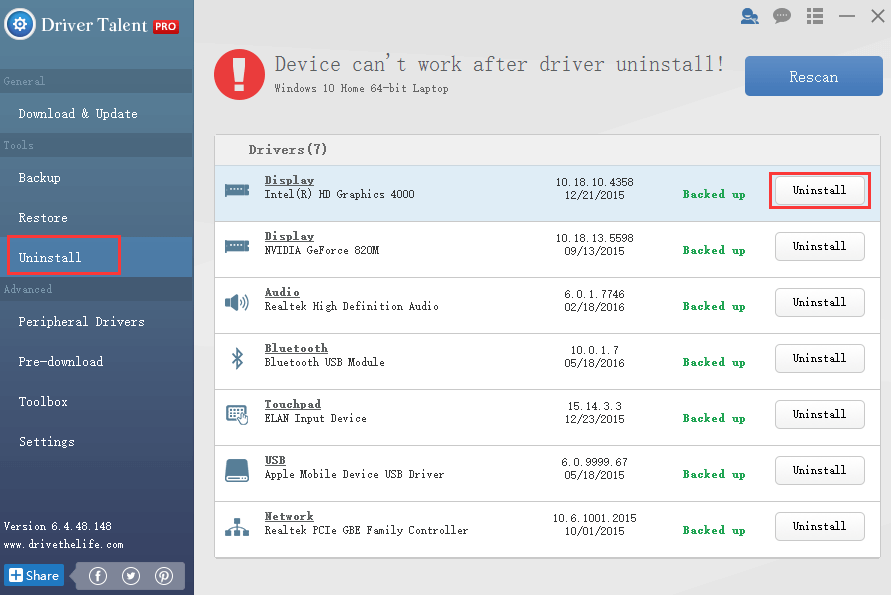
Step 1. Select Uninstall on the left-side pane. Choose the graphics device and click on the Uninstall button to remove the driver.
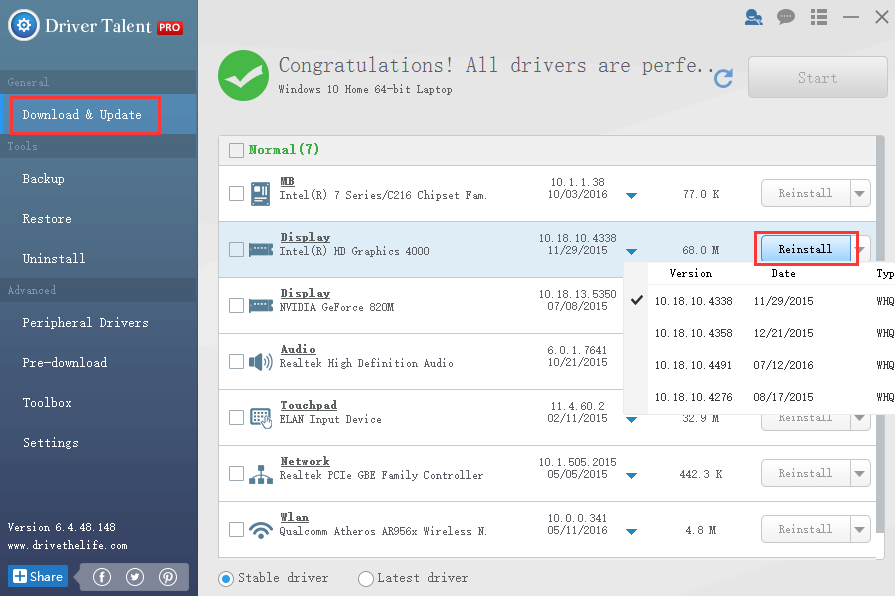
Step 2. Select the Download & Update menu. Choose the graphics device and the version you like, and then click on the Reinstall button. Driver Talent will download and reinstall the driver automatically.
Step 3. Restart the computer to make the newly install graphics driver updates take effect.
Type your password and see if the lock screen still asks for password twice. If you still fail to unlock Windows 10 directly this time, see the last solution below.
Solution 4: Disable the Sign-in Password
This solution is for those who have not so much private content stored in their computer. You can modify the Require Sign-in in Settings and disable sign-in password on lock screen when waking up the computer.
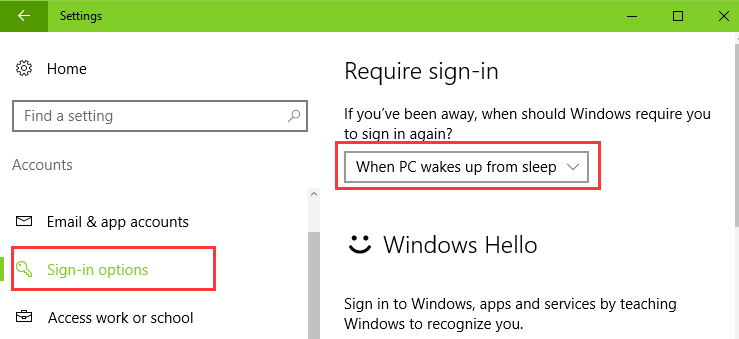
Step 1. Use Windows shortcut keys Win + I to launch Settings.
Step 2. Choose Accounts.
Step 3. Select Sign-in options from the left pane.
Step 4. Select the Never from the drop-down menu in the right pane.
The Windows 10 lock screen won't ask for password any more whenever you wake up your computer.
If you can't enter the Windows with the Windows Hello on the lock screen, see: Fix Windows Hello Not Working via Windows 10 Fingerprint or Camera.
Update: Thanks for the comment by Koray Okcu, You can also use shortcut keys Ctrl + Alt + Del to enter the Security Options screen and click the Sign out. Then restart the computer. After that, you can enter your Windows 10 Fall Creators Update/Creators Update/Annversary Update normally.

Hope this article can be a reference for you to fix the Windows 10 lock screen password problem, and you won't have to type your password twice when enter your Windows 10 Fall Creators Update/Creators Update/Annversary Update . If the methods above didn't work, you could drop a line in the comment section below, or click the LEFT MENU on this page for more help. If you have any other Windows 10-related issues, check for solutions in Windows 10 Issues and Fix section or just comment below please.

|
ExplorerMax |

|
Driver Talent for Network Card | |
| Smart and advanced file explorer tool for Windows platforms | Download & Install Network Drivers without Internet Connection | |||
| 30-day Free Trial | Free Download |