Many users may encounter a common issue during everyday computer use: no sound when headphones are plugged in—the headphone jack doesn't work, affecting the overall audio experience.
This article analyzes the common causes of headphone jack failure and offers practical solutions to help restore normal audio output.
1. Symptoms of a Non-Functional Headphone Jack
No sound output after plugging in headphones
Audio continues playing through speakers instead of headphones
System doesn't recognize the headphone device
Audio cuts in and out or fluctuates in volume
Yellow exclamation mark appears on audio devices in Device Manager
2. Causes of Headphone Jack Not Working
Corrupted or missing audio drivers
Incorrect default audio device settings
Loose or damaged audio port hardware
Improper configuration in Realtek or other audio manager software
Driver incompatibility after a system update
Faulty headphones or incompatible connector
3. Fixes for Headphone Jack Not Working
Method 1: Update Audio Drivers
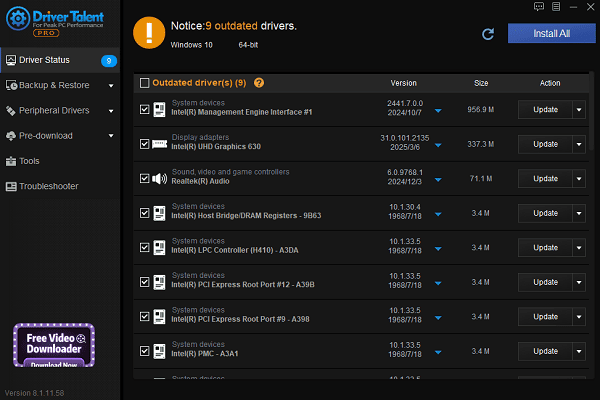
Driver issues are one of the most common reasons for headphone jack failure. For users unfamiliar with manual driver installation, it's recommended to use Driver Talent, which can automatically detect and update drivers, helping to avoid installation errors.
Download the latest version of Driver Talent, install and open the software.
Click "Scan" to check the status of all drivers.
Locate the audio driver in the results and click "Update".

Restart your computer to apply changes.
Method 2: Check Headphones and Audio Jack
Ensure the headphone plug is fully inserted into the jack.
Try another pair of headphones to rule out hardware issues.

For desktop users, try using the rear audio port instead.
Make sure you're using the correct jack (headphone vs. microphone).
Method 3: Set Headphones as Default Playback Device
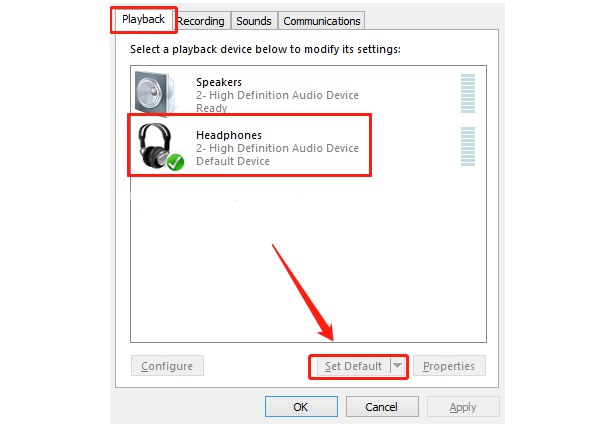
Right-click the speaker icon in the taskbar and select "Sounds".
Go to the Playback tab, select the headphones, then click "Set Default".

Click "Apply", then "OK". Replug the headphones to test.
Method 4: Enable the Audio Device
In the Sound settings window, right-click an empty area and check "Show Disabled Devices".
If headphones appear greyed out, right-click and choose "Enable".
Set them as the default device.
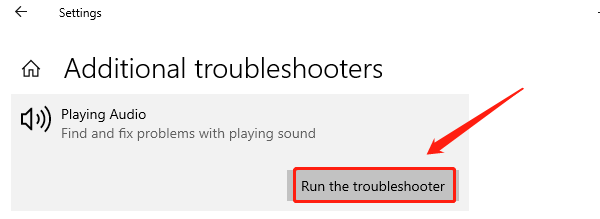
Method 5: Run Windows Audio Troubleshooter
Go to Settings > Update & Security > Troubleshoot > Other troubleshooters.
Find "Playing Audio", then click "Run the troubleshooter".

Follow the instructions to fix detected issues.
Method 6: Check Audio Management Software
Some systems include Realtek or third-party audio control panels:
Open Realtek Audio Console (or similar software).
Under "Connector Settings" or "Jack Settings", ensure the front panel audio is enabled.
Enable the option to auto-detect headphone insertion.
4. Frequently Asked Questions (FAQ)
Q1: The headphone jack seems fine, but there's still no sound.
A: Check if the system volume is muted, the headphones are set as default, and update the sound drivers.
Q2: The system doesn't detect my headphones at all.
A: Enable "Show disabled devices" in Sound settings and manually enable the headphone device.
Q3: Sound only comes through one side of the headphones.
A: This may indicate a headphone issue or a loose jack—try another set of headphones to test.
The issue of a non-working headphone jack can stem from hardware contact problems, driver errors, or misconfigurations. By following the step-by-step methods outlined above, most problems can be resolved effectively.
If none of these methods work, consider contacting your device manufacturer or a professional technician for further diagnosis.
See also:
Fix ntoskrnl.exe High Disk Usage Issue on Windows 10
[Fixed] ntkrnlmp.exe BSOD Error on Windows 11
Razer Headset Mic Not Working on PC? Try These Fixes
How to Fix a Slow Internet Connection on Windows
Qualcomm Atheros QCA61x4A Driver Download and Installation Guide


