How to Free Up RAM on Windows 10: 7 Tested and Trusted Hacks
Aug. 01, 2023 / Updated by Eloise to Windows 10
RAM, or Random Access Memory, is a type of temporary storage that allows your PC to access and process data faster. The more RAM you have, the more programs you can run smoothly and efficiently on your PC. However, sometimes your PC may run out of RAM, or use too much of it for certain tasks. This can cause your PC to slow down, freeze, crash, or display error messages. To avoid these problems, you need to free up more RAM on your Windows 10 PC.
But how to increase RAM? And how do you check how much RAM you have or how much you are using? In this article, we will answer these questions and provide you with 7 proven hacks to free up RAM on Windows 10. By following these hacks, you will be able to clear memory and boost RAM and improve your PC's performance and stability.
See also How To Fix Kernel Security Check Failure Ram In Windows 11
How to Check RAM Usage on Windows 10
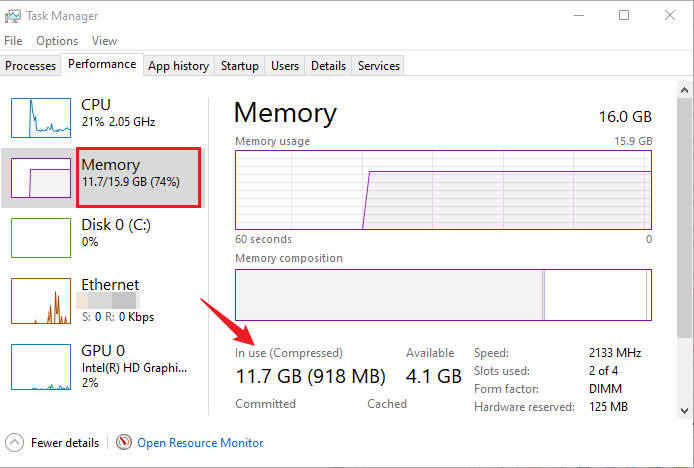
To check this information, you can use the Task Manager. For more details about your RAM usage, you can click on the Performance tab at the top of the Task Manager window. Here you will see a graph that shows you how much RAM is being used by your PC over time.
Hack 1: Close Unnecessary Programs and Background Processes
One of the easiest and most effective ways to get more RAM on Windows 10 is to close any programs and background processes that you are not using or need. This will reduce the amount of RAM that is occupied by these programs and processes, and make more memory available for other tasks.
To close unnecessary programs and background processes, you can use the Task Manager, where you can sort the programs and processes by memory usage and end any task that is consuming a lot of RAM or that you don't recognize or need.
Note: be careful not to end any system processes or services that are essential for your PC's operation. If you are not sure what a process or service does, leave it alone.
Hack 2: Adjust Your Virtual Memory Settings
Virtual memory is a feature that allows your PC to use part of your hard disk as an extension of your RAM. This way, your PC can store some data that is not currently needed in RAM on your disk, and free up some memory for other tasks.
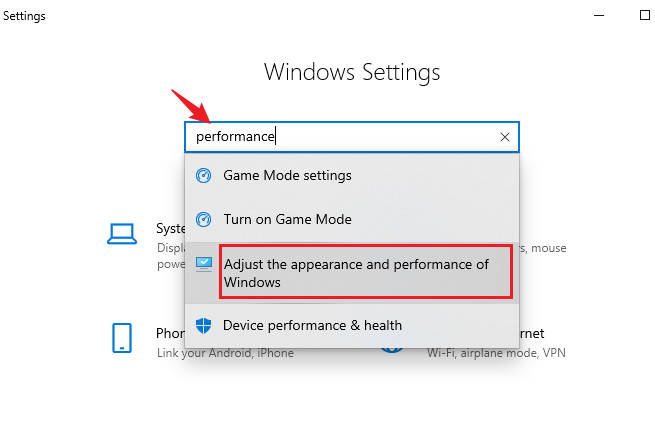
Step 1: Press Windows+I to open Settings, type performance in the search bar and choose Adjust the appearance and performance of Windows.
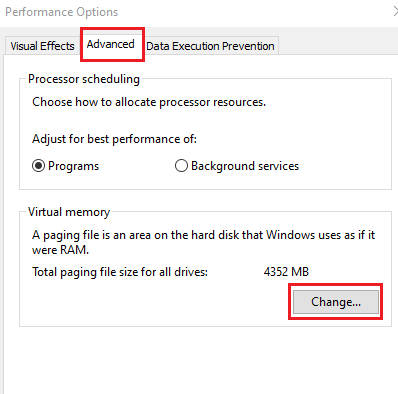
Step 2: Select the Advanced tab and click Change.
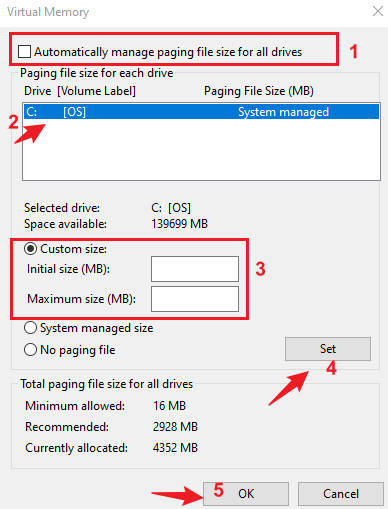
Step 3: Uncheck the Automatically manage paging file size for all drives option.
Step 4: Select the drive where you want to store the virtual memory file (usually C:).
Step 5: Select the Custom size option and enter the initial and maximum size for the virtual memory file in megabytes. A good rule of thumb is to set the initial size to 1.5 times your RAM size and the maximum size to 3 times your RAM size. For example, if you have 8 GB of RAM, you can set the initial size to 12288 MB and the maximum size to 24576 MB.
Step 6: Click on Set and then OK to save your changes and restart your PC.
Hack 3: Remove old drivers
Sometimes, drivers may become outdated, corrupted, or missing, which can cause problems with your devices and affect your RAM usage and performance. For example, if you have a faulty or incompatible graphics driver, it may consume more RAM than necessary or cause errors or crashes. But how to find the outdated or problematic driver? This is where Driver Talent comes in handy. Driver Talent can scan your PC for any driver issues, monitor your driver status and provide you with the best solutions. With such a tool, you're able to uninstall or remove unused drivers with just a few clicks.
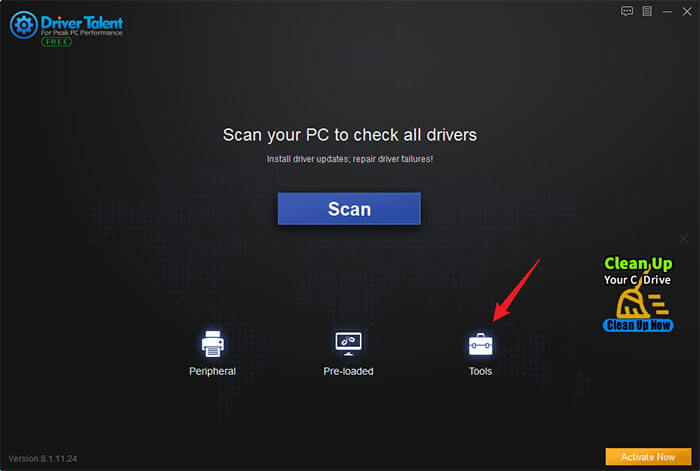
Step 1: Start Driver Talent and select the Tools option.
Step 2: On the navigation pane, choose Backup & Restore >Uninstall Drivers, click the Uninstall button to remove the unused or unwanted drivers on your Windows PC.
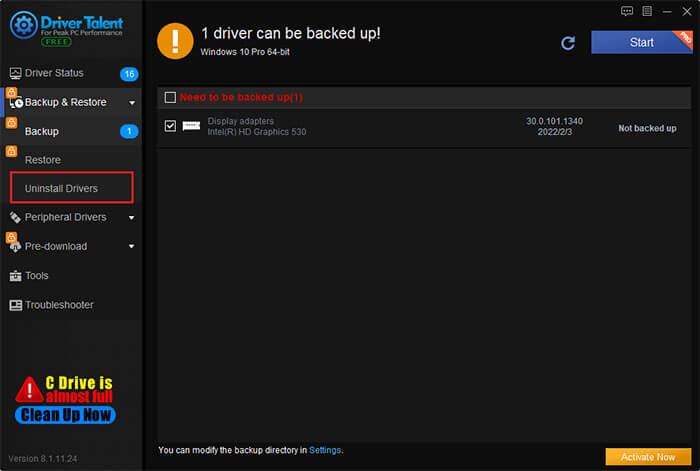
Step 3: This will totally clear the unnecessary drivers without residual files and restart your PC after done.
Hack 4: Disable Superfetch and Prefetch Services
Step 1: Press Windows+R to open the Run dialog, type services.msc in the box and click OK to open the Services Manager.
Step 2: Find Superfetch in the list of services and select Stop to stop the service.
Step 3: Right-click on it again and select Properties. In the Startup type drop-down menu, choose Disabled.
Step 4: Click Apply and OK to save your changes
Repeat the same steps for Prefetch in the list of services.
Hack 5: Update Your Drivers
By updating your drivers to the latest versions, you can ensure that they are compatible, stable, and efficient. This can reduce the amount of RAM they use and free up some memory space for other processes. Updating drivers can also fix any bugs or errors that may be causing memory leaks or high memory consumption. But finding and installing the right drivers for your devices can be a hassle, especially if you have many devices or old drivers. That's exactly what Driver Talent is designed for. Driver Talent can update and install the drivers for you with one click, without requiring you to go through complex steps or restart your computer multiple times. You can update all your drivers at once or choose which ones you want to update individually.
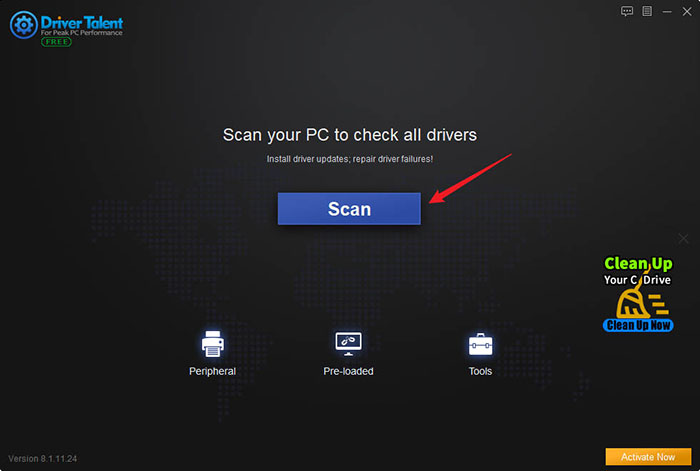
Step 1: Launch Driver Talent and click on the Scan button to detect any driver issues on your PC.
Step 2: After the scan is completed, you will see a list of drivers that need to be updated, repaired, or removed.
Step 3: To update a driver, click on the Update button on the download drop-down menu. You can also select multiple drivers by checking the boxes next to them or click Install all.
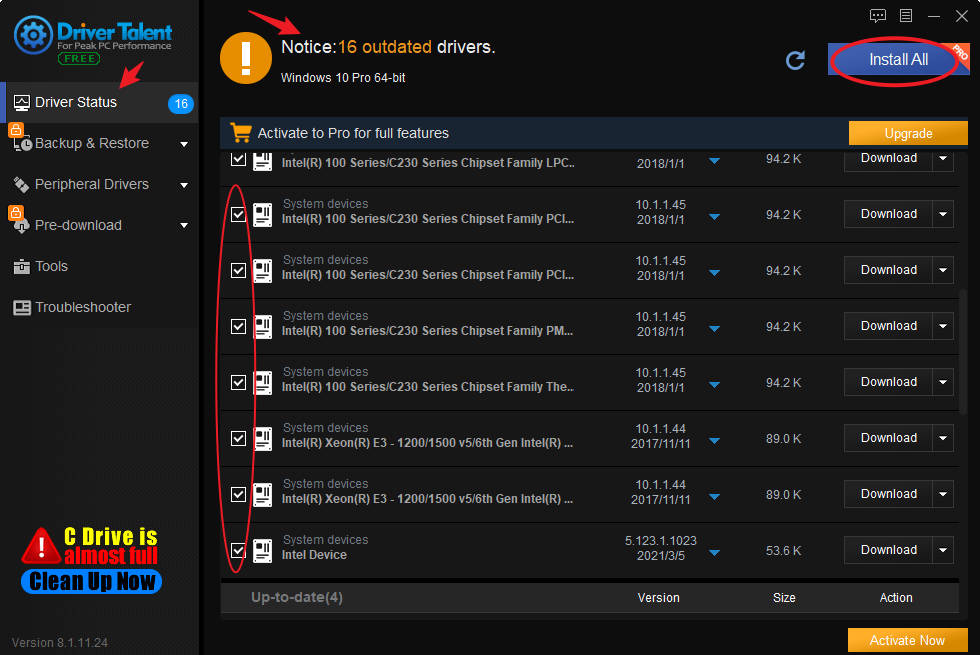
Step 4: Wait for the download and installation process to finish and reboot your system.
Hack 6: Use ReadyBoost
ReadyBoost is a feature that allows you to use a USB flash drive or an SD card as an extra memory cache. This way, your PC can store some data that is not currently needed in RAM on your device, and free up some memory for other tasks. ReadyBoost can be useful especially when you have a low amount of RAM or run many programs or games that require a lot of memory.
Step 1: Open File Explorer, right-click on your external storage device and select Properties, then ReadyBoost.
Step 2: If your device is compatible, you will see a message that says ReadyBoost can be enabled on this device. If not, you will see a message that says This device cannot be used for ReadyBoost.
Step 3: If your device is compatible, select Dedicate this device to ReadyBoost or Use this device. You can also adjust the amount of space that you want to use for ReadyBoost by moving the slider.
Step 4: Click on Apply and then OK to save your changes.
Hack 7: Restart Your PC Regularly
Restarting your PC can help you clear memory and boost RAM on Windows 10 by clearing any temporary files and processes that are stored in your memory. This can also help you fix any errors or issues that may affect your RAM usage and performance.
You should restart your PC at least once a week, or more often if you use it heavily or run many programs or games that require a lot of memory. It is advisable to schedule automatic restarts on your PC using the Task Scheduler or the Power Options.
You may also like

|
ExplorerMax |

|
Driver Talent for Network Card | |
| Smart and advanced file explorer tool for Windows platforms | Download & Install Network Drivers without Internet Connection | |||
| 30-day Free Trial | Free Download |


