Printer Not Printing Full Page--How can I fix it?
Jul. 17, 2023 / Updated by Eloise to Windows 10
Almost every printer vendor (HP/ Canon/Epson/Brother/Ricoh/Xerox) were found problems with not being able to print the whole page. This problem appears in the following ways:
Printer won’t print whole document but just specified pages.
Printer only prints one page or no more than two pages and then stops.
Printer cannot print everything on the page (not printing entire image or text).
You know how frustrating it can be. You may have an important document or a photo that you want to print, but the printer only prints part of it or leaves some blank spaces. If you are struggling with any of the above issues, don't be anxious. There must be a fix for you in this article.
1. Check your printer paper and ink
2. Check your printer settings
4. Restart Print Spooler service
There are several possible reasons why your printer is not printing full page, such as low paper or ink levels, incorrect printer settings, outdated printer driver, printer spooler service error, or SNMP (Simple Network Management Protocol) conflict. Based on these causes, we have five solutions available.
1. Check your printer paper and ink
One of the simplest and most obvious solutions is to check your printer paper and ink levels. Make sure you have enough paper in the tray and that it is aligned properly. Also, check your ink or toner cartridges and replace them if they are low or empty. Sometimes, low ink levels can cause the printer to skip some parts of the page or print faintly.
2. Check your printer settings
Another possible reason why your printer is not printing the whole content is that you have set the wrong printing preferences. For example, you may have selected the wrong paper size, orientation, margins, scaling, or quality. To check and adjust your printer settings, follow these steps:
Step 1: Enter printers and scanners in the search bar and open it.
Step 2: Select your printer from the list and click Manage.
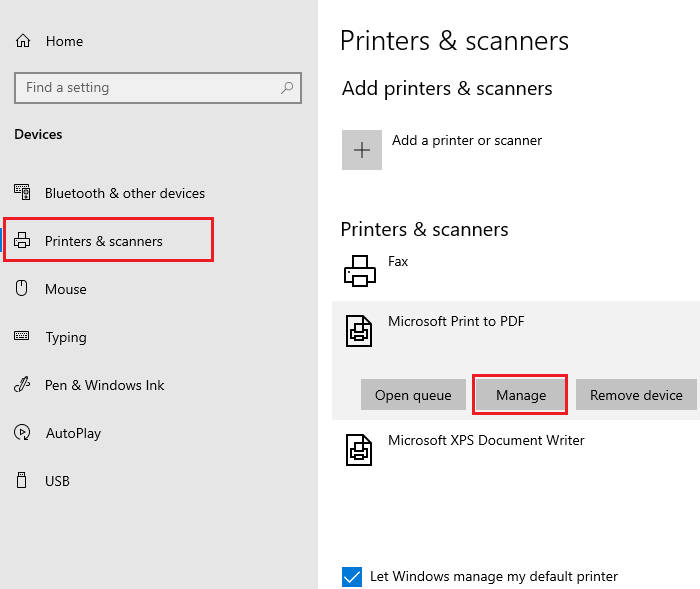
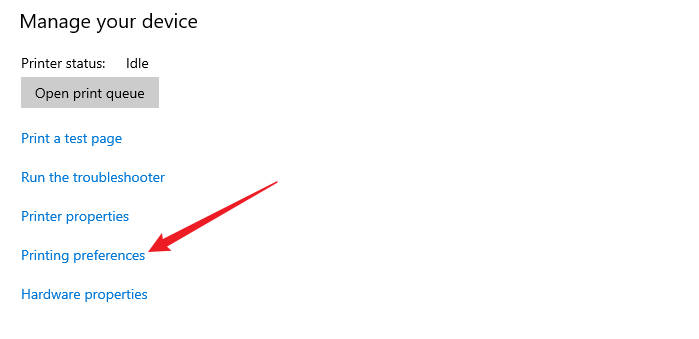
Step 3: Locate and click Printing Preferences.
Step 4: Go to the Paper tab, choose Plain Paper in the "Type" or "Paper Type" field .
Step 5: Choose Draft or Normal in the "Print Quality" field.
Step 6: Switch to Graphics tab and select Standard or Quality.
3. Update printer driver
Your printer driver is a software that allows your computer to communicate with your printer. If your printer driver is outdated or corrupted, it may cause some printing problems. Driver Talent will be the ultimate solution for all your driver problems. It is a powerful and trustworthy software that can simplify the process of updating your printer driver. By checking your computer for any drivers that are old, missing, or damaged and downloading and installing the most suitable ones for your device, it will finally optimize your printing device performance.
Step 1: Download and install Driver Talent.
Step 2: Run Driver Talent, click Peripheral Drivers>Printer, select your printer and let it automatically detect your computer and printer driver status.
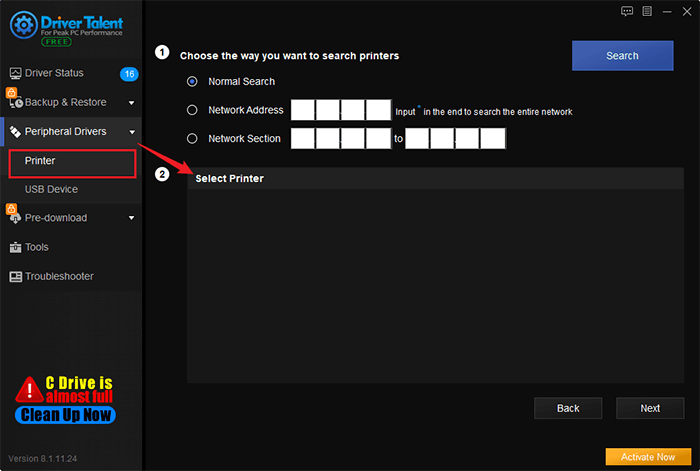
Step 3: If Driver Talent finds any problem with your printer driver, it will give you corresponding prompts and suggestions. You can click the Up to date button, and let it automatically download and install the latest driver.
Step 4: Restart your computer and printer, and try to print again.
See also
How to reinstall the printer driver on Win10 system
Canon Printer Drivers Download and Update for Windows
2 Ways to Download and Update Samsung Printer Drivers for Windows
4. Restart Print Spooler service
Printer Spooler is a service that manages the printing jobs in your computer. Sometimes, this service may encounter some errors or get stuck, which can prevent your printer from printing all pages. To restart Printer Spooler service, follow these steps:
Step 1: Search services in the search bar and open it.
Step 2: In the Services window, find Print Spooler from the list and click Restart the service on the left pane.
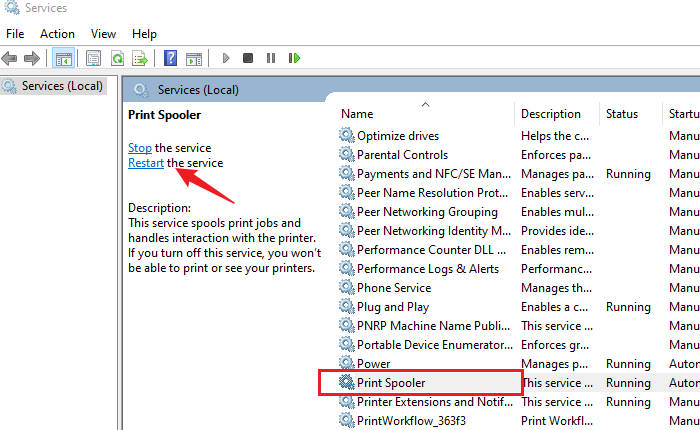
Step 3: Close the Services window and try printing again.
5. Manage printer properties
SNMP (Simple Network Management Protocol) is a protocol that allows network devices to communicate with each other. Some printers use SNMP to monitor their status and report errors. However, sometimes SNMP can cause some conflicts or delays in printing, which can result in printer not printing correctly. To disable SNMP for your printer, follow these steps:
Step 1: Open Printers & scanners from Settings, select your printer device and click Manage.
Step 2: Select Printer properties.
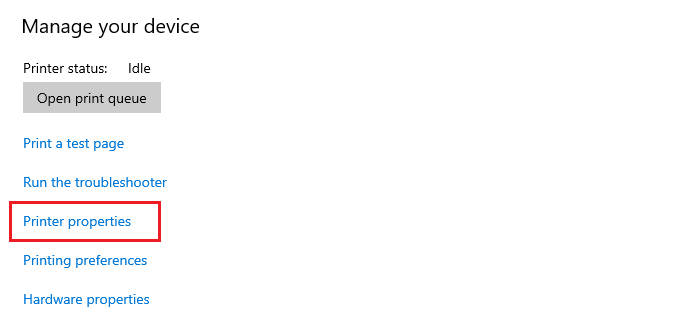
Step 3: In the Printer properties window, go to the Ports tab and select your printer port from the list. Click on Configure Port.
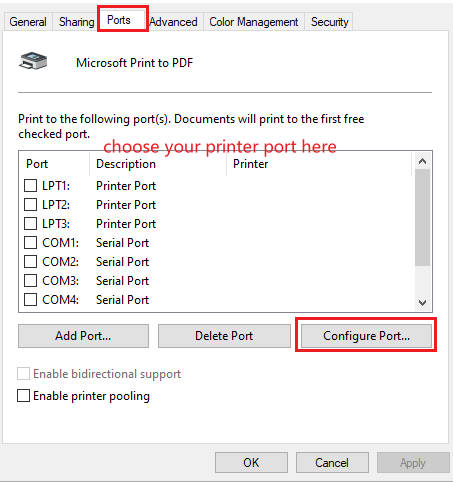
Step 4: In the Configure Port window, uncheck the box next to SNMP Status Enabled and click OK.
Step 5: Click OK again to close the Printer properties window and try printing again.
You may also like
[HP, Canon, Brother, Epson] Printer Not Responding or Offline
Printer Error Code 0x00000bc4 On Windows 11 Printer Not Working

|
ExplorerMax |

|
Driver Talent for Network Card | |
| Smart and advanced file explorer tool for Windows platforms | Download & Install Network Drivers without Internet Connection | |||
| 30-day Free Trial | Free Download |


