The Chipsbnk flash disk USB device is commonly used in many USB flash drives, card readers, and portable storage devices. However, users often encounter problems such as driver errors, device not working, or failed recognition in Windows. In this guide, we provide detailed solutions to repair, install drivers, and restore functionality for your Chipsbnk USB devices.
Understanding Chipsbnk Flash Disk USB Devices
Chipsbnk refers to a series of USB controller chips commonly used in manufacturing low-cost flash drives and USB card readers. They control data transfer between the flash memory and your computer. Without the correct USB device driver, Windows may fail to detect or correctly operate the device.
When the device malfunctions, you may see errors such as:
"Chipsbnk flash disk USB device not recognized"
"Chipsbnk flash disk USB device not working"
"No driver found for Chipsbnk USB device"
Common Causes of Chipsbnk Flash Disk USB Device Problems
Before repairing, it’s important to know why these errors happen:
Corrupted or outdated USB drivers
Firmware corruption in the flash drive
Damaged USB port or cable
Virus or malware infection
File system errors or bad sectors
Improperly ejected device
Step-by-Step Chipsbnk Flash Disk USB Device Repair
The repair process involves both hardware and software checks. Follow these steps carefully.
1. Check Physical Connections and Hardware
Before diving into driver updates, ensure the problem isn’t hardware-related.
Try plugging the Chipsbnk flash disk into a different USB port.
Test on another computer to confirm if the device is recognized.
Avoid USB hubs; connect directly to the PC.
Inspect for physical damage to the USB connector.
2. Reinstall the Chipsbnk Flash Disk USB Device Driver
Driver problems are the most common cause of malfunction. Reinstalling can restore communication between your device and Windows.
Press Windows + X and select Device Manager.

Expand Universal Serial Bus controllers or Disk drives.
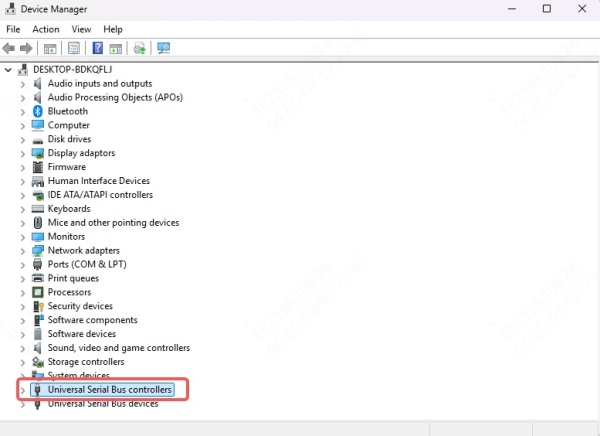
Locate the Chipsbnk flash disk USB device.
Right-click and choose Uninstall device.
Disconnect and reconnect the USB device – Windows will attempt to reinstall the driver automatically.
3. Download and Install Chipsbnk Flash Disk USB Device Driver
If automatic installation fails, you need to manually install the correct driver.
Using Driver Talent for Automatic Updates
Driver Talent is a professional driver management tool that automatically detects outdated or missing drivers and installs the correct versions for your hardware.
Key Features of Driver Talent:
Detects unknown USB devices such as Chipsbnk flash readers
Installs official or compatible drivers automatically
Backs up and restores drivers easily
Fixes driver-related device malfunctions
How to Use Driver Talent:
Download and install Driver Talent from the official website.
Launch the program and click Scan to detect driver issues.
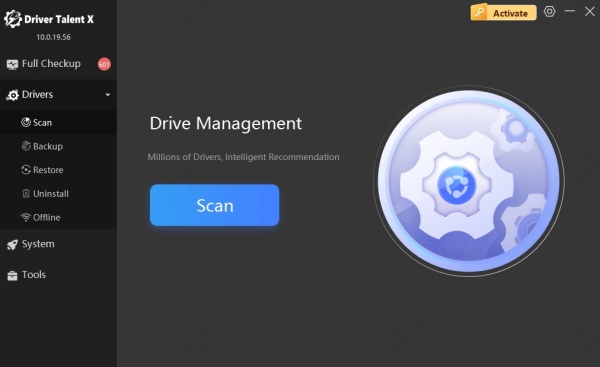
Locate the Chipsbnk flash disk USB device in the results.
Click Install or Update to download and apply the correct driver.
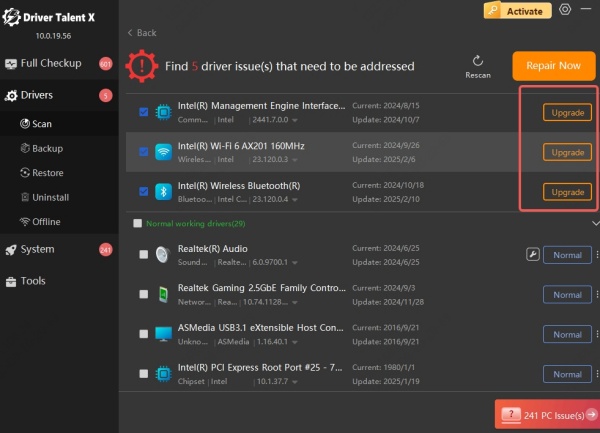
Restart your computer for changes to take effect.
By using Driver Talent, you eliminate the risk of installing the wrong driver, ensuring your USB device works optimally.
4. Format the Chipsbnk Flash Disk USB Device
If the device is recognized but inaccessible, formatting may solve file system errors.
Warning: Formatting erases all data.
Open File Explorer and right-click the USB drive.
Select Format.
Choose FAT32 or exFAT for compatibility.
Click Start to begin formatting.
5. Repair Using Command Prompt
If Windows detects the device but reports errors, run a disk check.
Press Windows + S, type cmd, right-click and choose Run as administrator.
Type: chkdsk X: /f /r /x (Replace X with your USB drive letter)
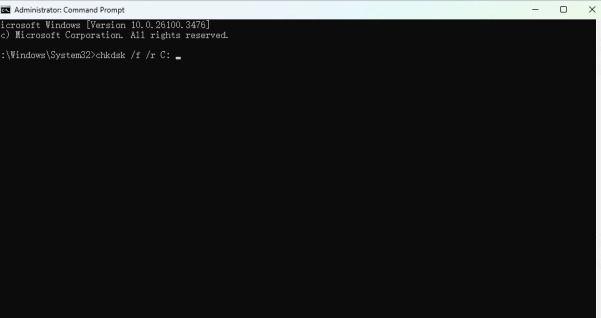
Press Enter and wait for the repair process to complete.
Special Case: Chipsbnk Flash Reader USB Device
Some Chipsbnk controllers are built into multi-card readers. If your flash reader USB device is not detected:
Ensure the memory card is functional by testing in another reader.
Update both the USB controller driver and card reader driver using Driver Talent.
Clean the card slot to ensure proper contact.
Troubleshooting Chipsbnk Flash Disk USB Device Not Working in Windows 10/11
If your Chipsbnk device still doesn’t work after driver updates, try these additional fixes:
Disable USB selective suspend:
Go to Control Panel > Power Options.

Edit your active plan and set USB selective suspend to Disabled.
Enable Legacy USB Support in BIOS:
Access BIOS and ensure USB compatibility mode is enabled.
Run Windows Hardware Troubleshooter:
Press Windows + I to open Settings.
Go to Update & Security > Troubleshoot > Additional troubleshooters.
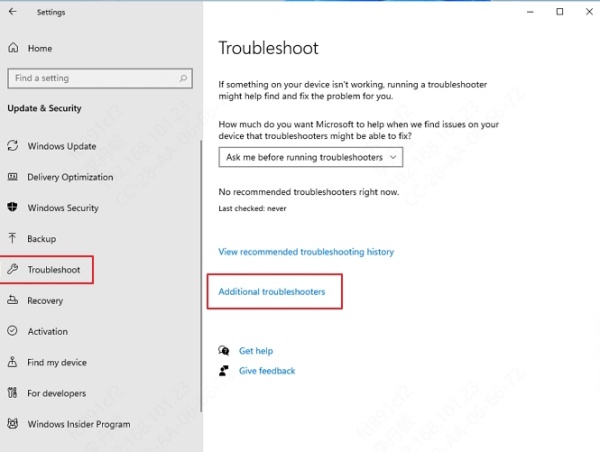
Select Hardware and Devices and run the troubleshooter.
When to Replace Your Chipsbnk Flash Disk USB Device
If all repair methods fail, the controller chip or memory cells may be physically damaged. In such cases:
Data recovery may require specialized hardware tools.
Replacement is often more cost-effective than repair.
Conclusion
The Chipsbnk flash disk USB device can often be repaired by reinstalling or updating the correct drivers, checking hardware connections, and fixing file system errors. Using Driver Talent ensures that you always have the correct Chipsbnk flash disk USB device driver installed, preventing “not working” errors and extending device lifespan.
For the best results, keep your drivers up to date, safely eject your USB devices, and regularly scan for disk errors. With the right tools and maintenance, your Chipsbnk USB device can continue to perform reliably for years.


