The Brother MFC-L2700D is a monochrome laser all-in-one printer that supports printing, copying, scanning, and duplex printing. Without the correct driver installed, the device may not function properly on a Windows system.
This article provides detailed instructions on how to download, install, and troubleshoot the driver to help you complete the setup quickly.
1. Why Need to Install the Brother MFC-L2700D Driver?
The driver acts as a communication bridge between the printer and the operating system. Once installed, the OS can recognize and control all printer functions correctly. Missing or incorrect drivers can cause issues such as:
Inability to print or scan
Print jobs getting stuck or error messages appearing
Duplex printing not working
Scanning features unavailable
2. How to Download the Brother MFC-L2700D Driver
Way 1: Using Driver Talent
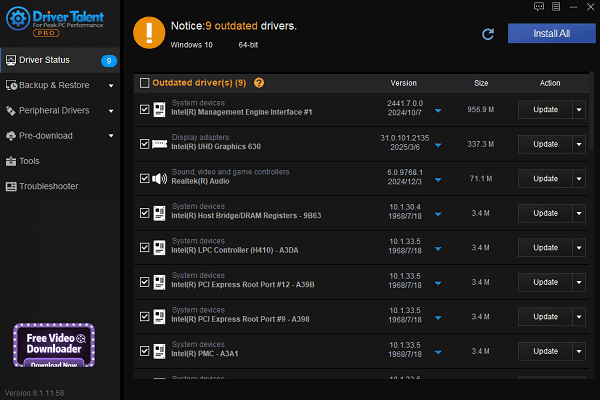
For users unfamiliar with manually downloading and installing drivers, it's recommended to use Driver Talent, a driver management tool that can automatically detect missing or outdated drivers and offer one-click fixes.
Click the download button to get the latest version of Driver Talent. Install and launch the program, then click "Scan".
After scanning, it will list all drivers that are missing or need updates. Locate the printer driver and click the "Update" button.

Once updated, it's recommended to restart your computer to ensure the new driver takes effect.
Way 2: Downloading from the Official Website
Brother's official website offers the latest drivers for various operating systems, including Windows 10, Windows 11, and Windows 8.1.
Open your browser and visit Brother's official driver download page.
Enter "MFC-L2700D" in the search bar and click "Search".
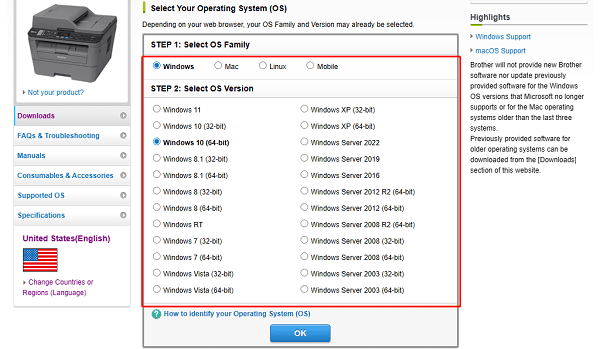
Click "Downloads", select your operating system (e.g., Windows 10/11 32-bit or 64-bit), then click "OK".

Find the Drivers section and download the Full "Driver & Software Package" or individual drivers.
Save the file to your local computer.
3. Brother MFC-L2700D Driver Installation
Method 1: Automatic Installation
Double-click the downloaded installer file (.exe).
Select your language and click "Next".
Read and accept the license agreement.
Choose the connection type (USB or Network).
Connect the printer via USB and follow the on-screen instructions to complete installation.
After installation, restart your computer to apply the changes.
Tip: If using a USB connection, make sure to plug in the USB cable only when prompted to avoid detection errors.
Method 2: Manual Installation (If Not Automatically Recognized)
Press Win + X and open "Device Manager".
Locate the "Unknown device" or find Brother MFC-L2700D under "Print queues".
Right-click and choose "Update driver".
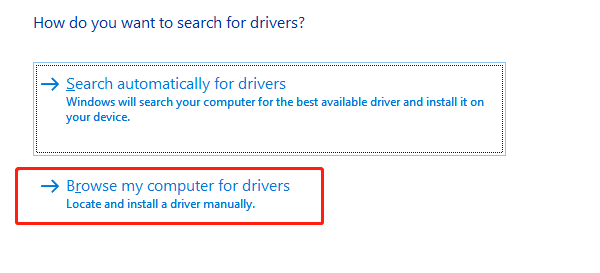
Select "Browse my computer for drivers".

Navigate to the folder where you extracted the downloaded driver files.
Click "Next" to complete the installation.
4. Frequently Asked Questions (FAQ)
Q1: The printer still isn't recognized after installing the driver. What should I do?
A: Check if the USB cable is connected properly and try a different port. Reinstall the driver and restart the system.
Q2: I can't find my operating system on the Brother website.
A: Try downloading the Universal Driver or contact Brother support for assistance.
Q3: Driver installation failed with a "Permission Denied" error.
A: Right-click the installer file and choose "Run as administrator". You may also disable security software temporarily and try again.
Installing the Brother MFC-L2700D driver is essential for optimal printer performance. By following the steps above, you can successfully enable all key functions, including printing, copying, and scanning.
If you encounter any issues, check connection types and system compatibility first, then use this guide for step-by-step troubleshooting and resolution.
See also:
Getting Error Code 0x80070035 on Windows? How to Fix It
Tips to Improve PC Performance for Gaming (Windows 10/11)
How to Fix Logitech K780 Keyboard Not Pairing on Windows


