
A Dell laptop refusing to turn back on after a seemingly normal shutdown often leaves users uncertain whether the problem is due to a dead battery, a faulty power supply, or a deeper system conflict.
While hardware failure is a possibility, the cause is frequently rooted in residual power glitches, faulty power management drivers, or BIOS settings that prevent a proper restart sequence. To systematically diagnose and fix your Dell laptop, this guide provides detailed, step-by-step solutions, starting with the software and driver integrity that governs system power.
Part I: Driver and System Integrity Checks
If your laptop occasionally fails to restart or shuts down unexpectedly, corrupted drivers for the chipset or power management (ACPI) may be preventing the system from receiving the correct "wake up" signals.
Automated Driver Update with Driver Talent X
Manually updating the drivers for the battery, chipset, and ACPI can be tedious and prone to error. A specialized utility automates this process, ensuring that the necessary power and system drivers are perfectly stable, resolving deep-seated conflicts.
Preparation (If Possible):
If your PC is experiencing intermittent restart issues, boot into Windows.
If the PC won't turn on at all, proceed to Part II first, and use this method once you achieve a temporary boot.
Download and Install:
Click the "Download" button to download the software package.
Install it on your Dell laptop.
Run Scan:
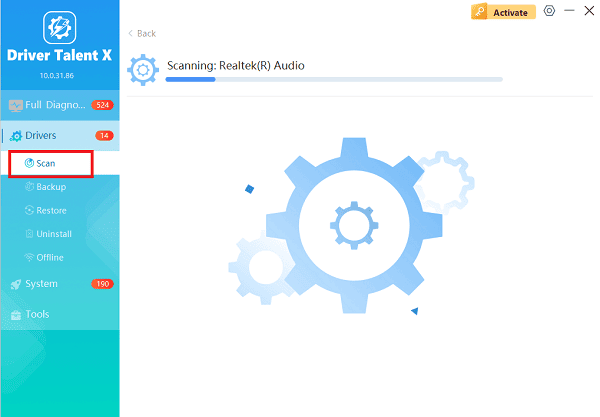
Launch the application and go to "Drivers" > "Scan", click "Scan".
The software will perform a deep analysis of your system, focusing on critical power and system components.
Execute Update:
After the scan is complete, the software will display a list of all drivers that need attention. Select the necessary power and system drivers and click the "Upgrade" or "Repair Now" button.
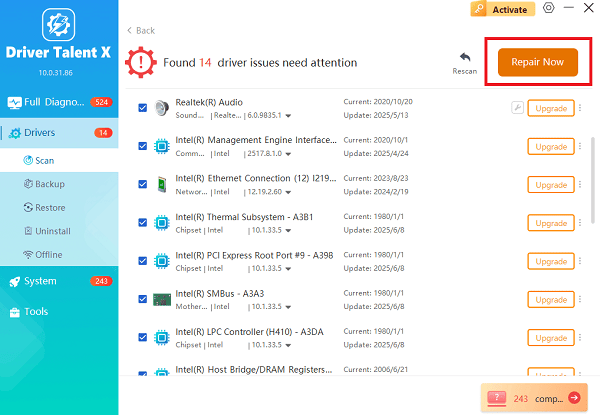
Driver Talent X will download the latest, certified versions specific to your Dell model.
Finalize:
After the installation is complete, restart your computer and test the shutdown and restart functionality several times.
Part II: Hardware and Power Drain Checks
These steps address physical faults in the power delivery system, which are the most common causes of a failed startup.
Method 1: Perform a Power Drain (Hard Reset)
This is the most critical first step. Residual electrical charge (flea power) can sometimes confuse the laptop's Embedded Controller (EC) and prevent the power button from initiating a boot.
Disconnect Everything: Power down the laptop completely. Unplug the AC adapter and remove the battery if your model has an external, removable battery.
Hold Power Button: Press and hold the laptop's main power button for 30 to 40 seconds. This drains all residual charge from the system components.
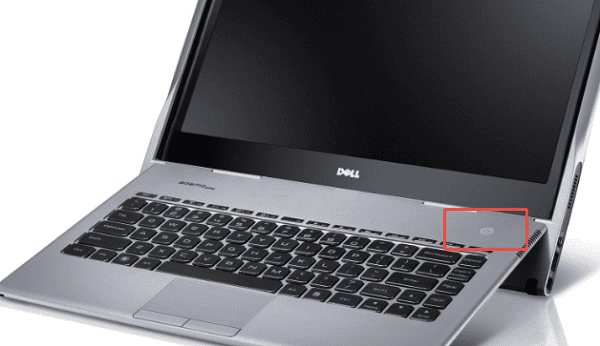
Test: Reconnect the AC adapter (without the battery, if removable) and attempt to power on the system. If it works, shut it down, reconnect the battery, and try again.
Method 2: Check AC Adapter and Battery Status
Ensure the power adapter is functioning and that the laptop is receiving adequate charge.
Inspect Adapter: Check the entire length of the charger cable and the power brick for fraying or damage. Ensure the connector tip is clean.
Check Light: Plug the adapter into the wall and the laptop. Look for the small power status light on the laptop or the adapter itself. If there is no light, the adapter or the wall outlet may be faulty.
Try a Different Outlet: Plug the charger into a different, confirmed working wall outlet to rule out a faulty power source.
Part III: BIOS and System Configuration
These solutions address firmware settings that might be incorrectly configured after a shutdown.
Method 1: Update BIOS/UEFI Firmware
The BIOS (Basic Input/Output System) manages all hardware functions, including the shutdown and startup sequences. An outdated BIOS may contain bugs related to power management.
Go to Dell Support: Visit the official Dell Support website and enter your laptop's service tag or model name.
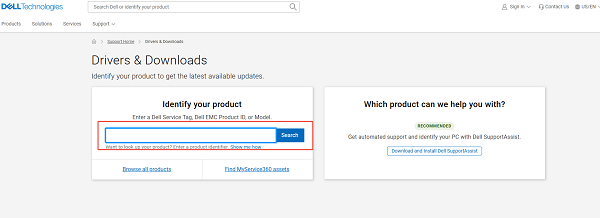
Download BIOS: Search for available BIOS/UEFI Firmware updates under the "Drivers & Downloads" section.
Install: Download the latest update and follow Dell's instructions precisely (ensure the laptop is plugged in and the battery is charged above 25% during the process). Warning: Do not interrupt a BIOS update.
Restart: After the update, restart your computer.
Method 2: Disable Windows Fast Startup
Fast Startup, a feature in Windows 10/11, uses a hibernation-like state to speed up boot times. However, it can often lead to conflicts, preventing a full, clean shutdown and subsequent restart.
Search the Windows Start Menu for "Control Panel" and open it.
Go to "Hardware and Sound" > "Power Options".
Click "Choose what the power buttons do" on the left panel.
Click "Change settings that are currently unavailable".
Uncheck the box next to "Turn on fast start-up (recommended)".
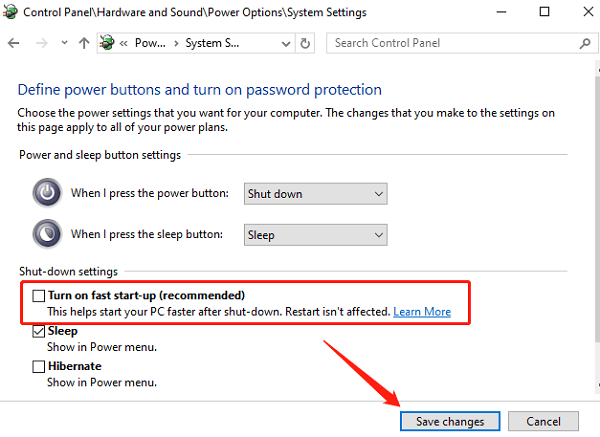
Click "Save changes", shut down the laptop, and try turning it back on.
Conclusion
A Dell laptop failing to turn on after a shutdown is most often a power management or firmware issue, not a permanent hardware defect. The most critical first step is the Power Drain.
To ensure long-term stability and prevent recurrence, prioritize synchronizing your power management drivers with Driver Talent X. By combining these steps with disabling Windows Fast Startup, you can systematically eliminate common boot-up failures.
See also:
Elden Ring: Nightreign Highlights and System Requirements Overview
[Fixed] 'xinput1_3.dll Was Not Found' Error on Windows


