Five methods to disable system automatic updates win10
Jul. 09, 2025 / Updated by Seraphina to Windows 10
Controlling automatic updates in Windows 10 is crucial for users who desire more flexibility in their system maintenance schedules. This guide provides a detailed overview of methods to disable automatic updates, ensuring that you can take charge of when and how updates are installed on your Windows 10 computer.
Preparation:
Drivers serve as the bridge between hardware devices and the operating system. Without the correct drivers, many hardware devices may fail to function properly. Here, you can swiftly check your computer's hardware drivers using "Driver Talent" and install the corresponding drivers with just one click.
Click the download button to acquire the latest version of Driver Talent. Once installed, open the software and click "Scan".
After the scan is complete, it will display which drivers are not installed or require updates. Click the "Download" button.
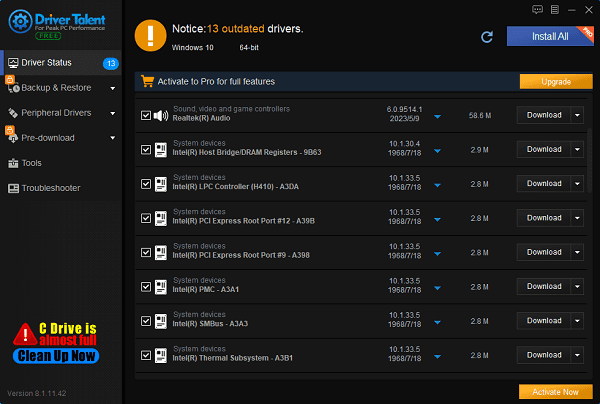
After the update is completed, it's recommended to restart your computer to ensure the new drivers take effect.
Understanding Automatic Updates in Windows 10:
By default, Windows 10 is configured to automatically download and install updates to ensure the operating system remains secure and aligned with the latest features and bug fixes. While automatic updates are beneficial for security and system health, they can sometimes be disruptive, especially during critical work hours or in scenarios with limited bandwidth. Disabling automatic updates allows users to manually control the update process.
Methods to Disable Automatic Updates in Windows 10:
Method 1: Using Group Policy Editor (Professional, Enterprise, and Education editions)
Access Group Policy Editor: Press Win + R to open the "Run" dialog, type gpedit.msc, and then press Enter.
Navigate to update settings: In the Group Policy Editor window, go to "Computer Configuration" > "Administrative Templates" > "Windows Components" > "Windows Update".
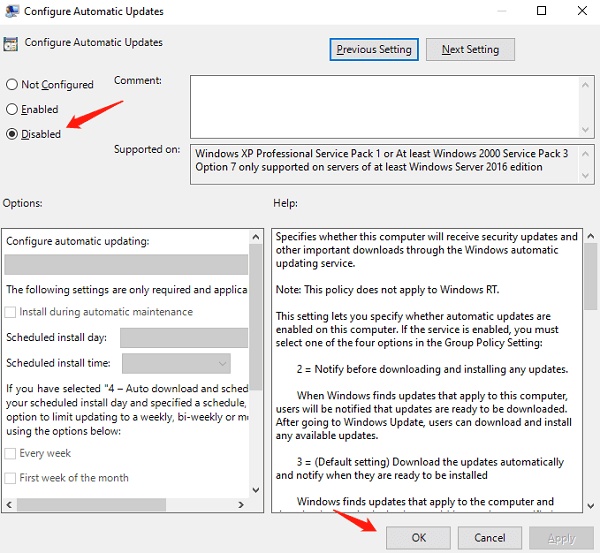
Configure automatic update policy: Locate the policy named "Configure Automatic Updates", double-click it, choose "Disabled" in the popup window, and click "OK".
Method 2: Disabling the Windows Update Service (All editions)
Open Services: Press Win + R, type services.msc, and then press Enter.
Locate the Windows Update service: Scroll down in the list and find the "Windows Update" service.
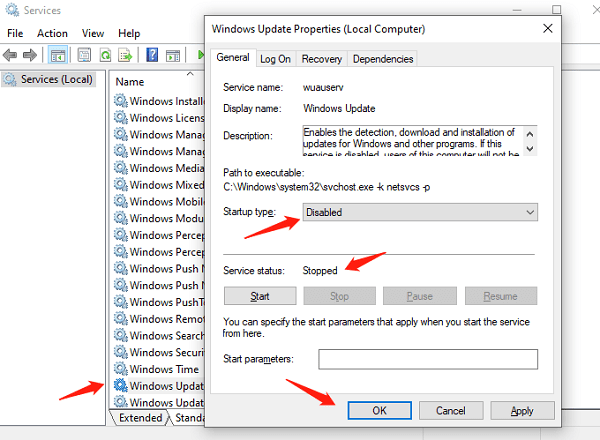
Modify startup type and stop the service: Right-click "Windows Update", select "Properties". On the "General" tab, change the "Startup type" to "Disabled". If the service is running, click "Stop" to pause it immediately. Click "Apply" and then "OK". On the "Recovery" tab, set all failures to "Take No Action".
Method 3: Using Metered Connection (Wi-Fi only)
Set network as metered connection: Go to "Settings" > "Network & Internet". Under "Wi-Fi", select your active Wi-Fi connection. Turn on the "Set as metered connection" toggle. This way, when connected to this Wi-Fi network, Windows 10 will limit automatic downloads, including updates, treating it as a data-limited connection.
Method 4: Editing the Registry
The registry is a database in the Windows system used to store configuration information. By modifying the registry, we can control update behavior more deeply.
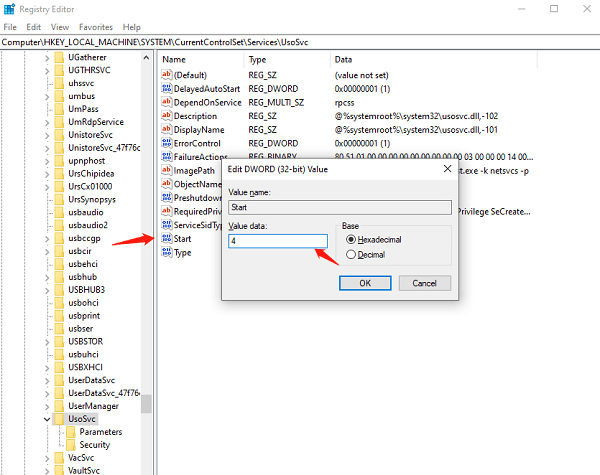
Press Win + R, type regedit, and open the Registry Editor.
Navigate to HKEY_LOCAL_MACHINE\SYSTEM\CurrentControlSet\Services\UsoSvc.
Find the Start key and change its DWORD value to "4" to disable the service.
Method 5: Using Task Scheduler
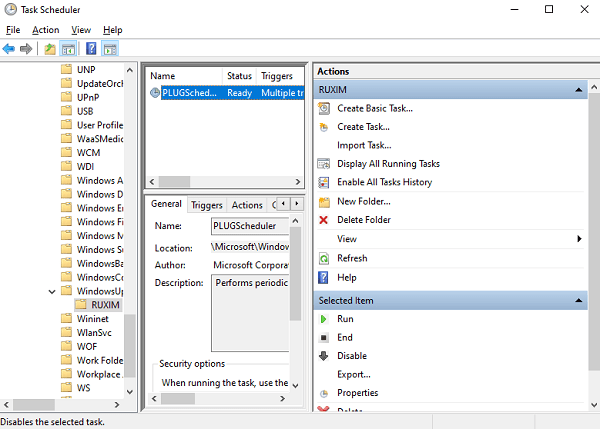
Task Scheduler allows us to manage system tasks, including update-related tasks. Press Win + R, type taskschd.msc, and open Task Scheduler. Navigate to Task Scheduler Library\Microsoft\Windows\WindowsUpdate, find the relevant update tasks, and set them to Disabled.
Considerations Before Disabling Automatic Updates:
While disabling automatic updates provides more control, it's important to remember that updates often include critical security patches. It's recommended to manually check for and install updates regularly to keep the system secure. Additionally, please note that some of the above methods, particularly modifying services, may impact other functionalities reliant on the Windows Update service.
Disabling automatic updates in Windows 10 is a straightforward process with multiple methods to choose from, each tailored to different user preferences and system configurations. Whether through Group Policy, modifying services, setting metered connections, or using third-party tools, users can regain control over update schedules. However, striking a balance between convenience, security needs, and the necessity for timely system improvements is crucial. Regularly checking for updates manually and devising a well-structured update schedule ensures a balanced approach to system maintenance.
See also:
Steps to Fix No Sound Issue on Windows 11
How do I fix my graphics card malfunctioning after updating
How do I get my HP webcam to work and installation tutorial
Solution for Computer Not Detecting WiFi Networks

|
ExplorerMax |

|
Driver Talent for Network Card | |
| Smart and advanced file explorer tool for Windows platforms | Download & Install Network Drivers without Internet Connection | |||
| 30-day Free Trial | Free Download |


