When using Windows 11/10, some users may encounter an issue where the system fails to detect the NVIDIA graphics card. This can negatively impact device performance and prevent graphics-intensive applications or games from running properly.
This article explores the common causes and provides detailed troubleshooting steps to help you resolve the issue quickly.
I. Common Causes of NVIDIA Graphics Card Not Being Recognized
The graphics driver is not properly installed
The driver is corrupted or incompatible
The graphics card is not properly inserted or the hardware connection is loose
BIOS settings do not enable the dedicated GPU
Driver conflicts after a Windows update
Power supply or hardware failure
II. How to Fix NVIDIA Graphics Card Not Detected
Method 1: Check Graphics Card Status
Press Win + X and select "Device Manager".
Expand the "Display adapters" section.
If you only see "Microsoft Basic Display Adapter", it means the driver is not installed or the GPU is not recognized.
If the NVIDIA graphics card shows a yellow exclamation mark, there is a driver issue.

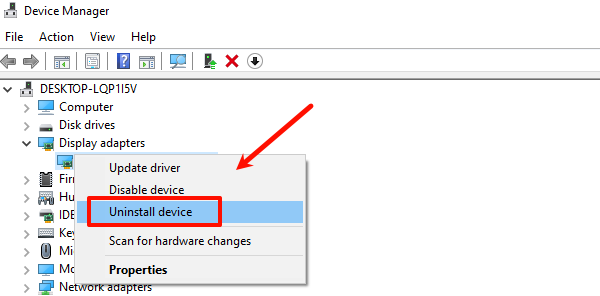
Right-click on the NVIDIA device, choose "Uninstall device", check "Delete the driver software for this device", then restart your computer.
Tip: If no NVIDIA device appears in Device Manager, it might be due to hardware connection issues or BIOS settings.
Method 2: Update Graphics Drivers
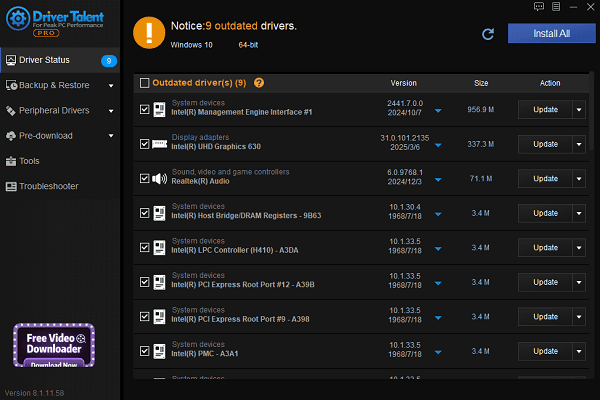
Driver issues are a major reason for the system not recognizing the NVIDIA GPU. It's recommended to use a tool like Driver Talent, which automatically detects missing or faulty drivers and provides one-click repair.
Download and install the latest version of Driver Talent.
Open the software and click "Scan".
Once the scan is complete, find the graphics driver in the list and click "Update".

After the update, restart your computer to apply changes.
Method 3: Enable Dedicated GPU in BIOS
Some motherboards default to integrated graphics. You may need to manually enable the dedicated GPU:
Restart your computer and press Del/F2/F10 (depending on your motherboard brand) to enter the BIOS.
Go to the "Advanced" or "Chipset settings".
Set "Primary Display" or "Graphics Adapter to PEG (PCI-E Graphics)".
Save changes and exit BIOS. The system will reboot.
Method 4: Disable Automatic Driver Installation
Press Win + R, type "sysdm.cpl", and press Enter.
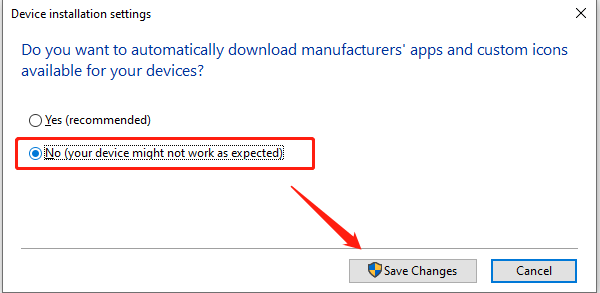
Go to the "Hardware" tab and click "Device Installation Settings".
Choose "No (your device might not work as expected)" and click "Save Changes".

This prevents Windows from overwriting your installed NVIDIA drivers.
Method 5: Run Windows Troubleshooter
Go to Settings > Update & Security > Troubleshoot > Other troubleshooters.
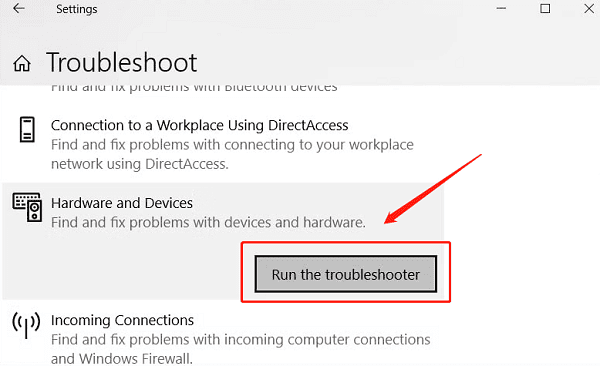
Find "Hardware and Devices" and click "Run the troubleshooter".

Follow the on-screen instructions to complete the fix.
III. Additional Suggestions
Check the Power Supply: Ensure your PSU provides enough power, some high-end GPUs require extra power cables.
Inspect GPU Slot and Power Cables: Reseat the graphics card and clean any dust.
Try Another Slot or Test GPU: If possible, test the GPU in another PCI-E slot or on another system to rule out hardware damage.
There are many reasons why Windows 11/10 might not detect your NVIDIA graphics card. Whether it's due to driver issues, BIOS settings, or hardware problems, the methods outlined above can significantly improve detection rates.
Hopefully, this guide helps you get your NVIDIA GPU up and running again for a smooth, high-performance experience.
See also:
Fix PCI Encryption/Decryption Controller Not Working on Windows
Top Ways to Fix Delta Force FPS Drops on Windows PC
Top Solutions for Brother Printer Code 45 Error in Windows
Download & Install Brother MFC-7860DW Printer Driver for Windows


