
A malfunctioning mouse (whether wired or wireless) can bring your productivity to a sudden halt. Symptoms like cursor freezing, erratic movement, or complete unresponsiveness are often traced back to a corrupted, outdated, or conflicting mouse driver.
Safely reinstalling the mouse driver is the most effective way to resolve these "Driver Error" issues on Windows. To ensure a smooth, error-free fix, this guide provides detailed, step-by-step solutions for safely removing and reinstalling your mouse driver, starting with the most efficient method for achieving system stability.
Part I: Driver Integrity and System Preparation
Before you attempt to reinstall the mouse driver, ensuring that the host system's core USB and chipset drivers are stable is crucial, especially for external or wireless mouse.
Automated Driver Update with Driver Talent X
Manually troubleshooting and updating the various input, USB Controller, and Chipset drivers can be complex. A specialized utility automates this process, guaranteeing that all necessary components are perfectly synchronized, often eliminating the root cause of the error.
Preparation:
Connect an external working mouse (if necessary) or use the keyboard to navigate.
Download and install the Driver Talent X application onto your Windows PC.
Run Scan:
Launch the application and go to "Drivers" > "Scan", click "Scan".
The software will perform a deep analysis of your system, focusing on peripheral and controller drivers.

Execute Update:
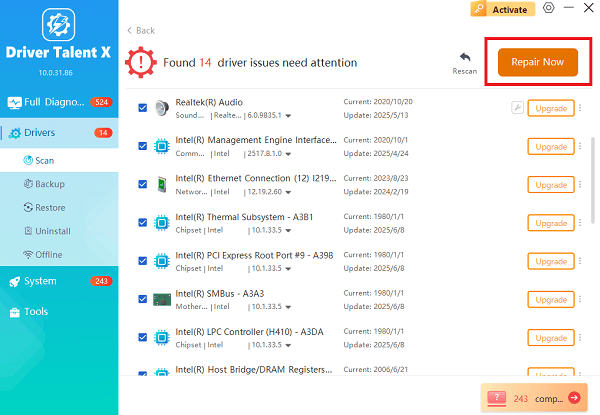
After the scan is complete, the software will display a list of all drivers that need attention.
Select the necessary drivers and click the "Repair Now" button. Driver Talent X will download the latest, certified versions specific to your mouse and Windows version.
Finalize:
After the installation is complete, restart your computer. Stable drivers are the foundation for any successful peripheral operation.
Part II: Driver Reinstallation via Device Manager
This is the standard and safest way to force Windows to remove the current problematic driver and load a fresh, clean version.
Clean Reinstallation using Device Manager
This method is crucial for resolving conflicts caused by recent Windows updates or software installation errors.
Press Windows Key + X and select "Device Manager".
Expand the "Mice and other pointing devices" category.
Right-click on your mouse entry (it may be labeled as "HID-compliant mouse", "PS/2 Compatible Mouse" or your specific brand/model).
Select "Uninstall device".
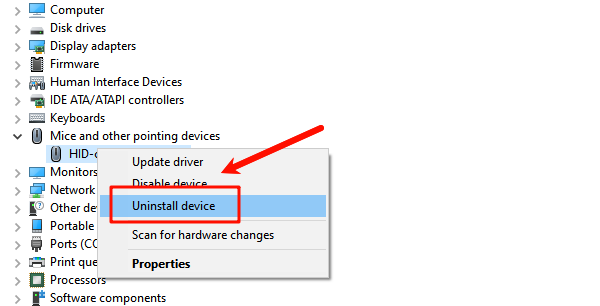
Crucially, do NOT check the box that says "Delete the driver software for this device" (unless specifically instructed, as this often leaves the necessary driver files intact for a quick reload).
Unplug the mouse (if wired/USB).
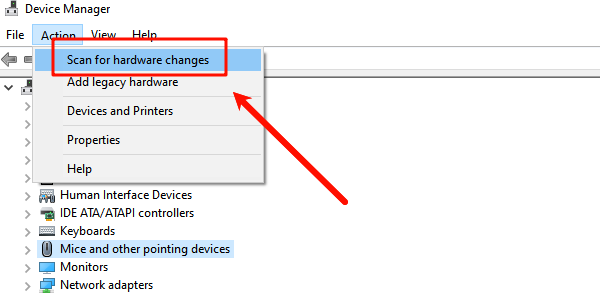
In the Device Manager menu, click "Action" > "Scan for hardware changes". Plug the mouse back in (if applicable). Windows will automatically detect the device and load a fresh driver copy.
Restart the laptop to confirm the fix.
Part III: Power and Windows Settings Troubleshooting
These steps address common settings that can unintentionally disable or interrupt mouse functionality.
Method 1: Disable Power Saving for USB Ports
Windows often puts USB ports to sleep to conserve power, which can lead to intermittent disconnections or unresponsiveness, mimicking a driver error.
Press Windows Key + X and select "Device Manager".
Expand the "Universal Serial Bus controllers" category.
Right-click on any USB Root Hub entry and select "Properties".
Go to the "Power Management" tab.
Uncheck the box that says "Allow the computer to turn off this device to save power".
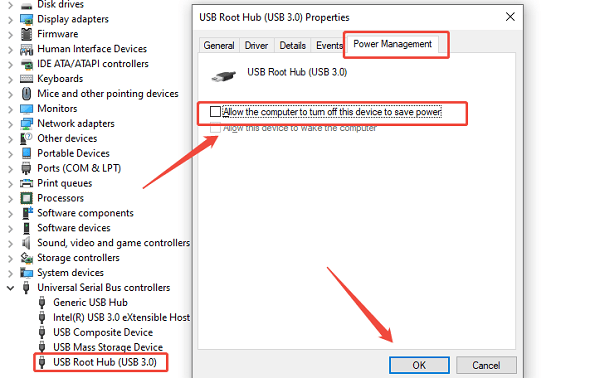
Click "OK". Repeat this process for all USB Root Hub entries.
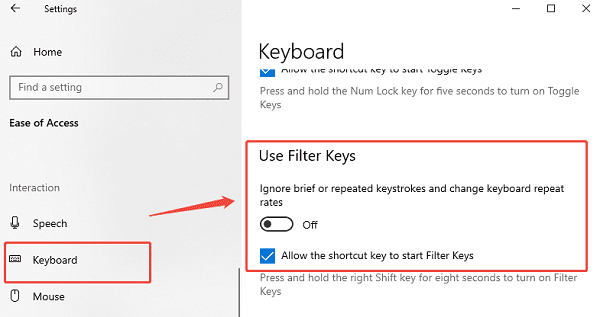
Method 2: Check for Filter Keys Interference
Windows Accessibility settings, if enabled unintentionally, can cause the mouse or touchpad to feel unresponsive, which users often misinterpret as a driver problem.
Press Windows Key + I to open Settings.
Navigate to "Ease of Access" > "Keyboard" (or "Accessibility" > "Mouse or Accessibility" > "Keyboard").
Ensure the "Filter Keys" toggle switch is set to "Off". This feature ignores quick or repeated inputs and should be disabled for normal use.
Conclusion
Safely reinstalling a mouse driver is the most effective solution for resolving cursor errors and unresponsiveness. The most reliable method is to first ensure driver stability and clean installation across your entire system with Driver Talent X.
By combining this foundational fix with a clean reinstallation via Device Manager and disabling USB Power Saving on the receiver ports, you can systematically eliminate common failure points and restore smooth, precise cursor control.
See also:
Canon CanoScan LiDE 100 Not Recognized? Try These Fixes
How to Fix Knup Keyboard Connection Issues – Working Driver Solutions
Canon IR2520 UFRII LT Driver Not Recognized? Try These Fixes
Can't Print with HP LaserJet M1120 MFP? Complete Troubleshooting Guide


