Updating your computer's BIOS is a critical procedure that can improve system stability, enhance compatibility with new hardware, and fix security vulnerabilities.
While a USB flash drive is the most common and safest tool for this job, some advanced motherboards offer methods to update the BIOS without a USB.
This guide will provide you with a comprehensive look at how to update your BIOS without a USB.
We'll also cover an alternative, much easier way to manage all your other drivers—which is a more frequent and less risky task that solves most common PC problems.
The Most Important Rule: Why a BIOS Update Is Not a Routine Task
First, it's crucial to understand what a BIOS is. The BIOS (Basic Input/Output System) is the low-level firmware that starts your computer before the operating system even loads. A successful update is vital, but a failed one can permanently damage your motherboard, a state commonly known as "bricking".
To update your BIOS without errors, you must:
Ensure a Stable Power Supply: Use a UPS (Uninterruptible Power Supply) if possible to prevent power outages from interrupting the update.
Download the Correct File: Make sure you get the exact BIOS version for your specific motherboard model from the official manufacturer's website.
Do Not Interrupt: Once the update begins, do not turn off or restart your PC under any circumstances.
Method 1: The Official Way to Update BIOS Without a USB
Only specific high-end motherboards come with a feature that allows a BIOS update without a CPU, RAM, or a USB drive. These features are usually a dedicated button on the back of the motherboard or a specific tool within the BIOS itself.
Step 1: Identify Your Motherboard and Get the Correct BIOS File
Identify your motherboard: You must know the exact model number. You can find this printed on the motherboard itself or on the retail box.
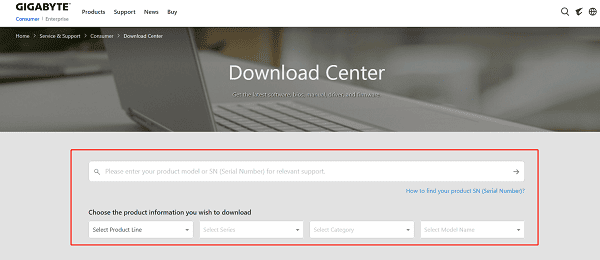
Go to the manufacturer's website: Visit the official support page for your motherboard (e.g., ASUS, Gigabyte, MSI).

Download the latest BIOS: Find the support page for your model, click on the "BIOS" or "Firmware" tab, and download the latest version's ZIP file.
Prepare the file: Unzip the downloaded file. Inside, you'll find the BIOS file (often with a .CAP, .ROM, or similar extension). You'll typically need to place this file in the root directory of an external storage device, even if you are using a BIOS Flashback or Q-Flash Plus feature.
Step 2: Use the Manufacturer's Specific Feature
The process depends on your motherboard's brand:
ASUS (BIOS Flashback): With the power off, plug your USB drive into the designated USB port on your motherboard's back panel. Press and hold the "BIOS Flashback" button for three seconds. The LED will begin to flash and then turn off, signaling a successful update.

Gigabyte (Q-Flash Plus): With the power off, connect a power supply to the motherboard. Plug your USB drive into the designated port and press the "Q-Flash Plus" button. The system will turn on and begin the update automatically.
MSI (Flash BIOS Button): Similar to the other brands, with the power off, you will copy the BIOS file to a USB drive, plug it into the dedicated "Flash BIOS" port, and press the button.
Method 2: Way to Update All Your Drivers (Recommended)
While a BIOS update is a serious and rare task, keeping your other drivers—like your chipset, audio, and graphics drivers—up to date is a frequent and essential task for optimal performance.
Manually searching for and installing each driver can be a hassle. Driver Talent X is a professional driver management tool that makes this process incredibly simple and safe.
Step 1: Scan for Outdated Drivers
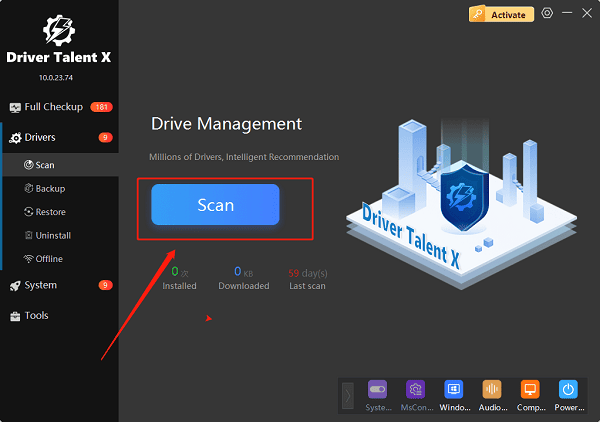
After installation, launch Driver Talent X.
Click the "Scan" button. The software will perform a deep scan of your entire system, identifying any outdated, missing, or corrupted drivers. This includes drivers for your motherboard, graphics card, sound card, and more.

Step 2: Update Your Drivers with One Click
After the scan, Driver Talent X will present a clear list of drivers that need updating.
Find the drivers you want to update (e.g., your motherboard's chipset driver).
Simply click the "Upgrade" button next to each one, or choose the "Repair Now" option.
Driver Talent X will automatically download and install the latest, most compatible drivers for you, ensuring your system runs smoothly without any manual effort.
Q&A
Q: Is it always possible to update the BIOS without a USB?
A: No, this feature is only available on certain motherboards that have a dedicated "BIOS Flashback" or "Q-Flash Plus" button on the back panel.
Q: What is the main difference between a BIOS update and a driver update?
A: A BIOS update changes the low-level firmware of your motherboard. A driver update is software that allows the operating system to communicate with your hardware. Driver updates are much safer to install.
Q: Can Driver Talent X update my BIOS?
A: No, Driver Talent X is a software tool designed to manage and update your PC's drivers. It cannot update your motherboard's BIOS, as that requires a separate, manual process using the manufacturer's official utility.
Conclusion
Updating your BIOS without a USB is a possible but advanced procedure, only available on specific motherboards with dedicated features.
For all other routine driver maintenance—which is crucial for day-to-day performance and stability—a tool like Driver Talent X is the safest and most efficient solution.
It simplifies the entire process, ensuring your PC's drivers are always up to date and your system runs smoothly.
See also:
Intenso USB Driver Not Working? How to Fix It
Fuji Xerox DocuPrint CP305d Driver Download Tutorial
How to Fix USB2.0-CRW Device Not Recognized in Windows


