Keeping your AMD graphics drivers up to date is essential for achieving the best performance, stability, and compatibility on your Windows 10/11 computer.
Outdated or corrupted AMD drivers can cause issues such as screen flickering, poor game performance, or even system crashes.
In this guide, we'll explain why updating your AMD graphics driver matters, show you step-by-step instructions to update drivers using Driver Talent X, and answer some common questions from users.
Why Updating AMD Graphics Drivers Is Important?
Your AMD graphics card plays a crucial role in delivering smooth visuals for gaming, video editing, and everyday tasks. Regular driver updates can:
Fix bugs and compatibility issues.
Improve FPS and overall gaming performance.
Add support for new games and applications.
Ensure stability after Windows updates.
If your AMD drivers are outdated, you may notice poor performance or display issues. That's why it's important to update them correctly and safely.
Method 1: Update AMD Graphics Drivers Manually
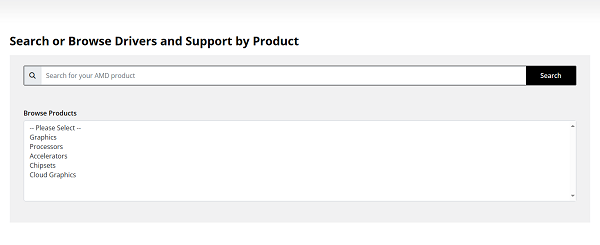
You can manually update your AMD driver by visiting the official AMD Drivers and Support page.
Open the AMD website, find the driver download page.
Enter your graphics card model in the search bar (e.g., Radeon RX 6000 series).

Select your operating system (Windows 10 or Windows 11).
Download and install the latest driver package.
Restart your computer to apply changes.
While effective, this process can be time-consuming, especially if you don't know your exact hardware details.
Method 2: Update AMD Drivers Using Device Manager
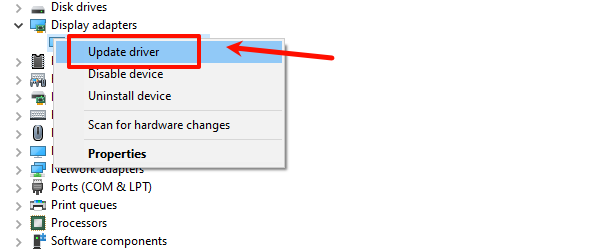
Right-click the Start menu and select "Device Manager".
Expand "Display adapters".
Right-click your AMD graphics card and choose "Update driver".

Select "earch automatically for drivers".
Windows will try to find and install the latest driver.
However, Windows may not always provide the most recent AMD drivers. For the best results, a professional tool — Driver Talent X is recommended.
Method 3: Update AMD Drivers with Driver Talent X (Recommended)
If you want a fast, beginner-friendly solution, Driver Talent X is one of the best tools available. It automatically detects outdated, missing, or corrupted drivers and installs the latest stable versions.
Download and Install Driver Talent X:
Download and install the software on your Windows 10/11 PC.
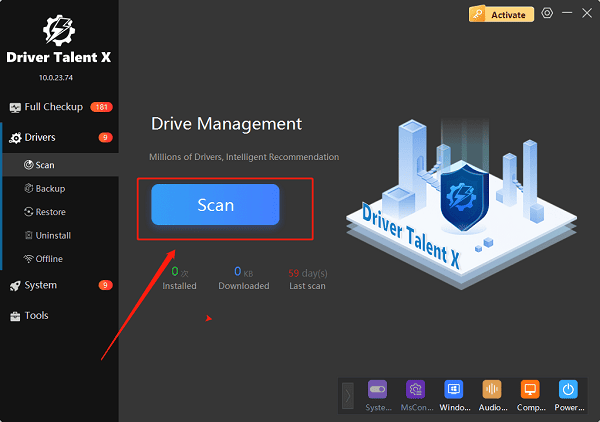
Launch the Program and Scan Your System:
Open Driver Talent X.
Click the "Scan" button.

The program will check your PC and list outdated, missing, or broken drivers, including your AMD graphics driver.
Update AMD Graphics Driver:
Locate your AMD graphics driver in the scan results.
Click "Upgrade" next to it.
Driver Talent X will download and install the latest official AMD driver automatically.
Restart Your PC:
Restart your system to ensure the new driver is fully applied.
With these steps, you can update your AMD graphics drivers safely and avoid compatibility issues.
FAQs About Updating AMD Graphics Drivers
Q1: How do I know if my AMD graphics driver is outdated?
A: Signs include stuttering in games, display glitches, or error messages in Device Manager. Driver Talent X can scan your PC and instantly detect outdated drivers.
Q2: Do I need to uninstall old AMD drivers before updating?
A: No. Driver Talent X automatically removes old files and installs the new driver cleanly, preventing conflicts.
Q3: How often should I update my AMD graphics driver?
A: It's recommended to check for updates every 1–2 months, especially if you play new games or after major Windows updates.
Conclusion
Updating your AMD graphics driver on Windows 10/11 is a must for keeping your system stable and performing at its best. While manual updates work, they can be time-consuming and confusing for beginners.
The easiest and safest way is to use Driver Talent X, which automatically scans, downloads, and installs the correct AMD driver for your system.
Keep your drivers up to date, and your PC will reward you with smoother gameplay, better visuals, and fewer system errors.
See also:
Intenso USB Driver Not Working? How to Fix It
Fuji Xerox DocuPrint CP305d Driver Download Tutorial
How to Fix USB2.0-CRW Device Not Recognized in Windows


