How to Enable SATA AHCI Mode in BIOS on Windows 10
Jun. 24, 2022 / Updated by Helia to Windows 10
SATA AHCI mode makes the SATA hard drive run at its best, but if you didn’t enable the AHCI mode in BIOS, you won’t be able to enter Windows 10 normally or reinstall the system.
What Are the Advantages of AHCI Mode
SATA hard drive can work in IDE or AHCI mode, but the later, AHCI (Advanced Host Controller Interface) mode, is the better because it gives better read and write times and more extensive design support than the older IDE does. Choosing AHCI mode over IDE can also improve bandwidth speed in performance solid-state drives. So if you use AHCI mode, all the Serial ATA features are available.
How to Enable AHCI Mode and Improve SATA Hard Disk Performance
This tutorial will show you 3 methods of how to enable SATA AHCI mode in BIOS on Windows 10.
Method 1: Enable SATA AHCI Mode via Deleting SatrtOverride
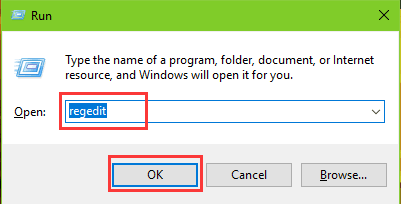
Step 1. Use Windows shortcut keysWin + R to launch Run on Windows 10. Type regedit into the box and press the Enter.
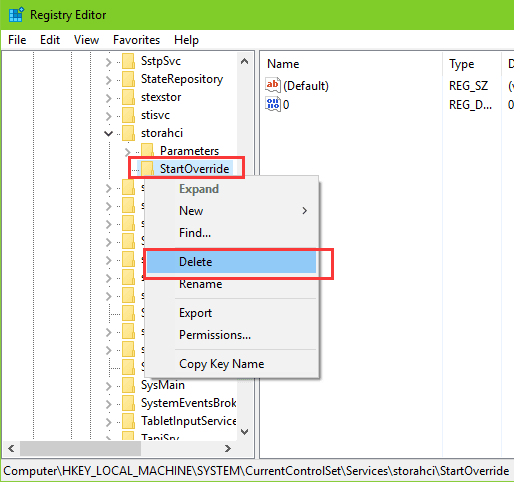
Step 2. When the Registry Editor window pops up, navigate to the below location and then delete the file StartOverride.
HKEY_LOCAL_MACHINE\SYSTEM\CurrentControlSet\Services\storahci
Step 3. Open the Notepad and paste the below text into the box. Save the document as AHCI.bat.
reg delete "HKEY_LOCAL_MACHINE\SYSTEM\CurrentControlSet\Services\storahci\" /v StartOverride /f

Step 4. Right click on the file you’ve just saved and select Run as administrator.
Step 5. Type Yes into the pop-up Command Prompt window and hit the Enter.
Now you can restart the computer and enter the BIOS to enable the SATA AHCI mode. (If you don’t know the way to enter Windows 10 BIOS, see How to Enter BIOS on Windows 10, 8.1, 8, 7, Vista, XP.) Take Phoenix BIOS as an example.
Step 1. Use the Right Arrow key to choose the Main tab.
Step 2. Use the Down Arrow key to highlight SATA Mode entry and press the Enter.
Step 3. Use the Down Arrow key to select AHCI Mode and press the Enter.
![]()
Step 4. Press F10 to save the changes and exit the BIOS.
See Also:Fix CMOS Checksum Error on Windows 10, 8.1, 8, 7, Vista, XP
Method 2: Enable AHCI Mode via Registry Modification
Step 1. Launch the Run and type into regedit, and then hit the Enter.
Step 2. When the Registry Editor window pops up, navigate to the following location:
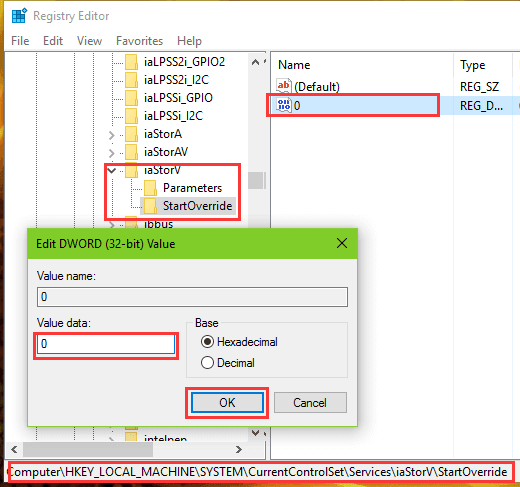
HKEY_LOCAL_MACHINE\SYSTEM\CurrentControlSet\Services\iaStorV
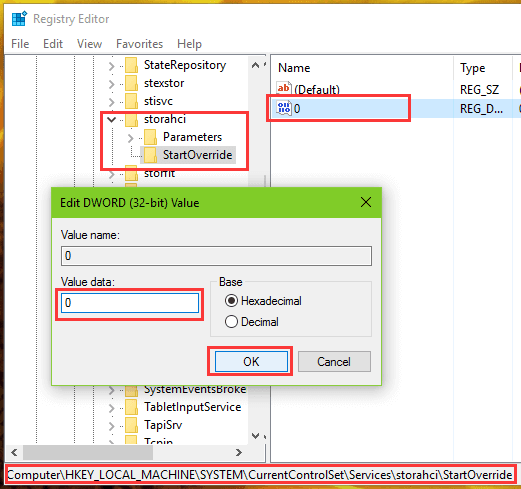
Step 3. Highlight the file iaStorV and double click on the Name Start in the right column. Modify the value as 0 and click on OK.

Step 4. Expand the iaStorV file and highlight the file StartOverride. Double click on the Name 0 in the right column and set the value to 0.
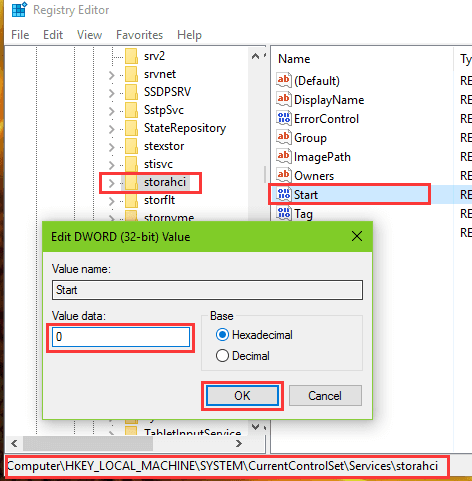
Step 5. Now navigate to the follow location and repeat the same value settings as step 3 and 4. (storahci-Name Start-value 0, storahci-StartOverride-Name 0-value-0)
HKEY_LOCAL_MACHINE\SYSTEM\CurrentControlSet\Services\storahci
HKEY_LOCAL_MACHINE\SYSTEM\CurrentControlSet\Services\storahci\StartOverride
After the value modification, restart the computer and enter the BIOS to enable AHCI mode with the same steps as in Method 1.
Note: Don’t delete or modify values of other entries that you ain’t familiar with. Also, backup registry before any changes in case serious system problems occur, such as UNEXPECTED KERNEL MODE TRAP error on Windows 10, 100% disk usage, internal power error blue screen, etc..
Method 3: Enable AHCI Mode via Command Prompt
If you want to install Windows OS on a Solid State Drive and boot it successfully after enabling AHCI in the bios, you can also follow the steps below to enable AHCI mode.
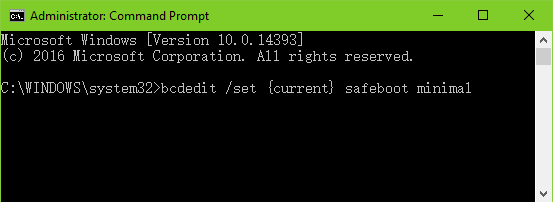
Step 1. Right click on the Start menu and select the Command Prompt (Admin).
Step 2. Type bcdedit /set {current} safeboot minimal into the dialog box and press the Enter.
Step 3. Close the window and restart the computer to enter the BIOS.
Step 4. Enable SATA AHCI mode in BIOS with the same steps as in Method 1, and then exit to boot into Windows safe mode automatically.
Step 5. In the safe mode, open the Command Prompt (Admin) and type into bcdedit /deletevalue {current} safeboot, and then hit the Enter.

After all of the steps, you can now restart the PC. You will successfully boot a Windows after enabling AHCI mode in the BIOS. However, if it does not work, switch the controller back to the IDE mode and enter the Windows to use Driver Talent to reinstall the SATA AHCI driver. And then take the step to re-enable AHCI mode to see if it works. If you have no Driver Talent installed on your PC, you could click the button below to get one.
If you want to download and install the SATA AHCI controller driver manually, click here.
Hope this article can be a reference for you to enable SATA AHCI mode on Windows 10. If you have any other Windows 10 related issues, check Windows 10 Issues and Fix section in our site for solutions please.

|
ExplorerMax |

|
Driver Talent for Network Card | |
| Smart and advanced file explorer tool for Windows platforms | Download & Install Network Drivers without Internet Connection | |||
| 30-day Free Trial | Free Download |