User Guide—How to Use Stellar Phoenix Windows Data Recovery Home
Stellar Phoenix Windows Data Recovery Home is an intuitive and powerful data recovery application. If you have lost or deleted your important photos, videos, audio files, office documents, database files, etc. from either the internal drive or external drive, the data recovery software can assist you in getting the data back to your Windows laptop or desktop.
The following is a user manual of how to recover your priceless files on your Windows computer with Stellar Phoenix Windows Data Recovery Home.
You can download and run the data recovery software on common Windows machines, such as Windows 10, Windows 8.1, Windows 8, Windows 7, Windows Vista, Windows 2000 and Windows XP. Make sure that the RAM is higher than 1GB and the hard disk contains over 50 MB free spaces.
The installation process of Stellar Phoenix Windows Data Recovery is similar to most of the Windows applications. After the installation, you can launch the software and start your data recovery with the following instructions:
Part 1. Scan Data with Stellar Phoenix Windows Data Recovery Home
To recover your lost or deleted data, you need to perform a hard disk or volume scan.
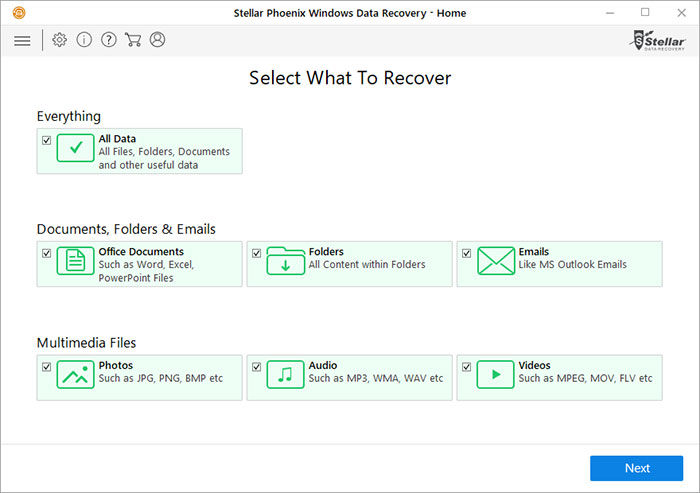
On the “Select What To Recovery” page, you have 3 main recovery options:
- Everything. This option enables you to recover all the supported formats of files from the selected storage device, including another two recovery options below.
- Documents, Folders & Emails. This option only allows you to recover all the Office documents, content within folders and emails.
- Multimedia Files. Check this option if you just want to get back your photos, audio files, videos or other multimedia files.
Choose one or more recovery options and click the “Next” button. Then you come to the “Select Location” page. Stellar Phoenix Windows Data Recovery Home provides 4 main scan types to search your missing files
Section 1. Scan Data from Normal Hard Disk Drive
You can search lost or deleted files on the hard disk drive on your laptop or desktop. Stellar Phoenix Windows Data Recovery supports NTFS, FAT, FAT16, FAT32, and ExFat file systems and you can recover almost all data of the volume on the selected volume or removable media.
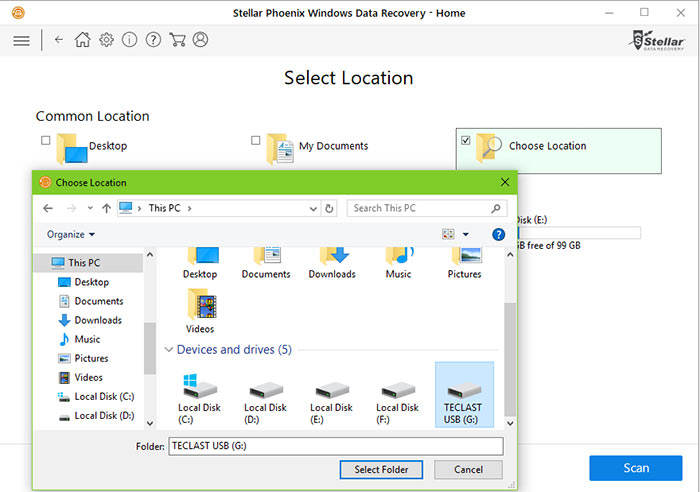
- Common Location. You can scan deleted files on location(s), including Desktop, My Documents, and other locations.
1. Choose a location.
2. Click the “Scan” button.
3. Click “OK” when the scanning completed.

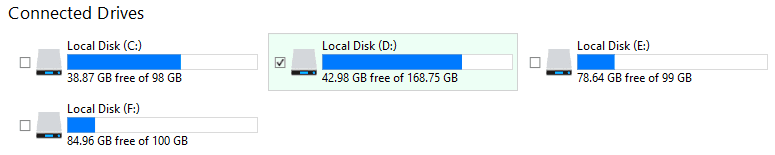
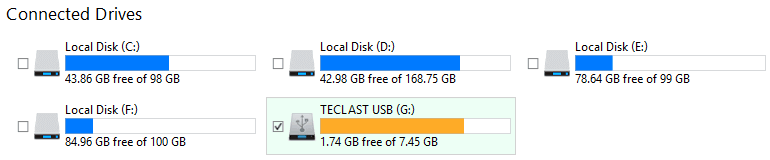
- Connected Drives. Scanning options for Local Disk (C:) (D:) (E:) (F:) (G:) or more are available here.
1. Choose the local drive(s).
2. Click the “Scan” button to begin the searching.
3. Click “OK” when it finished.
Section 2. Scan Data from External Storage Devices
To get back your missing data on external storage devices, like USB thumb drives, pen drives, external hard drives, memory cards, etc., you can start the scanning with the following steps:
- Common Location. Scan deleted files on the selected location.
1. Connect your movable media device to the Windows PC.
2. Check the “Choose Location”.
3. Find your external storage device.
4. Click “OK”.
5. Click the “Scan” button.
6. Click “OK” when the scanning completed.
- Connected Drives. Scanning options for your removable devices are available here.
1. Connect your movable media device to the Windows PC.
2. Choose the external storage device.(Note: If you can’t find the external storage devices, you can quit the software and re-launch it.)
3. Click the “Scan” button to begin the searching.
4. Click “OK” when it finished.
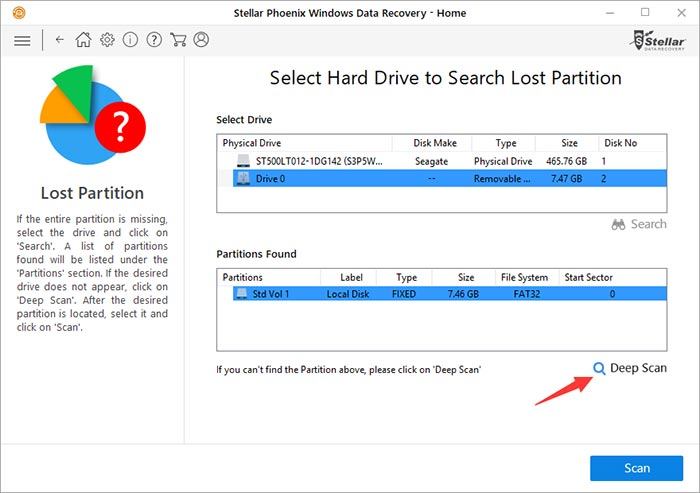
Section 3. Scan Data from Deleted Partitions
Stellar Phoenix Windows Data Recovery enables you to recover lost partitions on the hard drive disk or removable media device and recover the lost data on the partitions.
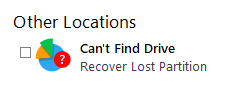
- Other Locations. You can recover lost partitions on the hard disks or the external storage devices with the steps below.
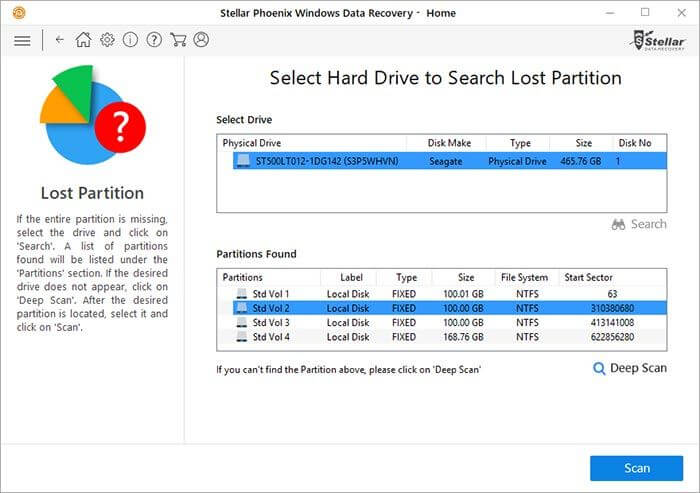
1. Choose the “Can’t Find Drive” option.
2. Click the “Scan” button.
3. Highlight the drive in the “Select Drive” box.
4. Click the “Search” icon.
5. When it finished, highlight the partition in the “Partitions Found” box.
6. Click the “Scan” button to continue with the recovery process.
7. Click “OK” when it completed.
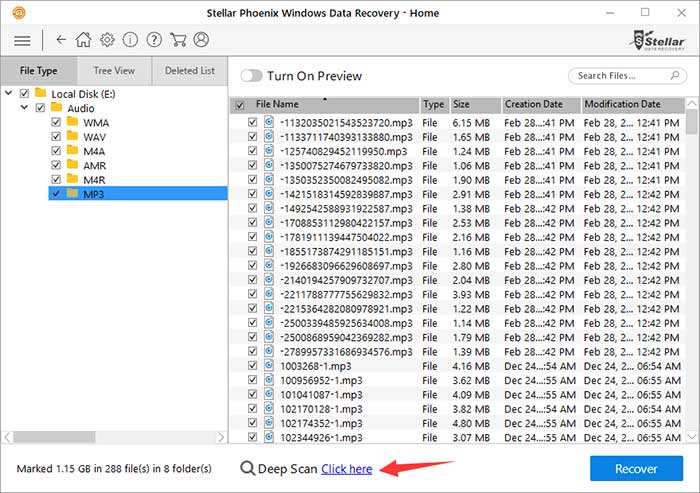
Section 4. Quick Scan & Deep Scan
The data recovery software provides two scan modes: Quick Scan and Deep Scan. The Quick Scan happens after you choose the device and click the first “Scan” button. If you can't find your desired files or partitions, you can go to the Deep Scan to perform a comprehensive scan.
- Deep Scan of the Selected Drive. Once the quick scan is completed, choose “Click Here” link at the bottom to start the Deep Scan.
- Deep Scan of the Selected Partition. For a further scanning for your desired partition in the “Partition Found” section, you can click the “Deep Scan” icon to perform a comprehensive scan lost partition.
Note: You are allowed to stop the scanning at any time just by clicking the red cross icon or the “Stop” button.
Part 2. Preview Scan Results
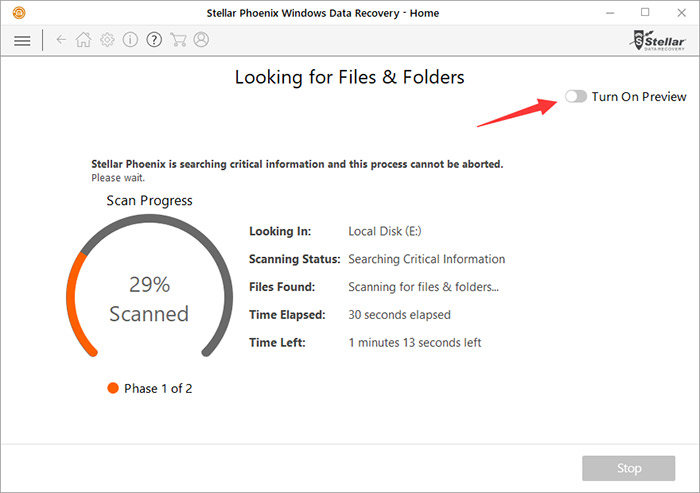
Stellar Phoenix Windows Data Recovery Home supports scan result preview after the scanning, and you can easily find the specific pictures, audio files, videos, etc. without referring to their file names.
- Turn On/Off Preview. You can enable or disable the preview feature at any time. (Note: During the scanning, it is recommended to turn off the preview to enhance the scanning speed.)
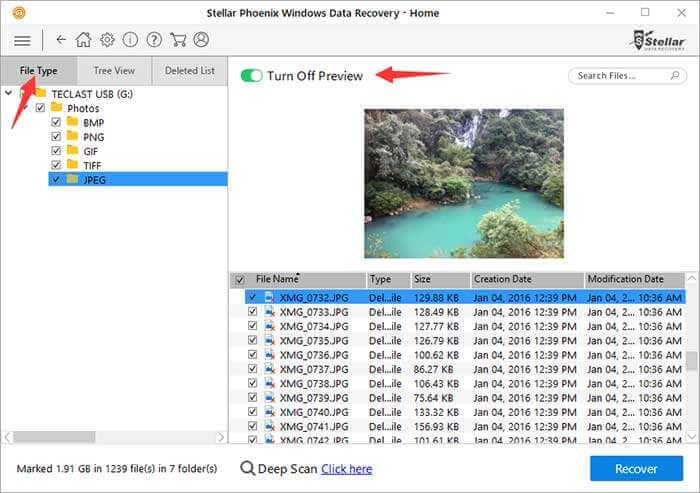
- Preview files by the File Type. You can preview your lost or deleted data by the File Type.
1. Turn on the preview feature.
2. Choose the “File Type” tab in the left pane.
3. Expand the folders listed according to their type.
4. Highlight a folder of a type to show files in the bottom right pane.
5. Highlight a file to preview the file that is preview-supported.
Note: Stellar Phoenix Windows Data Recovery Home support over 300 file types, including:
Documents Files
MDB, ACCDB, PDF, PS, CWK, FM3, FMT, WK1, WK3, WK4, DOC, DOCX, XLS, XLSX, PPT, PPTX, SDW, QXD, QXP, EPS, QBB, QBW, WPD, DOT, WBK, DOCM, DOTX, DOTM, DOCB, XLT, XLM, XLSM, XLTX, XLTM, XLSB, XLA, XLAM, XLL, XLW, POT, PPS, PPTM, POTX, POTM, PPAM, PPSX, PPSM, SLDX, SLDM, ADE, ADP, MDA, MDN, MDT, MDF, MDE, LDB, AND, ACCDR, ACCDT, ACCDA, MDW, ACCDE, LLACCDB, XPS, ODT, OTT, ODM, ODS, OTS, ODP, OTP, ODB, etc.
Emails Files
EMLX, PST, MSG, EDB, MBOX, NSF, GWI, EML, DBX, DCI, VCF, etc.
Photos Files
NEF, CRW, CR2, ORF, SR2, SRF,K25, KDC, DCR, RAF, MRW, PEF, X3F, JPEG, JPG, TIFF, TIF, BMP, GIF, PNG, XCF, PAT, ARW, DNG, PSP, PCT, RAW, MOS, PSD, EPS, INDD, ERF, FH3, FH5, FH7, FH8, FH9, FH11, MCD, VWX, MEF, WP, CDR, CPT, VSD, DWG, PGM, PPM, PCX, MNG, MSP, WMF, WPG, EMF, ANI, NRW, TGA, JP2, etc.
Audio Files
WAV, AIFF, RPS, MIDI, MID, M4A, AU, OGG, WMA, AAC, RFL, RNS, RA, RM, MP3, M3D, CDA, SND, etc.
Video Files
AVI, WMV, ASF, MP4, MOV, M4V, 3GP, MXF, MKV, MTS, DIVX, OGM, MOI, VOB, MPEG, MPG, AVS, DVM, QT, ANM, SMJPEG, SCR, FLC, CLK, ANI, FLA, SWF, FLV, M4P, etc.
Miscellaneous
MHT, MHTML, ASPX, JSP, PHP, DBF, QDG, QSD, ABD, CBK, CAS, CHM, HLP, NBP, QDF, RTF, TAX, TXT, etc.
Archive Files
ARJ, CAB, 7Z, LZA, RPM, TAR, BZ2, HQX, RAR, SIT, SITX, ZIP, etc.
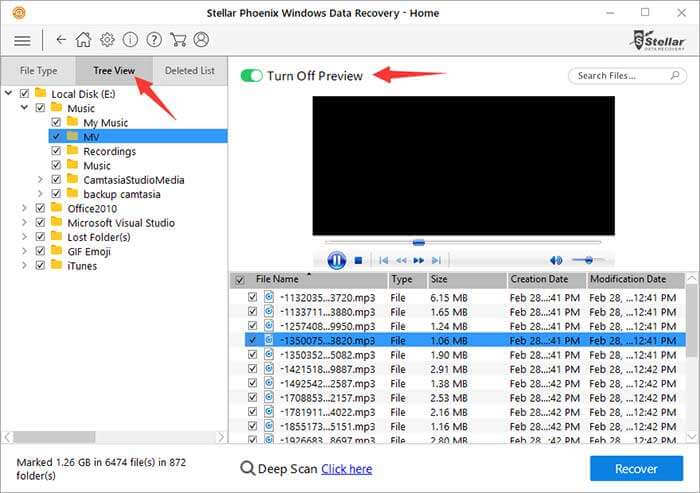
- Preview files by the Tree View. You can preview your lost or deleted data by the Tree View.
1. Turn on the preview feature.
2. Choose the “Tree View” tab on the left side.
3. Expand the folders listed in a hierarchical arrangement.
4. Choose a folder to show files in the bottom right pane.
5. Select a file to preview the file that is preview-supported.
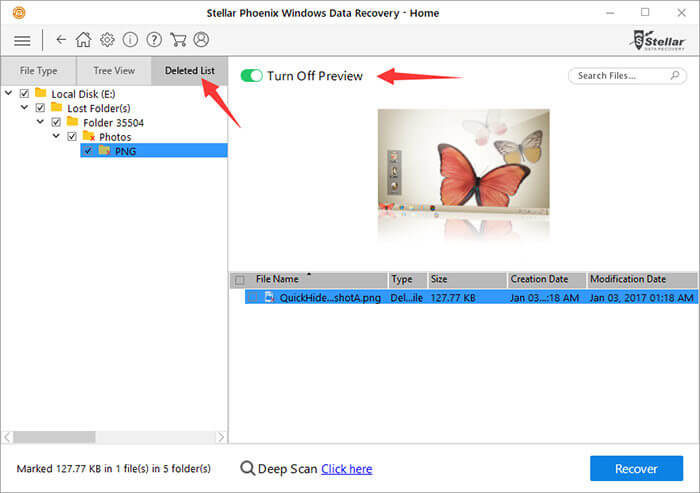
- Preview files by the Deleted List. The data recovery software also supports previewing your lost or deleted data by the Deleted List.
1. Turn on the preview feature.
2. Choose the “Deleted List” tab.
3. Expand the folders listed under this view.
4. Click a folder to show files in the bottom right pane.
5. Highlight a file to preview the file that is preview-supported.
Part 3. Recover Data or File(s)
You have the following options to recover your lost, missing or deleted data to your Windows desktop or laptop with Stellar Phoenix Windows Data Recovery application:
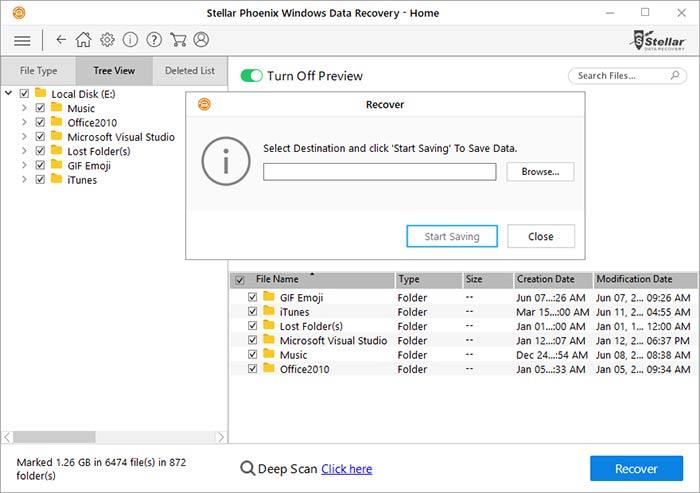
- Recover All the Files. The software allows you to recover all of the lost files once.
1. On the left side, select the root node of the drive. Or check the box beside the “File Name”.
2. Click the “Recover” button.
3. Click “Browse” to select a location on your Windows computer. Or paste a path to the bar.
4. Click the “Start Saving” button.
5. Find the recovery folder “#Root” on your PC and view the file(s).
- Recover Individual Folder(s). You can also recover the lost or deleted folder(s) that contains the files you need.
1. On the left side, select the parent folder including your desired folder(s).
2. Check the folder(s) in the bottom right pane.
3. Click the “Recover” button.
4. Click “Browser” to select a location on your Windows computer. Or paste a path to the bar.
5. Click the “Start Saving” button.
6. Find the recovery folder “#Root” on your PC and view the folder(s).
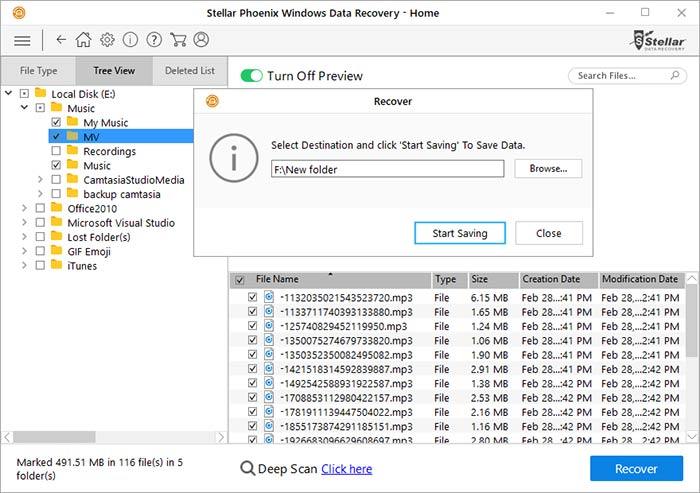
Note: If you fail to find the folder(s) among the long list, you can go to the search bar on the top right.
- Recover Specific File(s). Individual file(s) recovery is also available.
1. On the left side, select the folder including your desired file(s).
2. Check the file(s) in the bottom right pane.
3. Click the “Recover” button.
4. Click “Browser” to select a location on your Windows computer. Or paste a path to the bar.
5. Click the “Start Saving” button.
6. Find the recovery folder “#Root” on your PC and view the file(s).
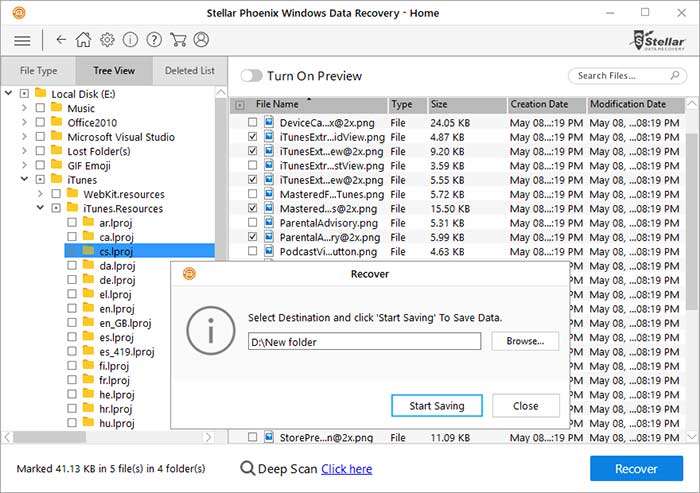
Note: If you fail to find the file(s) among the long list, you can go to the search bar on the top right.
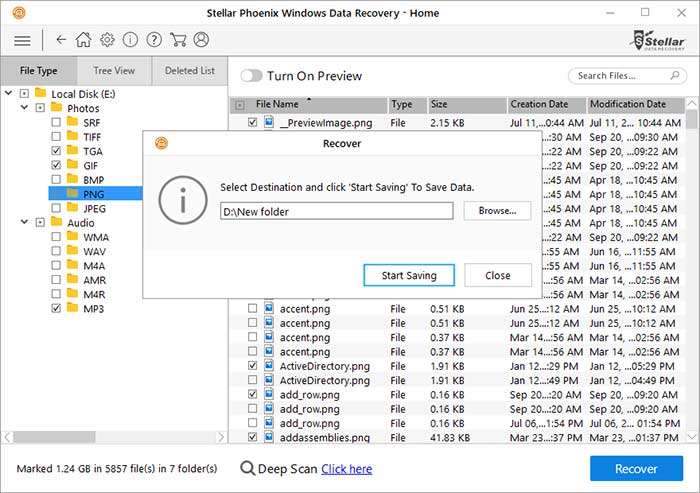
- Recover Folder(s)/File(s) by the Category. You can recover specific types of the files.
1. On the left side, choose the “File Type” tab.
2. Select the parent folder(s) including your desired file type(s).
3. Check the folder(s)/file(s) in the type in the bottom right pane.
4. Click the “Recover” button.
5. Click “Browser” to select a location on your Windows computer. Or paste a path to the bar.
6. Click the “Start Saving” button.
7. Find the recovery folder “#Root” on your PC and view the file(s).
Part 4. Save Scan Results to Recover Data Later on
Stellar Phoenix Windows Data Recovery provides the scan result save option, which enables you to resume the data recovery with the .DAT file next time so that you won’t need to spend a long period waiting for the scanning results. You can save scan result of any scanning process: complete or incomplete recovery process.
- Save Scan Results of Complete Recovery Process. To save the whole scan results, you can follow the steps below:
1. Finish a completed scanning on the software.
2. Click the “Back” icon or the “Home” icon.
3. Click the “Yes” button.
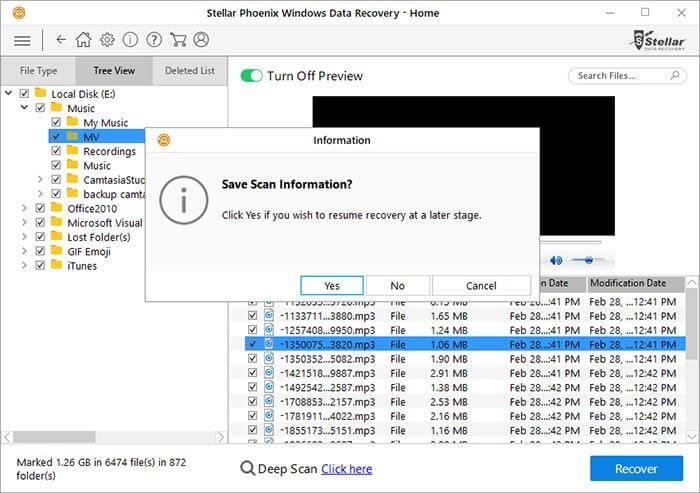
4. Select a location on your Windows PC to save the .DAT file.
5. Click the “Save” button.
- Save Scan Results of Incomplete Recovery Process. To save the incomplete recovery process, do the following:
1. Click the “Stop” during the drive Deep Scan. Or click the red cross icon during the partition scan.
2. Click the “Yes” to abort the scan.
3. Click the “Back” icon or the “Home” icon.
4. Click the “Yes” button.
5. Select a location on your Windows PC to save the .DAT file.
6. Click the “Save” button.
Note: To resume recovery scan from a .DAT file, go to Part 5 for the details.
Part 5. Advanced Settings
Stellar Phoenix Windows Data Recovery software allows you to do more management with great features in “Advanced Settings” or other configuration panels. There are seven icons on the top left of the user interface:

- Back. Click the “Back” icon ![]() to go back to the last page.
to go back to the last page.
- Home. Click the “Home” icon ![]() to go to the home page, aka the “Select What To Recovery” page.
to go to the home page, aka the “Select What To Recovery” page.
- Advanced Settings. Click the gear icon ![]() to enter the “Advanced Settings”. In the “Advance Settings”, you can manage your Stellar Phoenix Windows Recovery software:
to enter the “Advanced Settings”. In the “Advance Settings”, you can manage your Stellar Phoenix Windows Recovery software:
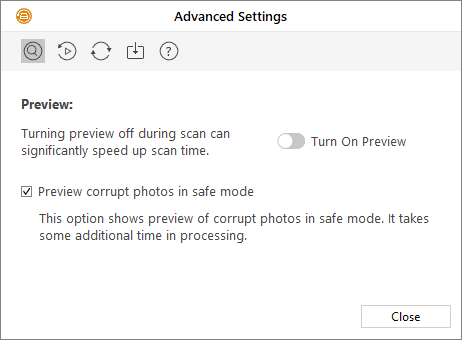
![]() Preview. Preview option allows you to apply settings for preview window of the application.
Preview. Preview option allows you to apply settings for preview window of the application.
1. Open the “Advanced Settings”.
2. Click the “Preview” icon on the top.
3. Toggle the switch to “Turn On/Off Preview” to control the scan speed.
4. Check or uncheck the “Preview corrupt photos in safe mode” to control the corrupt photos display in safe mode.
![]() Resume Recovery. This option enables you to continue your data recovery process with the .DAT file you’ve saved before.
Resume Recovery. This option enables you to continue your data recovery process with the .DAT file you’ve saved before.
1. Open the “Advanced Settings”.
2. Click the “Resume Recovery” icon on the top.
3. Click the “Add” button.
4. Select the .DAT file that contains the scan information.
5. Click the “Open” button.
6. Click the “Resume Recovery” button below to resume data recovery.
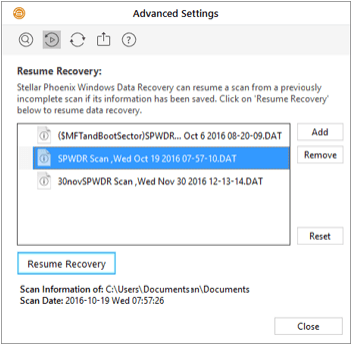
Note: You can remove the selected .DAT file from the list with the “Remove” button. Or click the “Reset” button to empty the list.
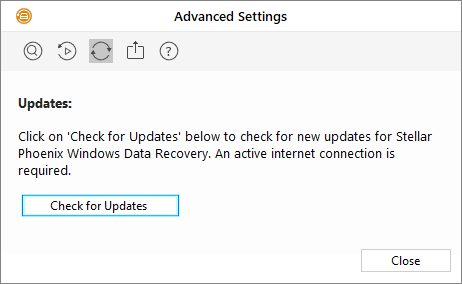
![]() Update. You can check for the latest version of Stellar Phoenix Windows Data Recovery Home with this option.
Update. You can check for the latest version of Stellar Phoenix Windows Data Recovery Home with this option.
1. Open the “Advanced Settings”.
2. Click the “Update” icon on the top.
3. Click the “Check for Updates” to see if there are updatable versions.
![]() Export License. The software allows you to export the license of the registered app to another PC.
Export License. The software allows you to export the license of the registered app to another PC.
1. Launch the FREE version of Stellar Phoenix Windows Data Recovery on your new computer.
2. Open the “Advanced Settings”.
3. Click the “Import License” icon ![]() on the top.
on the top.
4. Choose the “I want to import license from another machine”.
5. Click the “Next” button.
6. Record the “Registration ID”, which will be typed into the same bar on your original PC.
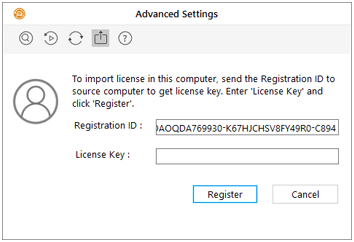
7. Launch the registered version on your original computer.
8. Go to the “Advanced Settings”.
9. Click the “Import License” icon on the top.
10. Choose the “I want to export license to other machine”.
11. Click the “Next” button.
12. Type into the “Registration ID” you got in step 6.
13. Click the “Transfer In” to generate the license key. (Note: You can click the “Save to File” to save the “Registration ID” and the “License Key”.)
14. Go to the new computer and type into the “License Key”.
15. Click the “Register” button.
16. Click “OK” to complete the activation process.

Note: Exporting the license will deactivate the software on your original computer and reactivate the product on the target PC.
![]() Help. Once you click this option, it will pop up the Help box.
Help. Once you click this option, it will pop up the Help box.
- About. Click the “About” icon ![]() to check the Stellar Phoenix Windows Recovery software information and view the user license.
to check the Stellar Phoenix Windows Recovery software information and view the user license.
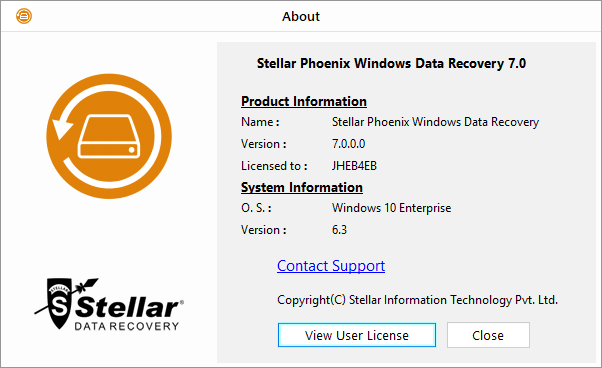
PICTURE stellar-phoenix-about-settings
- Help. Click the “Help” icon ![]() to open user help box.
to open user help box.
- Buy Online. Click the “Buy Online” icon ![]() to buy Stellar Phoenix Windows Recovery online.
to buy Stellar Phoenix Windows Recovery online.
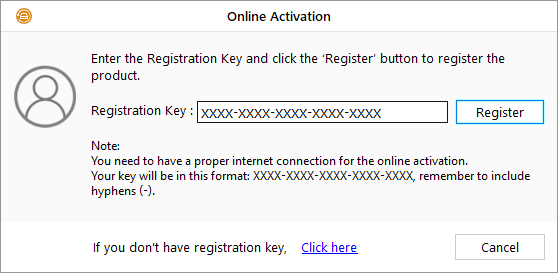
- Register. Click the “Register” icon ![]() to activate the software.
to activate the software.