Disappearing mouse pointers are a common issue in Windows 10. This article offers effective solutions to help you fix the problem quickly.
1. Update Drivers
Outdated or corrupted drivers are a frequent cause of disappearing mouse pointers. Ensuring your mouse driver is up-to-date can effectively prevent such issues. Using Driver Talent for automatic driver detection and updates saves time and reduces the risk of downloading or installing incorrect drivers.
Download the latest version of Driver Talent, install it, and open the software. Click "Scan".
Once the scan is complete, a list of missing or outdated drivers will appear. Locate the mouse driver and click "Download".

After the update is complete, restart your computer to ensure the new driver is applied correctly.
2. Check Mouse Connection
Wired Mouse: Ensure the USB connection is secure and try plugging it into another USB port.
Wireless Mouse: Verify that the wireless receiver is properly connected to the computer. Try reconnecting the receiver or replacing the batteries.
If possible, connect a different mouse to check whether the issue persists.
3. Unhide the Mouse Pointer
Press Win + I to open the "Settings" window.
Select "Devices", then click "Mouse" on the left panel.
On the mouse settings page, click "Additional mouse options".
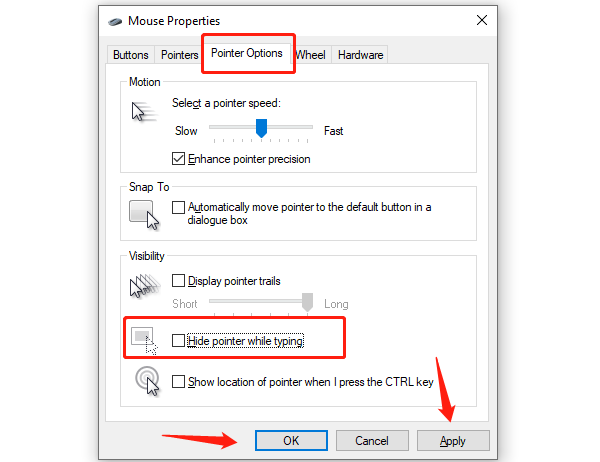
In the pop-up window, select the "Pointer Options" tab and uncheck the "Hide pointer while typing" option.

Click "Apply" and then "OK" to save the changes.
4. Repair System Files
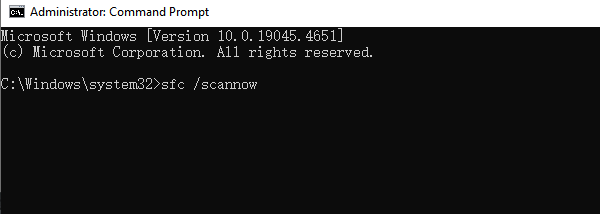
Press Win + S, type "Command Prompt", and select "Run as Administrator".
In the command prompt, type the following command and press Enter: sfc /scannow

The system will start scanning and automatically repair any errors. After the scan is complete, restart your computer.
5. Run Windows Troubleshooter
Click the Start menu and select "Settings".
In the Settings window, select "Update & Security".
From the left menu, choose "Troubleshoot".
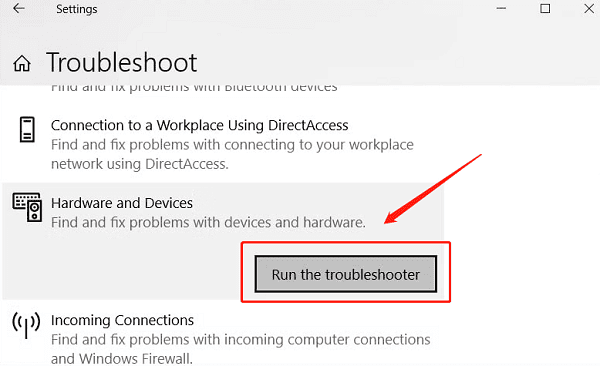
Select "Hardware and Devices" and click "Run the troubleshooter".

Follow the on-screen instructions to let the system scan and fix any potential issues.
6. Scan for Viruses and Malware
Open the Settings window and select "Update & Security".
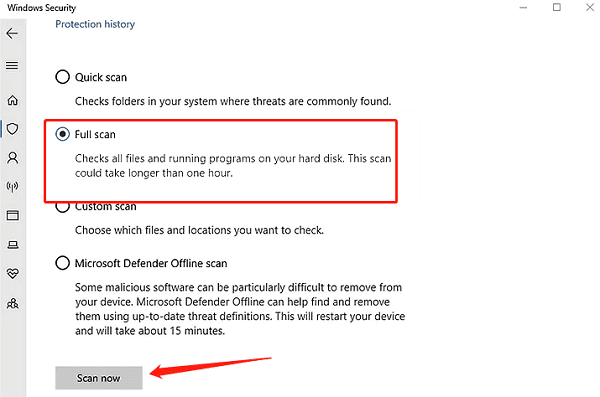
Click "Windows Security" from the left panel and then select "Virus & threat protection".
Choose "Quick Scan" or "Full Scan" to check for viruses and malware on your system.

If you use third-party antivirus software, perform a similar scan.
By following the steps outlined above, you can resolve the issue of a disappearing mouse pointer in Windows 10. If the problem persists, consider reaching out to professional technical support for further diagnosis.
See also:
How to Fix the No Audio Error on Windows 11
Resolve Modern Warfare Not Launching on PC
6 Simple Ways to Fix Valorant Stuttering


