BlueStacks is considered the best Android Emulator ever released for Windows, whose basic features are free to use and it provides android games and applications for free download.
However, by readers feedback BlueStacks crashed on Windows 11 computer. They are experiencing two types of crash issues: one is crashing with an unexpected error occurred message; the other is that it shows a blue screen of death.
First, check if the computer is suitable for installing BlueStacks.
Recommended System Requirements for BlueStacks:
OS: Windows 10 and above
Processor: Intel or AMD Multi-Core Processor with Single Thread benchmark score > 1000
Graphics: Intel/Nvidia/ATI, Onboard or Discrete GPU with benchmark score >= 750
RAM: 8GB or higher
Storage: SSD (or Fusion/Hybrid Drives)
Internet: Broadband connection
Solution1. Reset the BlueStacks
If there is an error in the configuration of the BlueStacks, you should set up the application settings including the Performance and Graphics settings of BlueStacks to fix the problem.
BlueStacks is a graphics-oriented software, so you will need a more advanced computer to run it. If it still crashes or freezes on a high-end PC, it's most likely because the computer is running out of memory, and not allocating enough RAM and CPU cores to the program. To resolve this issue, you can change the settings as follows:
1. Firstly, open the BlueStacks and press the gear button to bring up its Settings window.
2. In the Settings window, go to the Performance tab.
3. Next, under the CPU allocation option, select High (4 cores), set Memory allocation to High (4GB), and choose High Performance for Performance mode.
4. Move to the Graphics tab and change the settings as follows:
Graphics Engine: Performance
Graphics Renderer: OpenGL
Interface Renderer: OpenGL
GPU Settings: Prefer dedicated graphics (NVIDIA only)
ASTC: Hardware decoding
ASTC textures (Beta): Software decoding
5. Click the Save button
Solution2. Update Driver
As solution 1 mentioned, BlueStacks is a graphics-oriented software, so users will need a more advanced computer to run it, an outdated driver is likely to cause performance issues with BlueStacks. Hence, users need to ensure that their graphics drivers are up-to-date and they are using their latest version.
If you are not familiar with computer application settings or modifications. It is highly recommended to download the third-party driver software, Driver Talent, so as not to make your computer worse.
Driver Talent is free software for those who are affected by driving issues. Thousands of drivers are configured in the software, suitable for Windows 11, Windows 10, and Windows 8, and also suitable for desktops and laptops. Check which drivers need to be updated and which drivers can be backed up and reinstalled for free.
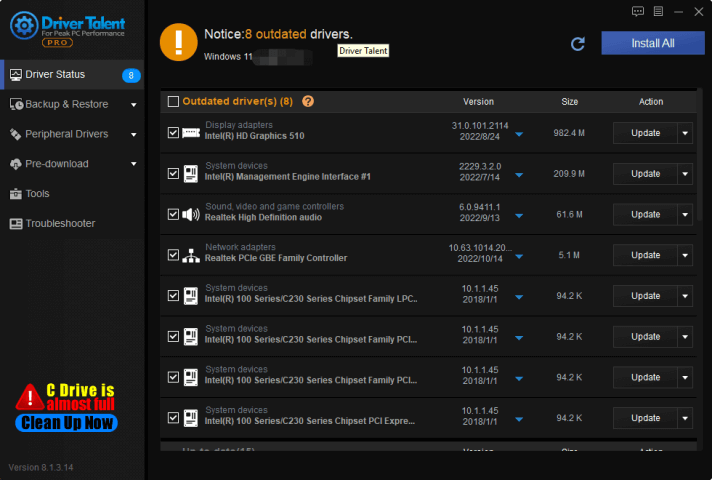
Launch Driver Talent and scan the computer.

Download the latest graphics engine, and update the graphics card driver to the latest version.
On Windows 10, Windows 11 system, you can update graphics card driver as the following steps manually:
1. Press WIN+X at the same time
2. Enter into Device Manager
3. Choose your purpose device
4. Select drivers which need to be updated
5. Select Search automatically for drivers
Solution3. Reinstall BlueStacks
Like drivers, if the software version is too old, it cannot run properly and it will crash on Windows 11 computer. Users need to make sure the BlueStacks is the latest version. If the version of BlueStacks is outdated, you may experience performance issues like crashes, freezes, etc. Therefore, please update BlueStacks to the latest version. If the installed version is already up-to-date, users should remove the BlueStacks(all relative files) from the computer and download another one.
If reinstalling BlueStacks failed to fix BlueStacks' crashing or freezing issue, users should try the next solution.
In this way, even if the installation file is damaged, BlueStacks cannot run normally, and the computer crashes or freezes, it is also useful.
Solution4. Remove Antivirus
Many problems of BlueStacks are caused by third-party virus software and its vicious competition. If there are any virus programs installed on the computer, you can try to uninstall this virus software.
To remove Antivirus software:
1. Type WIN+S together and input Control to search for the control panel
2. On the control panel, search for Programs and Features
3. Choose to uninstall a Program
4. In the Progress and Features window, right-click on any third-party antivirus program that the computer has installed. And then select uninstall.
5. Reboot the computer
After uninstalling the virus software, open BlueStacks, if it works normally, it is a software problem. If it still does not work, try the next method.
Solution5. Turn Off Hyper V Service
Many third-party virtualization applications don't work together with Hyper-V. Affected applications include VMware Workstation and VirtualBox. These applications might not start virtual machines, or they may fall back to a slower, emulated mode.
There are two ways to turn off Hyper V Service.
Method1.
1. Open the Start menu by pressing the Windows key.
2. In the search bar type CMD and click on open as administrator.
3. Now, in the space provided, type the below-mentioned code and press enter.
bcdedit /set hypervisorlaunchtype off
Method2.
1. Type WIN+S together and input Control to search for control panel
2. On the control panel, search for Programs and Features
3. Click on Turn Windows features on or off.
4. Do choose the “Windows Hypervisor Platform”, and click on OK.


