Stuck with the 0xc1900101 error when you are trying updating the Windows 10 to Windows 11 or installing the Windows 11 operating system? In fact, this error may occur at any stage of the upgrade or installation process. The error code 0xc1900101 is a generic rollback code. It suggests that there may be a missing or problematic driver causing unexpected reboots, blue screen and system hangs. This may seem complicated. Don't worry. It is not very difficult to fix. Here are 6 effective solutions to the 0xc1900101 error during Windows 11 installation.
Contents:
Fix 1. Unplug external peripherals
Fix 3. Run Windows Update Troubleshooter
Fix 4. Uninstall third-party apps
Fix 6. Disable network adapters
Fix 1. Unplug external peripherals
Occasionally, external hardware, such as speakers, headsets, USB devices, printers and so on, may trigger unknown problems and stop the installation process. Thus, you should unplug all external peripherals before starting upgrading your Windows operating system to reduce the possibility of installation errors. Once the installation is over, you can connect the external peripherals.
Fix 2. Update drivers
The 0xC1900101 Windows 11 install error is usually caused by a missing, corrupted or outdated driver. Hence, it is necessary to update the drivers on your computer to the latest versions when you encounter 0xC1900101 error. As for how to update drivers, we'd recommend Driver Talent to you. Driver Talent is a professional driver update utility that can diagnose and fix all driver-related issues in Windows by updating drivers, uninstalling drivers, reinstalling drivers or restoring drivers.
Now, click the button below to install Driver Talent.
Then, take these three steps to update your drivers.
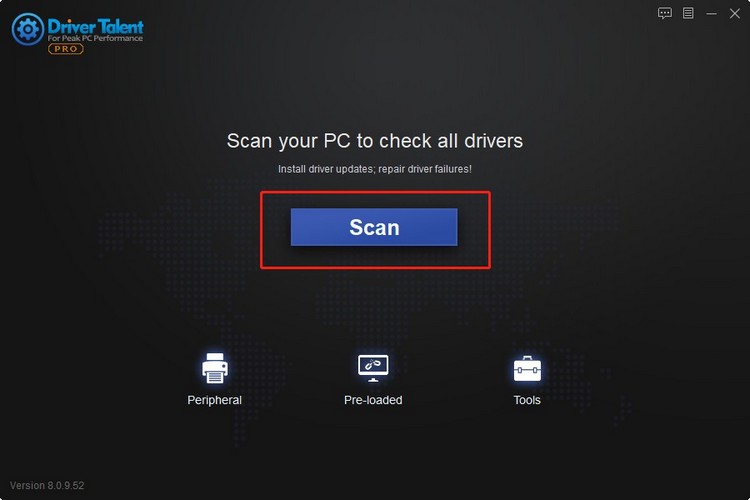
Step 1. Scan drivers on your computer.

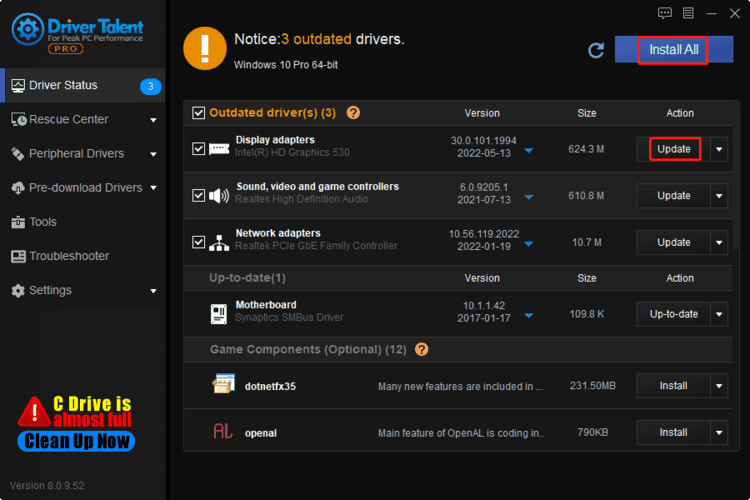
Step 2. Click the Update button beside the problematic drivers. Or more simply, click Install All to update multiple drivers all at once.

Step 3. Restart your computer.
After that, the drivers in your Windows 11 are updated, and the 0xC1900101 install problem should be resolved.
Fix 3. Run Windows Update Troubleshooter
Windows' built-in Troubleshooter can fix some known issues and bugs, so you should make use of it when you are struggle with the error code 0xc1900101 in your Windows 11. The steps are as follows:
Step 1. Open the Start menu, and select Settings.
Step 2. Click Update & Security, and select Troubleshoot.
Step 3. Choose Additional troubleshooters, and then click Windows Update.
Step 4. Click on Run the troubleshooter to resolve the problem.
Fix 4. Uninstall third-party apps
The 0xc1900101 error during Windows 11 installation can be caused by third-party apps especially non-Microsoft security suites. In this case, uninstalling the third-party applications can fix the error.
To do so:
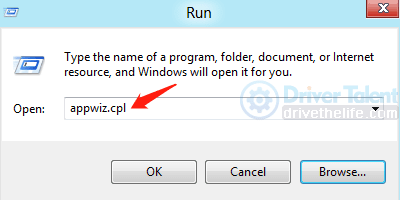
Step 1. Pree Windows and R altogether on your keyboard.
Step 2. Type appwiz.cpl in the Run box, and hit Enter.

Step 3. Find the non-Microsoft antivirus application, and right-click on it.
Step 4. Select Uninstall.
Step 5. Follow the on-screen instructions to uninstall the program.
Step 6. Repeat these steps until all third-party programs are removed.
Reboot your computer and see if the 0xc1900101 error is fixed.
Fix 5. Clean up the disk
In some cases, the 0xC1900101 error occurs because the storage space is insufficient. Many people fix the issue by cleaning the boot drive, so you can give it a shot.
Step 1. In the search box on the desktop, type disk cleanup and select it from the result.
Step 2. Choose the boot drive – the C drive – and then click on OK.
Step 3. Check the boxes before the files you want to delete, and click on OK.
Step 4. Confirm the prompt to continue.
Fix 6. Disable network adapters
The last solution to the 0xC1900101 Windows 11 install error is to disable network adapters.
Step 1. Press Windows and X altogether on the keyboard.
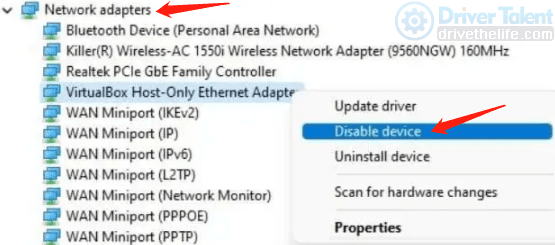
Step 2. Select Device Manager, and double-click on Network Adapters.
Step 3. Right-click on the drivers, and select Disable device.

Step 4. Repeat these steps until all drivers are disabled.
After that, restart your Windows 11 and see if the 0xC1900101 error is resolved.
Hope these 6 solutions can help you fix the 0xc1900101 error during Windows 11 installation. If you have any other ideas, please leave a message in the comments section below.
Read more:
1. Fix SYSTEM_SERVICE_EXCEPTION (dxgkrnl.sys) Blue Screen on Windows 10/11
2. How do I fix Bluetooth driver errors (Code 43) in Windows 11?
3. How to fix This Device Is Not Configured Correctly (Code 1)
4. How to Fix "Windows can't connect to this network" Error in Windows 11


