The "NVIDIA Driver not compatible with this Windows version" error is a common issue that users encounter when attempting to install or update NVIDIA graphics drivers on their Windows system. This error message indicates an incompatibility between the NVIDIA driver version and the current Windows version installed on the computer. However, there are several troubleshooting steps you can follow to resolve this problem. This article provides a comprehensive guide, comprising of 900 words, to help you fix this compatibility issue.
2. Download the Correct Driver
3. Uninstall Previous NVIDIA Drivers
4. Perform a Clean Installation
5. Disable Antivirus and Firewall
1. Verify System Requirements
The first step is to ensure that your system meets the requirements for the NVIDIA driver version you are trying to install. Check the NVIDIA website for the specific driver version and review the minimum system requirements. Verify that your Windows version is supported, and your hardware meets the necessary specifications.
2. Download the Correct Driver
Visit the official NVIDIA website and navigate to the driver download section. Make sure to select the appropriate driver for your GPU model and Windows version. Download the recommended driver to a location on your computer.
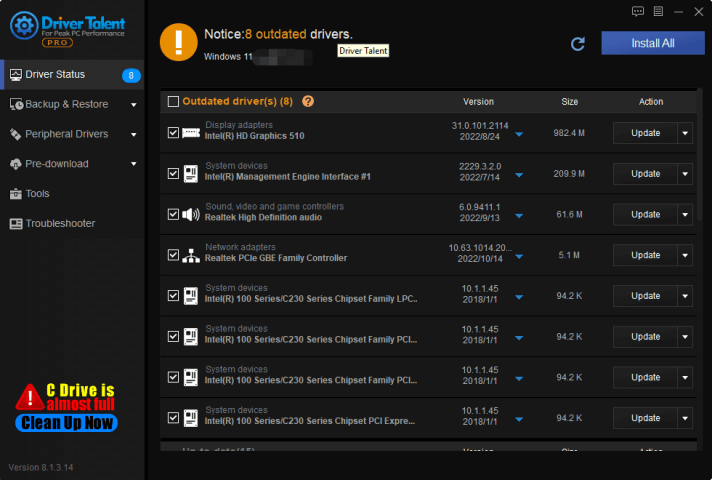
Driver Talent is a third-party driver management tool that simplifies the process of updating and downloading drivers on your Windows computer. Follow the steps below to effectively use Driver Talent:
1. Download and Install Driver Talent
2. Launch Driver Talent and Click the Scan button
After launching Driver Talent, it will automatically perform an initial scan to detect any outdated or missing drivers on your system.
3. Once the scan is finished, Driver Talent will display a list of detected driver issues.
You can view the driver status, including outdated, missing, or corrupted drivers.
4. To update a specific driver, click on the "Update" button next to it.
Driver Talent will download the latest version of the driver from the internet and install it on your computer.

3. Uninstall Previous NVIDIA Drivers
To avoid conflicts and compatibility issues, it is crucial to remove any existing NVIDIA drivers from your system before installing the new one. Follow these steps:
a. Press Win + X and select "Device Manager" from the menu.
b. Expand the "Display Adapters" category.
c. Right-click on your NVIDIA GPU and select "Uninstall device."
d. In the uninstallation wizard, check the box for "Delete the driver software for this device."
e. Click "Uninstall" to remove the NVIDIA driver completely.
4. Perform a Clean Installation
A clean installation ensures that all remnants of the previous NVIDIA driver are removed from your system. Follow these steps:
a. Restart your computer.
b. Enter "Safe Mode" by pressing F8 or Shift + F8 during startup.
c. Once in Safe Mode, run the Display Driver Uninstaller (DDU) tool to completely remove any remaining NVIDIA files.
d. After DDU completes the removal process, restart your computer normally.
e. Run the downloaded NVIDIA driver installer and follow the on-screen instructions to install the driver.
5. Disable Antivirus and Firewall
Sometimes, antivirus programs or firewalls can interfere with the installation process, falsely flagging NVIDIA drivers as potentially harmful. Temporarily disable your antivirus software and firewall before installing the driver. Remember to re-enable them once the installation is complete.
6. Windows Update/Rollback
Ensure that your Windows system is up to date with the latest patches and updates. Outdated Windows versions may cause compatibility issues with the NVIDIA driver. Follow these steps to check for updates:
a. Press Win + I to open the Settings app.
b. Navigate to "Update & Security" and select "Windows Update."
c. Click on "Check for updates" and allow Windows to download and install any available updates.
d. Restart your computer if prompted to complete the installation.
7. Update BIOS
Outdated BIOS and chipset drivers can also cause compatibility problems with NVIDIA drivers. Visit your computer manufacturer's website and check for any available updates for your system's BIOS and chipset drivers. Follow their instructions to install the updates correctly.
If the issue persists, you can try rolling back to a previous version of Windows to see if the NVIDIA driver is compatible with that particular version. However, this should be considered as a last resort, as it may cause compatibility issues with other software.
Conclusion
Encountering the "NVIDIA Driver not compatible with this Windows version" error can be frustrating, but with the right troubleshooting steps, it is possible to resolve the issue. By following the guidelines outlined in this article, you can ensure that your NVIDIA drivers are compatible with your Windows version, allowing you to enjoy optimal performance and functionality. Remember to always download drivers from official sources and regularly check for updates to keep your system running smoothly.


