Error code 12 often shows up in Device Manager after you upgraded your Windows, updated your BIOS, or made other changes to your computer. The full error message is “This device cannot find enough free resources that it can use. (Code 12) If you want to use this device, you will need to disable one of the other devices on this system.”

It is quit annoying when you are encountering this error. However, it is good news that you can fix it easily. Before going through the solutions, let’s take a look at its causes. Below are some of the common causes of code 12 error.
1. Two devices that are installed on your computer have been assigned the same I/O port.
2. Multiple devices are allocated to the same DMA (Direct Memory Access) channel.
3. BIOS did not allocate sufficient resources to a device.
4. Outdated, missing or corrupted device driver.
5. Faulty hardware.
How to Fix Error Code 12 on Windows 10, 8.1/8, 7, and Windows Vista
The device error 12 may disable the ability of your graphics card, network adapters, sound devices and any other hardware devices. To resolve this issue, let’s go from the most common solutions.
Solution 1 - Run Microsoft Troubleshooter
It is a common resolution of Windows issues recommend by Microsoft. For Windows 7 and Windows 8.1, run the hardware devices troubleshooter provided by Microsoft.
For Windows 10, it is recommend to update your device driver (Refer to solution 2).
Solution 2 - Update the Device Driver
For Windows 10, you can update drivers through Windows Update.
1. Search “Windows Update” from Start menu.
2. Press Enter to launch the Windows update program. It will automatically check your Windows update including driver update.
3. If there is any update available, just click “Update” to complete it.
For any other Windows such as Windows 8.1/8, Windows 7, and Windows Vista, you can update the drivers by the following methods.
Note: The methods below is also applied to Windows 10.
Update Driver Manually
You can find drivers from vendor’s website and manually download, and install it on your computer. Please make sure you are installing the compatible driver for your Windows version, or it may bring new problems to your hardware.
If you are not sure which driver is to install, you may use driver update software to automatically find and install compatible driver for your hardware.
Update Driver Using Driver Update Software
Let’s take Driver Talent as the example to show you how to use driver update utility to install device drivers automatically.
Step 1: Download Driver Talent, and install it on your computer.
Step 2: Launch it, and click “Scan” button to check your device drivers.
Step 3: Locate the device in question to see if there is any update or repair for the driver. If yes, click the Repair or Update button. If no, the driver updating solution may not help as to the code 12 error. You can also try to reinstall the driver to see if it works.
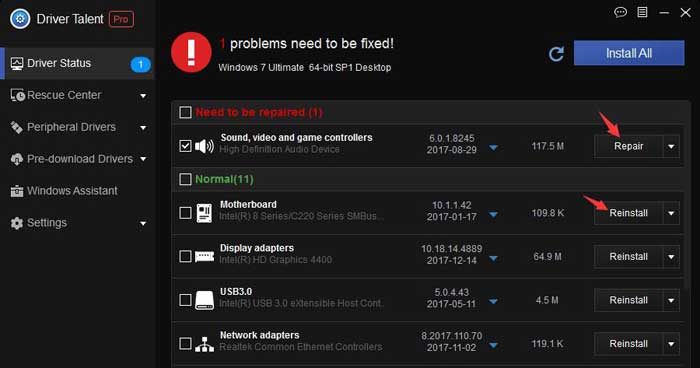
Step 4: If you are prompted to restart your computer after driver update, just do it.
Solution 3 - Change BIOS Settings for GPUs
If you are using multiple GPUs, it is likely that you will run into this issue. Follow the steps below to access and change your BIOS settings.
Step 1: Turn off your computer.
Step 2: Turn on your computer and press BIOS Setup key to enter BIOS settings before it enters the Windows system.
Note: The BISO Setup key will be different from different computer brands and models. Common keys to enter BIOS are F1, F2, F10, Delete, Esc, as well as key combinations like Ctrl + Alt + Esc and Ctrl + Alt + Delete. If you are not sure how to enter BIOS settings, please search it on google with the keywords “BIOS Setup Key for XXX (the exact model of your computer or motherboard manufacture)”. Here is a guide to enter BIOS settings for Lenovo laptop.

Step 3: When you are in the BIOS utility, you need to change the option of “Top Of Lower Usable Dram”. It is located under different tabs according to different computer manufactures. However, it is usually located under the Advanced tab or Memory management. If you are not sure of it, search it on google for the exact answer or look through the utility by yourself.
Step 4: Once you located it correctly, check the option button. If it is set to Automatic, please change it to “3.5 GB”.

Step 5: The next option you should change is “Above 4G Decoding”. As with the option “Top Of Lower Usable Dram”, it is also located under different location in the BIOS utility. You need to look it according to your computer manufacturer.
Step 6: When you located the “Above 4G Decoding” option, change it to “Enabled” if it is Disabled.

Step 7: When done, exit the BIOS utility by clicking “Exit and Save” or so. Then it would proceed to the system.
Solution 4 - Fix Registry Entries
Warning: Incorrectly editing registry keys would do an irreversible damage to your system. So it is highly recommended to backup the registry before you do any changes to it. To backup the whole registry, follow the steps below:
Step 1: Search for “regedit” from Start menu.
Step 2: Locate the Regedit editor, right click to choose “Run as administrator”. (If you are running your computer as administrator role, just skip this step)
Step 3: After opening the regedit editor, right click “Computer” on the top of the window, and choose “Export”.

Step 4: Save the file to a specified location. It is a .reg file.
Note: If you need to restore the registry from a backup, just right click File and choose “Import”, chose the backup file that you saved before.

After you backed up the registry, follow the steps below to make changes to it.
Step 1: In the regedit editor you opened in the above, navigate to the following path: HKEY_LOCAL_MACHINE\SYSTEM\CurrentControlSet\Control\PnP\Pci
Step 2: Right click the Pci key (Please note it is not CardList key), choose New >DWORD (32-bit) or DWORD (64-bit) depending on your system bit level.
Step 3: Rename the new value to “HackFlags”.
Step 4: Right click HackFlags, choose “Modify” and set Value data to 600, choose “Hexadecimal” as the Base option. Click OK to save the settings.

Step 5: Restart your computer to see if the code 12 error still persists.
Solution 5 - Update Your BIOS
Sometimes, after you are struggling much with this code 12 error, it is proved that updating to the latest version of BIOS is the quick resort.
Refer to this article to learn how to update your BIOS for different computers.
Solution 6 - Undo Recent Changes
If the error occurred after you made some changes, it is probably the change resulted to the error. Just undo the changes. To undo the changes, you can manually revert it to the previous state if possible. Or you may need to use system restore if you have created system restore point before.
Refer to this article to learn how to fix Windows issues using system restore.
Solution 7 - Update/Reinstall Your Operating System
If you are not running the latest version of Windows, try to update to the latest. If you are runing on the latest version, please reinstall it.
Solution 8 - Replace Your Hardware
If you have tried all the methods above and none of them worked, you may try to replace the hardware. You can send your computer to a repair store or contact the vendor for help.
If you discovered other fix, please don’t hesitate to share with us in the comments below.


