Lenovo Dock Manager is a powerful utility designed to help users keep their Lenovo docking stations running smoothly. It provides automatic firmware updates, real-time dock status monitoring, device compatibility checks, and centralized management for IT environments. Whether you're using a ThinkPad or another supported Lenovo system, this guide will show you exactly how to use Lenovo Dock Manager effectively.
Connect Your Lenovo Dock Properly
To ensure proper detection, connect your docking station correctly.
Plug the dock's power adapter into a power source
Use a USB-C or Thunderbolt cable to connect the dock to your laptop
Connect your external monitor(s), keyboard, mouse, Ethernet cable, and any other devices to the dock
Once everything is plugged in, Lenovo Dock Manager should automatically detect your docking station

How to Use Lenovo Dock Manager
Follow these steps.
Launch Lenovo Dock Manager
You can open the application in two ways:
Go to Start Menu → Lenovo → Lenovo Dock Manager
Search for "Dock Manager" using the Windows search bar
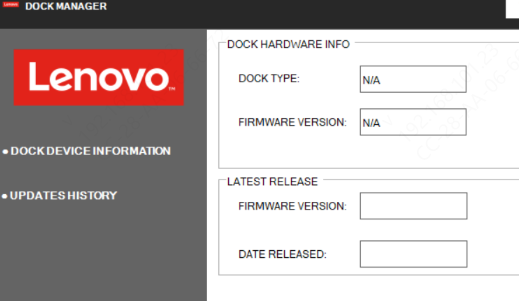
Once opened, you'll see an overview of your dock, including firmware version, connected devices, and power delivery information.
Check Dock Status and System Information
Inside Lenovo Dock Manager, you can review important information such as: Dock model and serial number, Power delivery status, Connected monitors and resolutions, USB port activity, Wired network (Ethernet) status and Installed firmware version
This dashboard helps you quickly identify whether everything is functioning correctly.

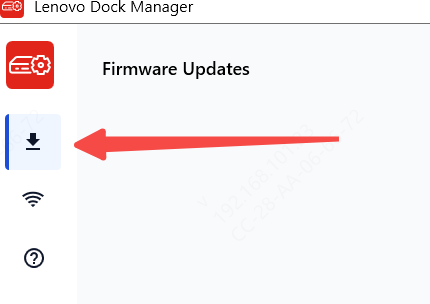
Update Dock Firmware Using Lenovo Dock Manager
One of the key features of Lenovo Dock Manager is automatic firmware updates.
Open Lenovo Dock Manager
Click Update to start the process
Do not disconnect your laptop or dock during the update
Wait until the firmware installation is complete
After completion, the dock may restart automatically
Customize Dock Manager Settings
Lenovo Dock Manager allows you to configure various settings depending on your needs.
Automatic firmware updates – Enable or disable
Update notifications – Choose to be alerted before updates
Dock-only update mode – Only update when docked
Enterprise control policies – For IT-managed environments
These settings help you take full control of dock behavior and update timing.

Boost Stability: Use a Driver Update Utility
Docking failures are often caused by outdated USB, Thunderbolt, display, or network drivers. To avoid issues such as monitor not detected, unstable docking performance, or failed firmware updates, using a dedicated driver update utility is highly recommended.
Download Driver Talent X
Click the Download button to get the installer, then run the setup file to complete the installation on your computer.
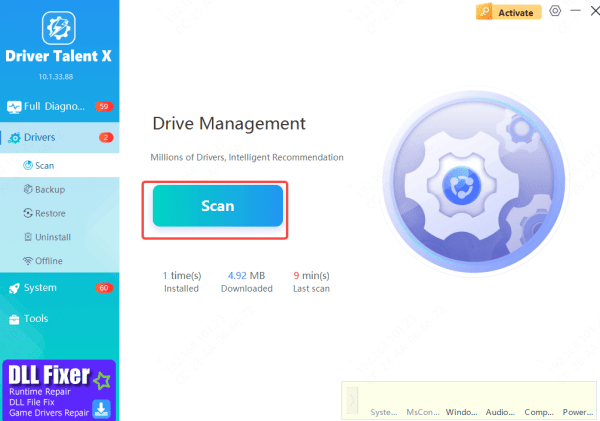
Run a System Scan
Launch the program, navigate to the Drivers section, and select Scan to detect outdated, missing, or corrupted drivers on your system.

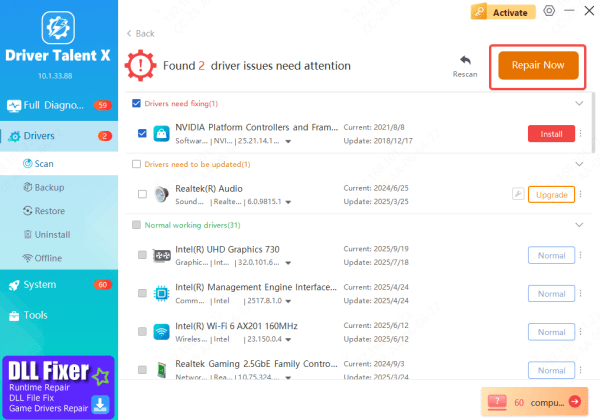
Update All Outdated Lenovo Drivers
Press Upgrade or Repair Now to automatically download and install the latest driver versions for all affected components.

Restart Your PC
Reboot your computer to finalize the updates. This ensures all docking components function properly with Windows.
Conclusion
Lenovo Dock Manager helps ensure your docking station stays updated, compatible, and stable by monitoring device health and applying necessary firmware updates. Regular checks can prevent most display, power, and connectivity issues. For even better stability, using a driver update utility like Driver Talent X keeps essential USB, Thunderbolt, display, and network drivers optimized. By combining Lenovo Dock Manager with an automated driver updater, you can maintain a reliable, high-performance docking setup suitable for both home and professional use.


