How to Fix Windows 10 High CPU Usage after Creators Update
Jun. 23, 2022 / Updated by Wendy to Windows 10
Many users recently encountered Windows 10 high CPU usage after Creators Update or the Windows 10 Fall Creators Update, which slower the computer performance with symptoms like 80% or even 100 disk usage in Task Manager.
Common Causes for High CPU Usage after Windows 10 Creators Update/Fall Creators Update
As for the causes of the high RAM usage on Windows 10 Creators Update, the following severals are the key reasons for the Windows 10 excessive memory usage after installing Creators Update.
• Windows 10 memory leak after Creators Update.
• Driver incompatibility issues after Creators Update.
• Redundant startup applications.
• Other causes.
Top 6 Ways to Fix Windows 10 High CPU Usage after Windows 10 Creators Update
If you happen to get trapped in a poor and slow performance computer with Windows 10 excessive CPU usage and want to decrease RAM usage, below are top 6 Windows 10 high CPU usage fixes to help you free up high RAM in Windows 10 Creators Update.
1. Disable Superfetch Service
Superfetch service has been reported by many Windows 10 users as a likelihood causing of high disk performance or CPU usage issues after Creators Update. Follow the instructions below to stop the Superfetch service.
Step 1. Click the Start button and then type cmd.exe in the search box.
Step 2. Right-click Command Prompt and choose Run as administrator.
Step 3. Click Yes to continue on the prompt UAC window.
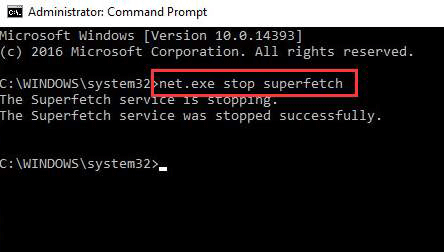
Step 4. Type the command net.exe stop superfetch and then hit Enter.Wait for the system to stop Superfetch service for you. You could see the results as below picture shows once it is stopped successfully.
2. Registry Hack to Troubleshoot High CPU Usage after Windows 10 Creators Update
It is approved by many users that high memory usage on Windows 10 can be relieved by the registry hack, below is how.
Step 1. Press Windows shortcut keys Win + R and then type in “Regedit” and then hit Enter.
Step 2. Follow the path:
“HKEY_LOCAL_MACHINE\SYSTEM\CurrentControlSet\Control\Session Manager\Memory Management”
Step 3. Find “ClearPageFileAtShutDown” and set its value to 1.
Step 4. Restart the computer to see whether the excessive CPU usage lower down.
3. Disable Startup Programs
Too many fast startup applications can undoubtedly lead to sluggish PC performance. Follow the tutorial guides to disable the fast startup.
Step 1. Go to Start ->Control Panel ->Power options, and then select "Choose what the power button does"
Step 2. Choose "Change settings that are currently unavailable".
Step 3. Unmark the checkbox "Turn on fast startup" and then click the Save changes button.
To vacate more available CPU space and speed up your computer, you could also try the following tricks.
Step 1. Press Win + R and then type in msconfig to open the Task Manager window.
Step 2. Click on the “Startup” tab and you will see a list of programs that run at startup.
Step 3. Right click on the applications that needn’t to be run at startup and select “Disable”.
4. Update Drivers for Windows 10 Creators Update
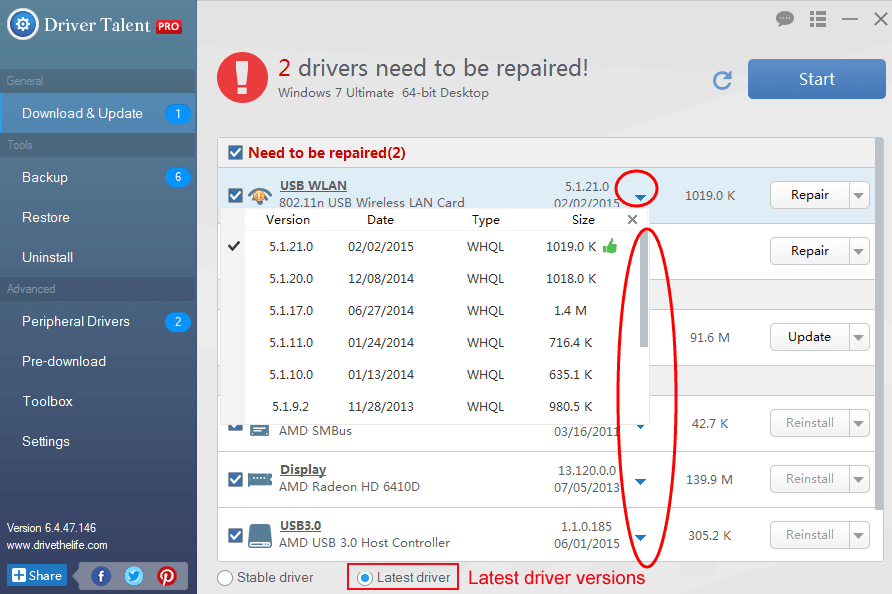
As we mentioned above, the drivers can be outdated or faulty after Windows 10 Creators Update which leads to the computer issues like installation stuck, black screen or blue screen and high CPU usage. To update all your drivers in a quick and safe way, you might as well try a professional one stop driver updater utility, such as Driver Talent, an automatic driver updater to update you the latest graphics drivers since Windows may fail to offer the latest driver version.
Click the button below to grab Driver Talent instantly.
Step 1. Click “scan” to let Driver Talent identify all the incorrect drivers installed on Windows 10 Creators Update.

Step 2. Click “Download” or “Update” to install the best-matched drivers to resolve the Windows 10 high memory malfunction after Creators Update.
Notes:Backup your drivers in advance in case you may need to roll back drivers in the future. And it is not recommended update what aren’t broken.
Step 3. Reboot your computer to make the newly updated drivers come into effect.
5. Disable Windows Search Service
Windows search service takes up too much disk usage sometimes. To disable it, perform below steps.
Step 1. Type cmd.exe in the Start search box. And then right-click on Command Prompt, choose Run as administrator.
Step 2. Click Yes at the UAC window prompt.
Step 3. Type in the command: net.exe stop "Windows search" and then hit Enter.
6. Scan for Possible Viruses and Malware
Viruses and malicious software often cause various computer issues, high disk usage error included. You’d better make a thorough malware detection for your computer to check if that helps to troubleshoot excessive CPU usage and free up Windows 10 RAM.
Read More:
Top 7 Ways to Fix WMI Provider Host - High CPU Usage in Windows 10
How to Fix High CPU Usage after Windows 10 Fall Creators Update
Top 10 Ways to Fix High CPU/RAM/Memory Usage after Windows 10 Update
Fix Windows 10 High Memory Usage/Leak after the Creators Update
Fix WMI Provider Host High CPU Usage after Windows 10 Creators Update
If you have other workarounds on how to fix Windows 10 high CPU usage after Creators Update/ V1709 Fall Creators Update, please share with us in below comment section or go to our OStoto official forum for further discussion.

|
ExplorerMax |

|
Driver Talent for Network Card | |
| Smart and advanced file explorer tool for Windows platforms | Download & Install Network Drivers without Internet Connection | |||
| 30-day Free Trial | Free Download |


