“Probably once a month I experience File Explorer closing on its own. I'll reopen it and it will only stay open for a matter of seconds. It will do it again and again. I've even tried restarting my computer and it will still do it.” – Quoted from Reddit
After install Windows 10, many users have been bothered by File Explorer crashing issue. When the File Explorer keeps crashing, it’s really annoying. If you are looking for solutions to this issue, you are in the right place. Below are some tricks for you to fix the File Explorer keeps crashing issue on Windows 10.

See Also:Fix: File Explorer not Working on Windows 10
Method 1. Run Autoruns to Fix the File Explorer Crashing Issue
Autoruns is a utility to show you what programs are configured to run during system bootup or login and when you start the built-in Windows applications like Internet Explorer and Explorer. It’s reported that disabling some third-party software in it would help troubleshoot the File Explorer crashing issue. To do this, follow these steps:
Step 1. Click here to download Autoruns.
Step 2. Run Autoruns as administrator.
Step 3. Click on Options from the top menu bar and check Hide Microsoft Entries.
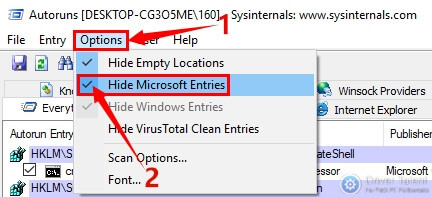
Step 4. Get to the Explorer tab and uncheck all the entries under it.

Step 5. Reboot your computer.
Method 2. Clear File Explorer History to Resolve the Issue
The second solution to the File Explorer keeps crashing issue you can try is to clear the File Explorer history. Take the steps below.
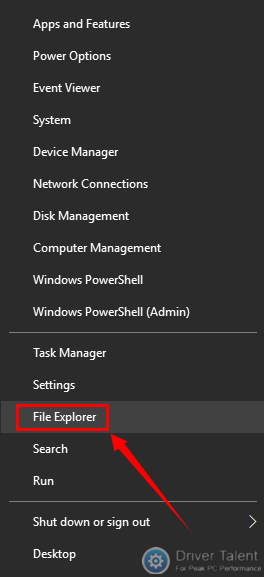
Step 1. Right click the Start button and select File Explorer to launch it.
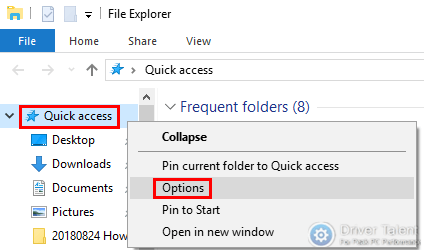
Step 2. Right click Quick access and select Options.
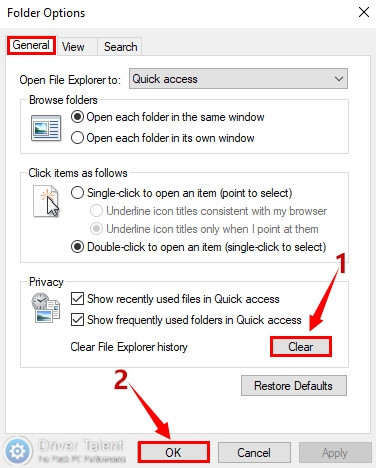
Step 3. Get to the General tab, click the Clear button under Privacy to clear the File Explorer history. And then click the OK button to save the change.
Now launch the File Explorer again to see whether the issue has been resolved.
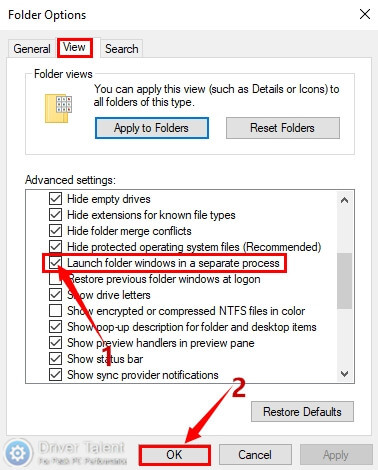
Method 3. Launch Folder Windows in a Separate Process to Fix the Error
This is another solution recommended to fix the File Explorer crashing error. Do as follows:
Step 1. Right click the Start button and select File Explorer to launch it.
Step 2. Right click Quick access and select Options.
Step 3. Get to the View tab, check Launch folder windows in a separate process in the Advanced settings and click the OK button to save the change.
Method 4. Reset the Winsock Catalog to Get Rid of the Issue
To get rid of the File Explorer crashing issue, you can also try to reset the Winsock Catalog. Take these easy steps:
Step 1. Run Command Prompt as administrator.
Step 2. Type the “netsh winsock reset” command into the window and hit Enter to run it.
Step 3. After the command is executed successfully, restart your computer to complete the reset.
Method 5. Update the Display Driver to Troubleshoot the Issue
If the File Explorer crashing issue still exists after you try all the methods above, maybe updating the display driver can work. These posts are for your reference:
Download and Update Graphics/Display/Video Driver for Windows 10
Free Download/Update Graphics Driver, Video Card Driver, Monitor Driver, Display Card Driver
Toshiba Graphics/Video/Display Drivers Download and Update on Windows 10, 8.1, 8, 7, Vista, XP
Above are all the tricks we find to fix the File Explorer keeps crashing issue on Windows 10. If you know better methods of addressing this issue, share them with us in the comment section below. We would appreciate it. For more solutions to other computer issues, you can click here.


