Fix: Safely Remove USB Icon Shows with 3 Dots on Windows 10
Jun. 23, 2022 / Updated by Helia to Windows 10
“The Safely Remove Hardware icon has been there with 3 dots and the 'Open Devices and Printers' option on my Windows 10. I have no external USB devices plugged in at the moment except my mouse.”
“In Win 10 the Eject Button keeps staying at the taskbar, if you don't have anything removable plugged in you will only see three dots under that.”
“The ‘Safely Remove Hardware and Eject Media’ icon shows and won't go away. I've had Window 10 for a few days and the icon has been there from the beginning.”
“After the Windows 10 update, I get the Safely Remove Hardware icon with nothing plugged in, and it shows 3 dots.”
“These devices show up in "Safely Remove Hardware and Eject Media" after I wake my laptop from sleep, even though I don't have any peripherals connected.”
Have you also got the notification of the “Safely Remove Hardware” icon on your Windows 10 desktop or laptop? The notice keeps asking you to eject USB device even if you have no USB or peripheral devices plugged in.
![]()
This problem often occurs after you install fresh Windows 10 or update the OS to the latest Windows version, like Windows 10 Creators Update or the Anniversary Update. When you’re using the PC, the “Open Devices and Printers” notice will pop up with 3 dots or some devices. If you click on the popup, there's no USB device to remove or the PC won’t recognize any hardware device, instead, it will direct you to the Devices and Printers. If you plug in any peripheral device, the eject button appears normally.
Are there any solutions to fix such “Safely Remove Hardware icon keeps showing up on Windows 10” issue?
Top 5 Ways to Fix Safely Remove Icon Showing on Windows 10 but No USB Device Connected
In this Windows 10 guide, we'll walk you through top 5 ways to troubleshoot the eject button problem and put your Windows 10 desktop or laptop on the right path. The methods below may take you minutes to hours to fix the “Safely Remove Hardware and Eject Media” icon problem. You can try them one by one until the computer gets back to the track.
Way 1. Turn on Windows Explorer (Safely Remove Hardware and Eject Media) on Windows 10 Settings
Go to the Windows Settings to check if the Windows Explorer switch has been toggled to the On position.
1. Use Windows shortcut keysWin + I to launch the Settings.
2. Go to the System menu. (For Windows 10 Creators Update users, go to the Personalization menu.)
3. Click the Notifications & actions. (For Windows 10 Creators Update users, click the Taskbar.)
4. On the right side, click the Select which icons appear on the taskbar.
5. Navigate to the Windows Explorer (Safely Remove Hardware and Eject Media) and toggle the switch to ON. If it has been turned on, you can turn it off and then turn it on again.

Now restart the computer to see if the “Safely Remove Hardware” eject button problem still persists when you plug no USB device. If so, go on the reading.
See Also:Top 5 Methods to Troubleshoot “Windows Explorer has stopped working” Error
Way 2. Uninstall the Virtual CD/DVD-ROM and Fix the Safely Remove Hardware Icon Problem
If you’ve installed any virtual CD/DVDROM recently, you need to uninstall it in Devices and Printers.
1. Click the Safely Remove Hardware icon you get on the taskbar.
2. Select the Open Devices and Printers.
3. Right-click the virtual CD/DVD-ROM you’ve created and select the Remove device.
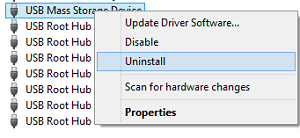
Way 3. Disable the Extra USB Mass Storage Devices to Solve the Safely Remove Hardware Icon Issue
If there are extra USB mass storage devices on the Windows 10, the Safely Remove Hardware notification with the dots may keep popping up and annoy you. So remove the USB devices in the Device Manager to solve the problem.
1. Use Windows shortcut keysWin + X to launch the Jump List.
2. Select the Device Manager.
3. Go to the View menu and check Show hidden devices.
4. Expand the Universal Serial Bus controllers entry.
5. Right-click the unnecessary USB Mass Storage Devices and select Disable device. You can also uninstall those hidden USB Mass Storage Devices.
Way 4. Install the AHCI Driver to Fix the Safely Remove Hardware Notice Problem
After the Windows 10 update, some of the Windows drivers may not be updated to the latest versions that are compatible with the OS. Outdated or incompatible AHCI drivers can cause the popup of the Safely Remove Hardware notice issue, and users will see the dots and “Open Devices and Printers” without plugging any USB devices.
See Also:
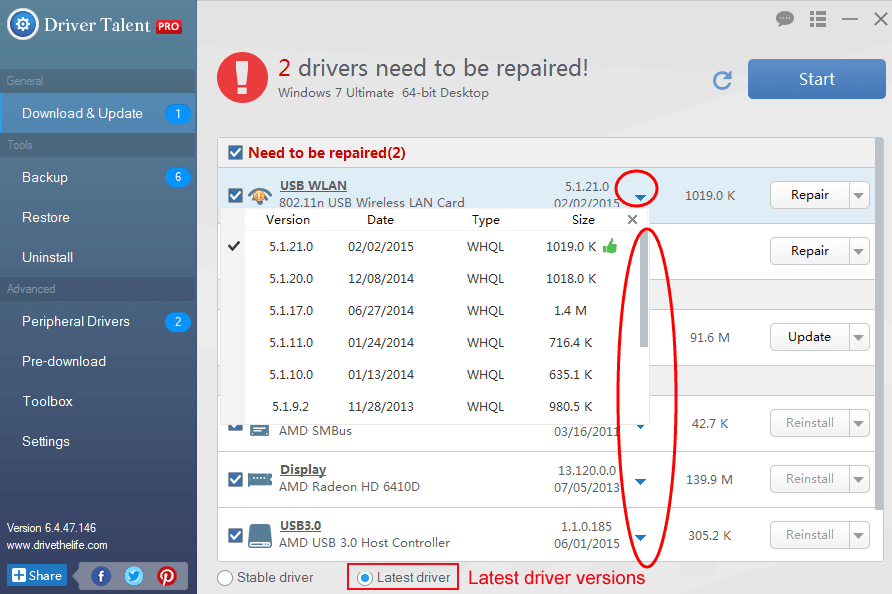
In this case, it’s better to use Driver Talent to fix the AHCI driver problem and get the USB eject notification back to track. Driver Talent is the professional Windows driver download and update utility and offers the latest official and WHQL AHCI drivers.
You can click the button below to update the driver.
1. Click Scan to detect faulty drivers on your Windows 10 computer.
2. Click Update to download and install proper AHCI driver. Or click Repair to fix driver issues.
3. Perform a restart to make the driver changes take effect.
Note: Don’t forget to backup all the drivers and create a system restore point before any system changes so that you can restore the system and the drivers when the computer runs into problems.
Way 5. Modify the Registry and Troubleshoot the USB Eject Button Issue
You can also fix the Safely Remove USB ejection problem via modifying the registry. (Note: Registry Editor is a database storing a massive collection of important Windows data, it’s necessary to backup registry before any changes in case other serious problems occur, like random restarts, blue screen, black screen, etc.)
1. Use Windows shortcut keysWin + R to launch the Run.
2. Type into regedit.
3. Hit the Enter.
4. Navigate to the following key:
HKEY_LOCAL_MACHINE\SYSTEM\CURRENTCONTROLSET\SERVICES\NVATA (Note: If you can’t find NVATA, then go to HKEY_LOCAL_MACHINE\SYSTEM\CURRENTCONTROLSET\SERVICES\NVATABUS)
5. Right-click the NVATA (or NVATABUS) and select New.
6. Select DWORD Value.
7. Rename the new value as DISABLEREMOVABLE.
8. Double-click DISABLEREMOVABLE and change the value to 1.
9. Click OK.
10. Restart the PC.
![]()
After that, Windows 10 won’t recognize the SATA hard drive disk as the removable device, and the Safely Remove Hardware icon will disappear and won’t affect other peripheral devices. (Note: If you find neither the NVATA nor the NVATABUS, you may need to reinstall the motherboard driver.)
Hope this post can help you remove the Safely Remove Hardware notification after the Creators Update. If you still can’t solve the “Safely Remove Hardware” icon issue or the USB eject button issue, you can comment below or check for other solutions on OSToto Official forum.

|
ExplorerMax |

|
Driver Talent for Network Card | |
| Smart and advanced file explorer tool for Windows platforms | Download & Install Network Drivers without Internet Connection | |||
| 30-day Free Trial | Free Download |


