It's frustrating to encounter the Windows 10 automatic repair loop issue. After upgrade to Windows 10, you receive the error message that "Automatic Repair couldn't repair your PC. Your PC did not start correctly, press 'Restart' to restart your PC, which can sometimes fix the problem. You can also press 'Advanced options' to try other options to repair your PC or 'Shut down' to turn off your PC". Here are top 6 solutions to help you fix the automatic repair loop problem on Windows 10, also applied to Windows 10 Creators Update and Windows 10 Fall Creators Update.

Top 6 Methods to Fix Windows 10 Automatic Repair Loop Issue
To fix the Windows 10 automatic repair loop issue, please try any of the following 6 troubleshooting methods, applied to all laptops, desktop PCs, or notebook computers, including Asus, Acer, Dell, Gigabyte, Lenovo, HP, ThinkPad, Toshiba, IBM, Microsoft, MSI, Sony, Gateway, Samsung, etc.
1. Update Device Drivers to Fix Windows 10 Automatic Repair Loop Problem
It has been proved by many Windows 10 users that corrupted or damaged device drivers could cause the “Windows 10 Automatic Repair couldn’t repair your PC” error. Therefore, you need to download and install the right device drivers for your computer.
The easy-and-quick method to download and install Windows 10 drivers is using Driver Talent. It is a widely-used, professional and automatic drivers updater utility, which could identify your outdated, missing, corrupted, damaged or broken device drivers in seconds, and then download and install the best-matched Windows 10 drivers to repair your bad device drivers easily and quickly.
Click the button below to free download Driver Talent.
Here are 3 easy steps to download and update the suitable device drivers for Windows 10 to fix your Windows 10 automatic repair loop issue.
Step 1. Scan Your PC
Launch Driver Talent. Click "Scan" to scan your computer to detect all bad drivers.

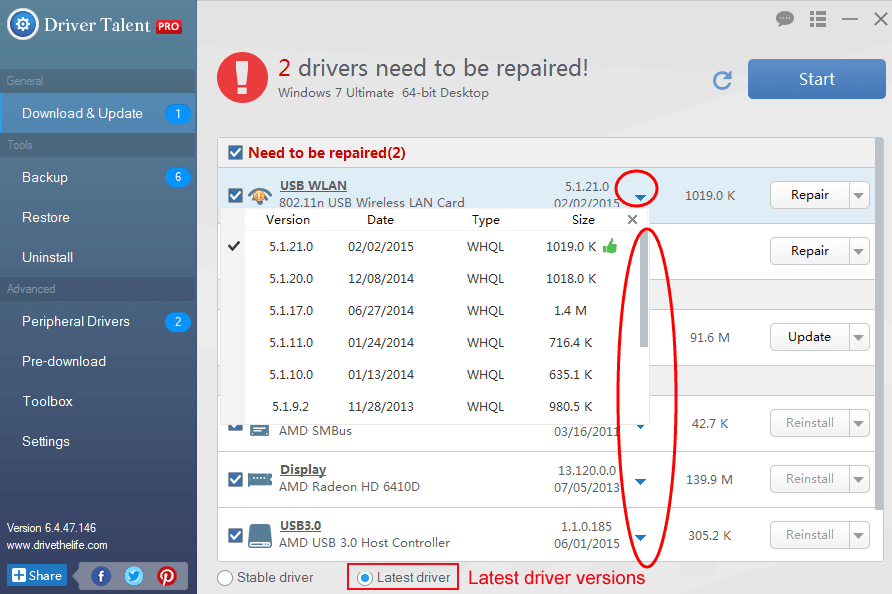
Step 2. Download and Update Drivers for Windows 10 to Fix Windows 10 Automatic Repair Loop Issue
Once corrupted, broken, damaged or missing device drivers are found, click "Repair" to fix them instantly. You are also able to one-click "Update" to download and install the most updated drivers for Windows 10. It is recommended that don't update what ain't broken.
Step 3. Reboot Your PC
Once the driver installation is complete, reboot your computer.
See Also: Free Download and Install Drivers after Window 10 Update
Free Download & Update Graphics Driver, Video Card Driver, Monitor Driver, Display Card Driver
2. Use Command Prompt to Fix Automatic Repair Loop in Windows 10
Sometimes, the Windows 10 automatic repair loop issue is due to file corruptions. You could use Command Prompt to run the chkdsk command on the hard drive to check whether there are any corruptions.
Step 1. Press Windows key + X, and then click Command Prompt (Admin).
Step 2. Type the chkdsk /f command, and then press Enter.
Step 3. Once Check Disk is complete, reboot your computer.
3. Disable Anti-virus Security Software to Fix Windows 10 Automatic Repair Loop
The "Windows 10 Automatic Repair couldn't repair your PC" error may also be caused by anti-virus security software, such as Norton 360 antivirus software. You need to disable the Early launch anti-malware protection option, following these steps:
Step 1. Find the Shut down / Restart menu and hold down the Shift key while clicking on Restart.
Step 2. The Boot Options Menu appears.
Step 3. Select Troubleshoot.
Step 4. Select Advanced Options.
Step 5. Click on Startup Settings.
Step 6. Click Restart.
Step 7. Your computer should restart now and some options are listed.
Step 8. Select Disable early launch anti-malware protection.
Step 9. Restart your computer.
Note: According to Microsoft, you need to uninstall any anti-virus security software on your Windows 8.1, 8, or 7 before upgrading to Windows 10. If the Windows 10 automatic repair loop issue still persists, you’d better uninstall your anti-virus security software.
4. Enter BIOS Settings to Fix Automatic Repair Loop after Windows 10 Update
Inappropriate BIOS settings could also result in the Windows 10 automatic repair loop issue. You need to enter BIOS to set the boot priority. To do it, follow these steps:
Step 1. Enter BIOS.
Step 2. Navigate to the Boot device priority.
Step 3. Set Hard Drive as the first boot device. Check to see if there are multiple hard drives in the Boot menu, and make sure put the drive where Windows 10 is installed as the first boot device.
Step 4. Save changes and exit BIOS.
Note: You'd better regularly update your BIOS, because outdated computer BIOS can lead to many Windows 10 issues.
See Also: Easy Way to Free Update Your BIOS on Dell, Acer, Asus, HP, Toshiba, IBM, Sony, Lenovo
5. Perform a System Restore
To fix the "Windows 10 Automatic Repair couldn't repair your PC" error, you could use Driver Talent to perform a system restore. Please see How to Use System Restore to Fix Windows 10 Issues for instructions.
6. Reinstall Windows 10
If you’ve tried all the aforementioned methods but the Windows 10 automatic repair loop issue remains unresolved, reinstalling Windows 10 might be able to fix the issue. Please refer to How to Reinstall Windows 10 on Your Desktop or Laptop.
You may also like to check out:
Fix Random/Auto Reboot after Windows 10 Fall Creators Update
Top 3 Ways to Fix Endless Reboot Loop after Windows 10 Update
How to Fix Windows 10 Startup Issue Caused by Driver Failure
How to Enter Safe Mode to Fix Windows 10 Boot Loop/Blue Screen/Black Screen
If you have other troubleshooting methods to fix the automatic repair loop in Windows 10, please share with us below this post or click the LEFT MENU on this page for more technical support. If you have any other Windows 10-related issues, see Windows 10 section on this site.


