High CPU usage again after another key update of Windows, Windows 10 Fall Creators Update. Nobody enjoys a PC that is stuck in various system issues after the Windows 10 v1709 update. When checking the Task Manager on Windows, you have the percentage CPU, memory or disk usage displaying on the screen, some may even come with a red notice like this:
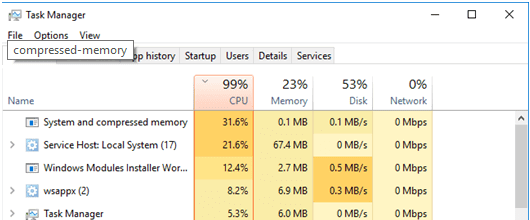
The long stutter computer due to 100% CPU usage prevents us from getting into the Fall Creators Update experience and even causes other problems like 100% disk usage, black screen error, endless reboot loop, etc.
Recommended:5 Ways to Update to the Windows 10 Fall Creators Update
Luckily, we've got answers for you to troubleshoot the issue and decrease the usage:
Top 3 Common Ways to Fix High CPU Usage on Your Windows 10 Fall Creators Update PC
Many factors can provoke the overloading CPU usage, memory leak issue, or high disk usage problem after the update, such as incorrectly configured Windows 10 settings, incompatible hardware devices drivers, too many running programs or startups and more.
If you are in the excessive CPU trap after the Windows 10 Fall Creators Update, you can try the following solutions to check and free up your CPU usage.
Way 1. Use DISM Command to Decrease the High CPU Usage
DISM refers to Deployment Image Servicing and Management, which is a tool you can use to fix errors occur after the update. You can enter the DISM command to lower the high CPU usage with the steps below:
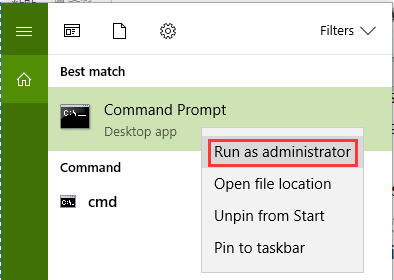
Step 1. Enter cmd into the taskbar search box.
Step 2. Right-click the Command Prompt and select Run as administrator.
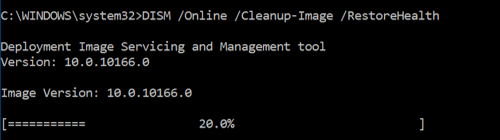
Step 3. Type into the command line: DISM.exe /Online /Cleanup-image /Restorehealth
Step 4. Hit the Enter key.
Step 5. Continue enter command and press the Enter key: DISM.exe /Online /Cleanup-Image /RestoreHealth /Source:C:RepairSourceWindows /LimitAccess
Step 6. Type into command and hit the Enter key: sfc /scannow

Restart the computer and go to the Task Manager to check if the excessive CPU or RAM usage has been lowered down.
See Also: How to Launch Command Prompt on Windows 10, 8.1, 8, 7, Vista, XP
Way 2. Repair Faulty Drivers to Free up High CPU Usage after Windows 10 Fall Creators Update
The driver update is one of the important processes during the v1709 update installation. Some hardware device driver updates may not installed correctly and the incompatibility of a single device can trigger tons of computer issues, like high CPU/Memory usage, blue screen error, slow computer running, Windows shut down problem and more.
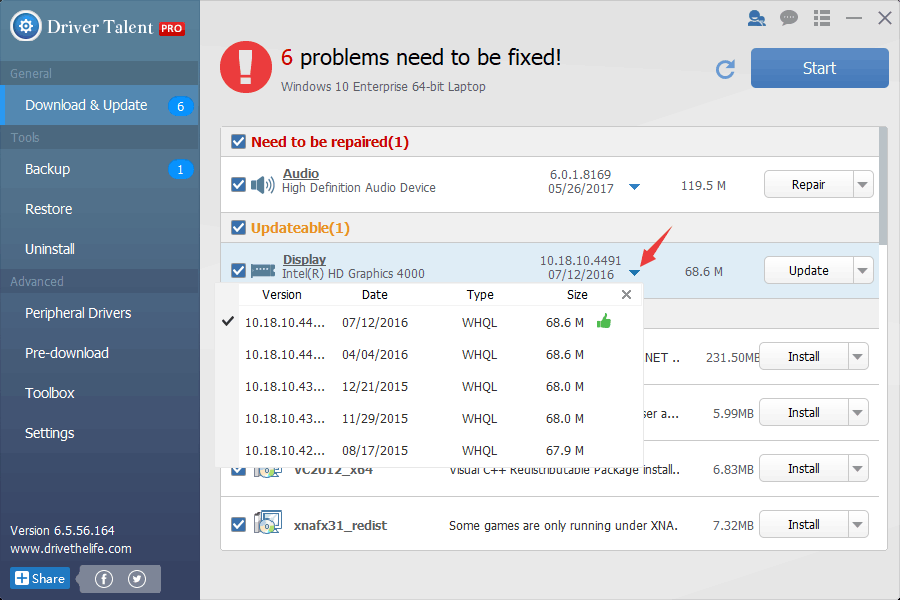
In this case, you can use Driver Talent, a safe and professional driver manager, to help to fix the faulty drivers to keep your Windows up-to-date.
Received good review by Engadget, Driver Talent provides WHQL and official drivers matching with lots of hardware devices. Click the button above to get your CPU malfunction problem fixed instantly.
Step 1. Click the Scan button to make Driver Talent detect problematic drivers.
Step 2. Click the Repair or Update button to download and install proper driver update for Windows 10 Fall Creators Update.
Step 3. Reboot the computer to make driver changes take effect. Check if the this lowers the CPU usage.
Notes: Don't forget to backup all the drivers before any system changes in case the computer runs into other issues.
Way 3. Disable Startups and Services That Trigger the 100% CPU Problem
Also, you need to stop some startups or services that can provoke the high percentage CPU usage on Windows 10 Fall Creators Update.
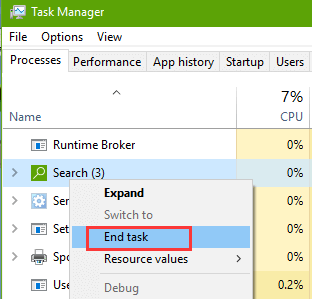
Step 1. Use shortcut keysCtrl + Shift + Esc to open Task Manager.
Step 2. Check the programs listed in the Processes tab. Right-click those apps or background programs occupying high percentage CPU usage and select End task. (Note: Don't remove those processes you don't know in case severe system issues occur.)
Step 3. Go to the Startup tab and disable the items that are not necessary to launch during the booting.
Step 4. Go to the Services tab and click the Open services.
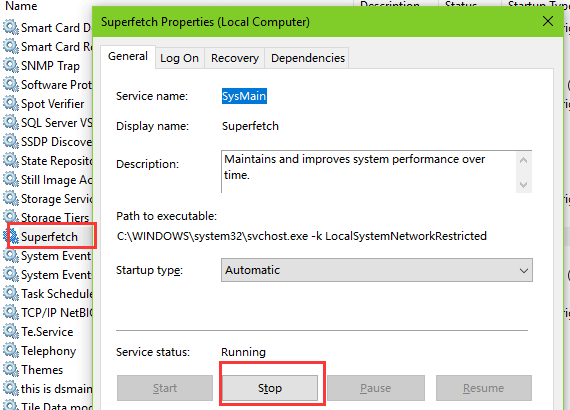
Step 5. Navigate to Superfetch service and double-click for the Properties.
Step 6. Click the Stop button to end the service and click the OK to save the change.
Step 7. Navigate to Internet Connection Sharing (ICS) service and double-click for the Properties.
Step 8. Click the Stop button to end the service. Click OK.
Step 9. Stop the Base Filtering Engine service with the same method.
Step 10. Restart the PC.
Note: You may get a blue screen right after stopping the Internet Connection Sharing service. Don't worried about it and wait until the reboot. The high CPU usage will be solved after that. If you are stuck in the BSoD, see Fix Blue Screen after Windows 10 Fall Creators Update.
Related Posts You May Want to Check out:
Top 7 Ways to Fix WMI Provider Host - High CPU Usage in Windows 10
Top 10 Ways to Fix High CPU/RAM/Memory Usage after Windows 10 Update
Fix Windows 10 High Memory Usage/Leak after the Creators Update
Fix WMI Provider Host High CPU Usage after Windows 10 Creators Update
If you still fail to troubleshoot the high CPU usage problem after the Windows 10 Fall Creators Update, you can comment below or click the SUPPORT menu on the left side for help. Any other Windows 10 Fall Creators Update related issues, please check Windows 10 section or our blog for solutions.


