Recently, the latest Windows 10 April 2018 Update 1803 has triggered new boot loop, blue screen of death, black screen or other similar problems that prevent the users from logging in Windows 10. Usually, users need to boot into Safe Mode to fix such screen issues.
If you have read the past posts, you may know it is a viable method to enter Safe Mode and perform a clean boot to solve such issues. But parts of the users don't know how to enter the Safe Mode on their Windows 10 laptop or desktop, or some of them only know the steps via the Settings.
The Safe Mode is a Windows 10 diagnostic mode that starts up your laptop or desktop in a limited state. It only allows the basic files and necessary drivers to run. This will help to remove virus or malware from the system or fix other system problems.
Today, this Windows 10 guide will tell you top 2 ways to enter Windows 10 Safe Mode:
Way 1. Enter Safe Mode by Holding the Power Button
This method applies to those who cannot boot into the home screen when coming across the reboot loop problem, black screen or blue screen of death. Here's how:
Step 1. Hold the power button of your PC for several seconds to force the computer to shut down.
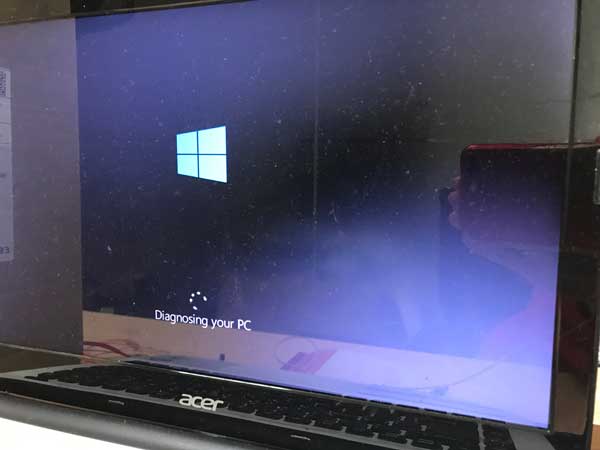
Step 2. Press the button to turn on the machine. Once you see the Windows logo appears, hold the button again to force the PC to turn off. Repeat this several times until you see the spinning screen with "Preparing Automatic Repair…" or "Diagnosing your PC".
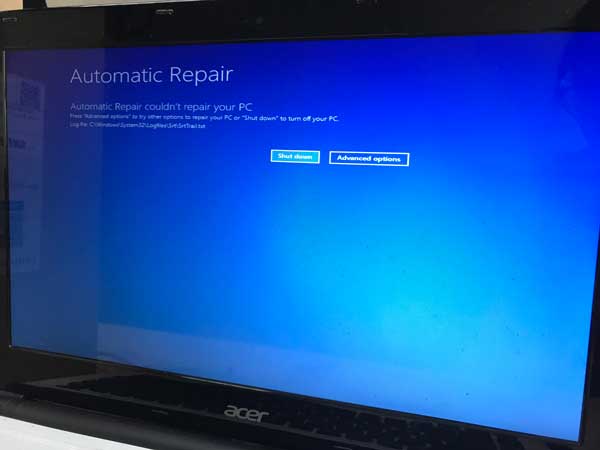
Then it will skip to a blue screen with instructions buttons or a black screen that asks you to use the F8 key. (The blue screen may be the Recovery screen or the Automatic Repair screen. This is different from computers states.)
Step 3. Click the Advanced options button or hit the F8 key. (Some may have the Advanced repair options button on the screen. You can click such buttons that notice you go to the settings.)
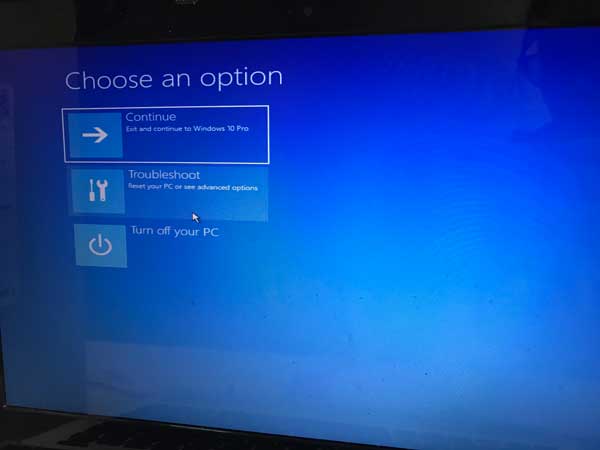
Step 4. Then you come to the Choose an option screen. Just click the Troubleshoot option.
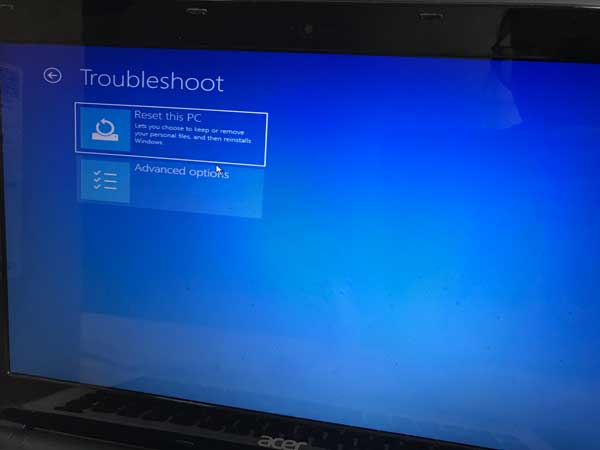
Step 5. On the Troubleshoot screen, click the Advanced options button.
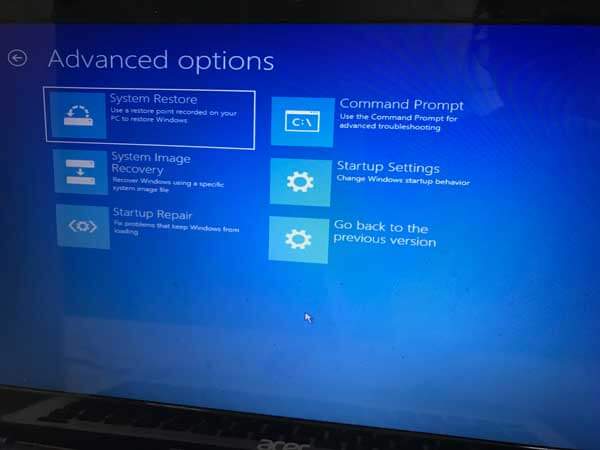
Step 6. When it comes to the Advanced options screen, you'll see many options. This time, click the Startup Settings. This will change Windows startup behavior, which helps you enter the Safe Mode.
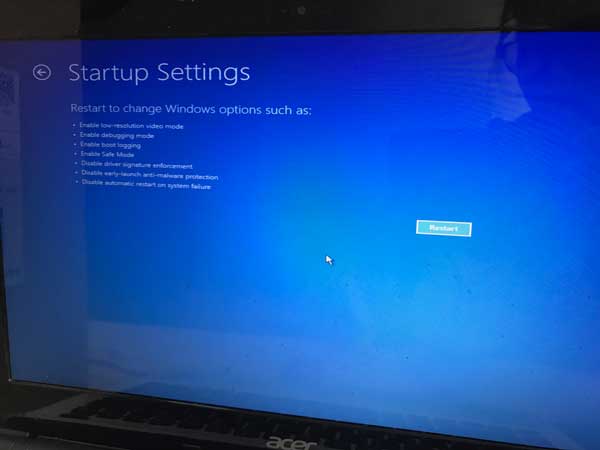
Step 7. On the Startup Settings screen, click the Restart button.
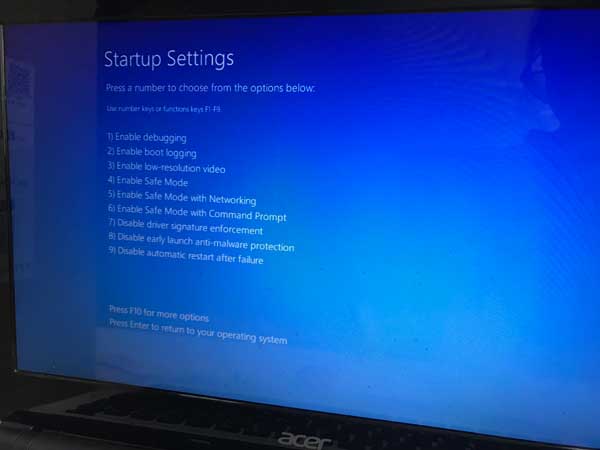
Step 8. The PC will skip to the boot flash for about a second, and then you have another Startup Settings screen with nine options. You can press the F4 or the F5 key to boot into Safe Mode. Here we recommend the F5, Enter Safe Mode with Networking.
Then you can start repairing your system issues in the Safe Mode.
Way 2. Enter Safe Mode via Settings
If it is the first time for you to have a certain blue screen or black screen, you can easily enter the Windows 10 home screen. For others, the blue/black screen of death may occur several times but does not affect the login. To enter the Safe Mode and fix such problems, you can go to the Settings directly after you boot into Windows 10, and then follow the on-screen instructions.
Step 1. Boot into Windows 10 as usual. Use Windows shortcut keysWin + I to launch Settings.
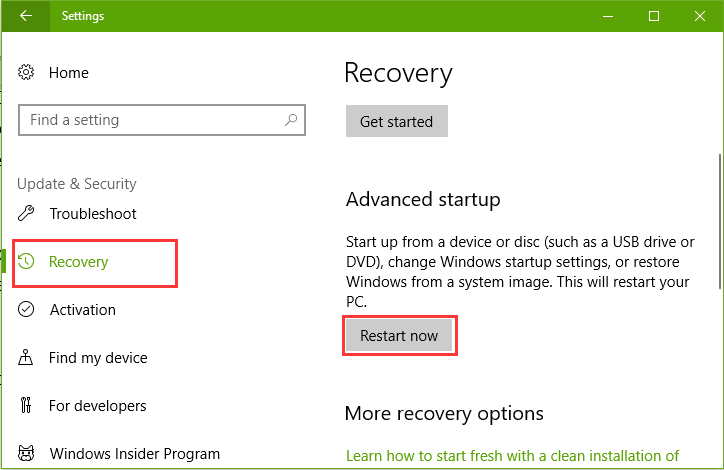
Step 2. Go to the Update & security menu.
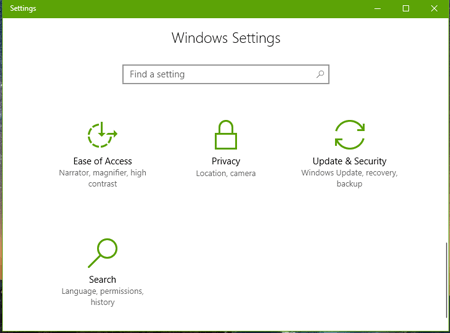
Step 3. Select the Recovery tab on the left. Then click the Restart now button under the Advanced startup.
After that, follow the same instructions in Way 1 (from step 4 to step 8) to enter Safe Mode.
Note: You can also hold the Shift key and click the power button on the Start menu to choose Restart. This will guide you to the Choose an option screen as well.
How to Quickly Install Driver Updates in Safe Mode
You may need to fix the display driver issues when the computer runs into the blue screen error or the black screen glitch.
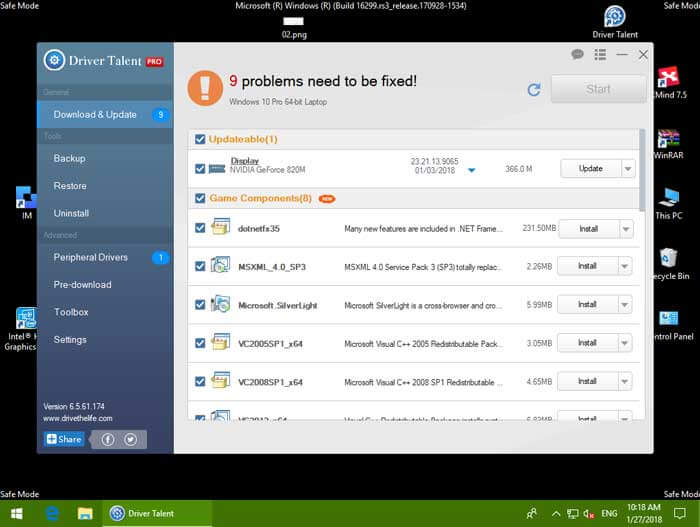
You can go to the Device Manager in Safe Mode to update the graphics driver manually, but if you prefer a quicker and time-saving method, you can use those professional driver download and update utilities, like Driver Talent, to troubleshoot the errors on Windows 10.
You can get Driver Talent via the button above in Safe Mode with Network and follow the steps below to solve the display problem:
Step 1. In the Safe Mode, launch Driver Talent. Click the Scan button to detect those outdated graphics drivers.

Step 2. Click the Update button to download and install the WHQL or official drivers.
Step 3. Restart the PC to make the driver changes take effects.
Note: In case other system issues occur, it is better to backup drivers before any changes on the computer.
That's it. Hope you can successfully enter Safe Mode with the guide above. You can go to the left menu on this page, or comment on this post if you have any questions on how to enter Safe Mode on Windows 10. Any other Windows 10-related problems, please see Windows 10 section on this site.
Related Posts:
Fix Random/Auto Reboot after Windows 10 Fall Creators Update
Top 3 Ways to Fix Endless Reboot Loop after Windows 10 Update
How to Fix Windows 10 Startup Issue Caused by Driver Failure
Top 4 Fixes for Windows 10 Boot Loop after Fall Creators Update Problem
4 Fixes for Igdkmd64.sys Blue Screen Error in Windows 10/8/7


