If your Windows laptop or desktop runs into Windows 10 high memory usage or RAM leak after the Windows 10 Creators Update or the Windows 10 Fall Creators Update, don’t worry and keep reading this post for proper solutions. Many users are often bothered with the Windows 10 high memory leak, 100% disk usage or high CPU usage problem after they update the OS to the latest Windows 10 versions, like the Windows 10 Fall Creators Update, Windows 10 Creators Update or the Windows 10 Anniversary Update. Sometimes, there even runs no applications, but the memory has been eaten up without our notice.
How do we troubleshoot such memory/CPU/disk usage issue and make our office work smoother? Here, we've had top 6 ways to get your Windows 10 back on track.
Top 6 Ways to Fix Windows 10 High Memory Usage or RAM Leak on Windows 10 Creators Update PC
In the following guide, we'll walk you through different ways to fix the Windows 10 high memory usage problem. It's important to note that some of the solutions below may take minutes to hours, and some require knowledge of the Windows inner workings. It's better to backup your important data and create a system restore point with Driver Talent in case other system issues occur. Here we go.
Way 1. End Useless Processes Using Too Much Memory and Fix the Windows 10 RAM Leak Issue
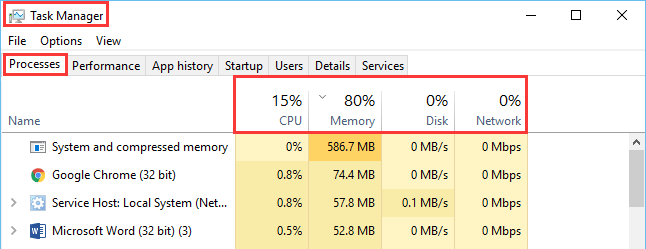
Ending some useless processes that use too much memory can help release the pain. You can go to the Task Manager to make it.
Step 1. Use shortcut keys Ctrl + Shift + Esc.
Step 2. Choose the Processes tab.
Step 3. Click the Memory option to range all the processes according to their memory usage.
Step 4. Highlight the useless processes that occupy high memory.
Step 5. Click the End task button to end the processes.
Way 2. Stop Services to Fix Windows 10 High Memory Usage on Windows 10 Creators Update/Fall Creators Update PC
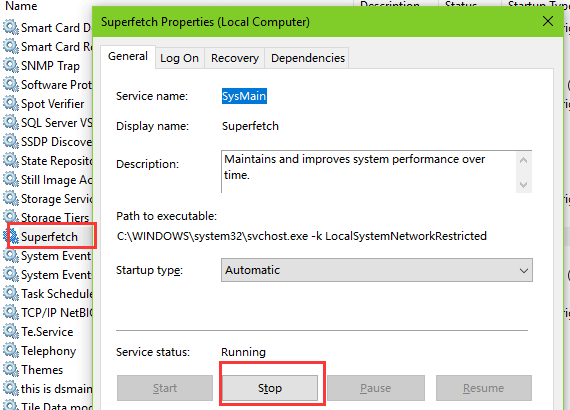
Some Windows services can also occupy the memory or disk and cause a flickering or flashing screen or a frozen computer. So you need to stop such Windows services.
Step 1. Use Windows shortcut keysWin + R to launch the Run.
Step 2. Type into services.msc.
Step 3. Press the Enter.
Step 4. Scroll down and double-click the following services:
SuperFetch
HomeGroupListener
HomeGroupProvider
Step 5. Click the Stop button under the Service status.
Step 6. Click OK.
Way 3. Set Virtual RAM to Solve the Windows 10 Memory Leak Issue
You can add the virtual memory to take the disk as a memory so that the programs can run as smoothly as possible on your Windows 10 Creators Update/Fall Creators Update PC. Thus the Windows 10 high memory usage or RAM leak issue can be resolved.
Step 1. Use Windows shortcut keys Win + PauseBreak.
Step 2. Click the Advanced system settings on the left side.
Step 3. Go the Advanced tab.
Step 4. Click the Settings button in the Performance bar.
Step 5. Choose the Advanced tab in the Performance Options box.
Step 6. Click the Change button in the Virtual memory bar.
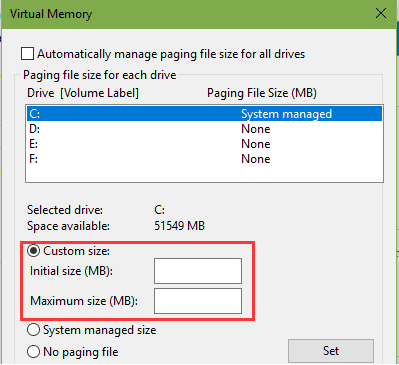
Step 7. Uncheck the Automatically manage paging file size for all drives.
Step 8. Select a Drive with high Space available.
Step9. Choose the Custom size option.
Step 10. Set the Initial size and the Maximum size, which should be as 1.5 times or twice that of the physical memory. For example, if the physical memory is 2G, the initial size is recommended to be set to 2G*1.5*1024=3072MB and the maximum size 2G*2*1024=4096MB. Click OK.
See Also:Fix Windows 10 Low Virtual Memory Error
Way 4. Modify the Registry and Troubleshoot Windows 10 High Memory Usage/Leak Problem
Registry modification is one of the workable methods to troubleshoot the Windows 10 Creators Update/Fall Creators Update memory leak or high memory usage issue. You can follow the steps below to modify the registry.
Note: Windows Registry is a database storing a massive collection of important Windows data, it’s necessary to backup registry before any changes in case other serious problems occur, like INACCESSIBLE_BOOT_DEVICE error, black screen issue, random restarts, etc.
Step 1. Launch the Run.
Step 2. Type into regedit.
Step 3. Hit the Enter.
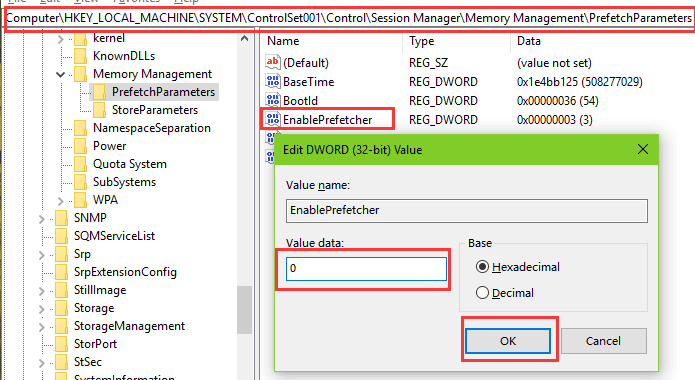
Step 4. Expand the entries according to the path below:
HKEY_LOCAL_MACHINE\SYSTEM\ControlSet001\Control\Session Manager\Memory Management\PrefetchParameters
Step 5. On the right pane, double-click the EnableSuperfetch and EnablePrefetcher.
Step 6. Change the Value data to 0.
Step 7. Click OK.
Step 8. Go to the following position:
HKEY_LOCAL_MACHINE\SYSTEM\CurrentControlSet\Control\Session Manager\Memory Management
Step 9. On the right pane, double-click the ClearPageFileAtShutDown.
Step 10. Change the Value data to 1 and click OK.
After the modification, restart the computer. This time the high memory usage issue won’t annoy you anymore.
Way 5. Update Drivers to Fix the Windows 10 High CPU/Disk/Memory Usage Issue
Outdated, incompatible or incorrectly configured drivers can also cause the high CPU usage issue, 100% disk usage problem, high memory usage error after the Windows 10 Creators Update or the Windows 10 Fall Creators Update. You can update Windows drivers via Device Manager or Windows Update. But if you are not sure which driver exactly should be updated, it's recommended to use Driver Talent, which has been reviewed as the safest and fastest way to update drivers. It is a professional driver download and update utility and offers the latest official and WHQL Windows drivers.
You can click the button above to get the driver updates and follow the steps below to update the drivers.
Step 1. Click Scan to detect all the faulty drivers on your Windows 10 PC.

Step 2. Click Update to download and install the best-matched driver updates with just one-click.

Step 3. Restart the computer to make the driver changes take effect.
Note: It's better to backup all the drivers and create asystem restore point before any changes so that you can restore the system once Windows runs into crashes.
Way 6. Fix Memory Leak by Adjusting Windows 10 for the Best Performance
The last method is to adjust for best performance on Windows 10 to fix the memory leak problem after the Windows 10 Creators Update or the Windows 10 Fall Creators Update .
Step 1. Use Windows shortcut keys Win + PauseBreak.
Step 2. Click the Advanced system settings on the left side.
Step 3. Go the Advanced tab.
Step 4. Click the Settings button in the Performance bar.
Step 5. Choose the Visual Effects tab in the Performance Options box.
Step 6. Choose the Adjust for best performance option.
Step 7. Click the Apply.
Step 8. Click the OK.
Step 9. Click the OK in the System Properties box.

See Also:
Top 10 Ways to Fix High CPU/RAM//Memory Usage after Windows 10 Update
Top 3 Ways to Fix WMI Provider Host High CPU Usage after Windows 10 Creators Update
That’s it. All of the above are the possible best solutions for fixing Windows 10 high memory usage or memory leak problem after the Windows 10 Creators Update or the Windows 10 Fall Creators Update. Hope this post can help you get your Windows 10 back on track again. If you still can't solve the high memory usage issue, you can drop a line below in the comment section, or check for other solutions by clicking the LEFT MENU on this page. Any other Windows 10-related issues please see Windows 10 section on this site for solutions.


